Posted on Leave a comment

Sourdough Buttermilk Waffles

sourdough buttermilk waffles

Easy Sourdough Waffles That Are Fluffy and Delicious Every Time

sourdough buttermilk waffles

The biggest reason I love this sourdough buttermilk waffles recipe is that it’s two recipes in one. Whether you’re in the mood for pancakes or waffles, you only need one batter.

This is a simple sourdough batter that you ferment overnight and really get that delicious sourdough taste in every bite! The waffles or pancakes turn out light and fluffy while the waffles are crispy on the outside with a chewy center.

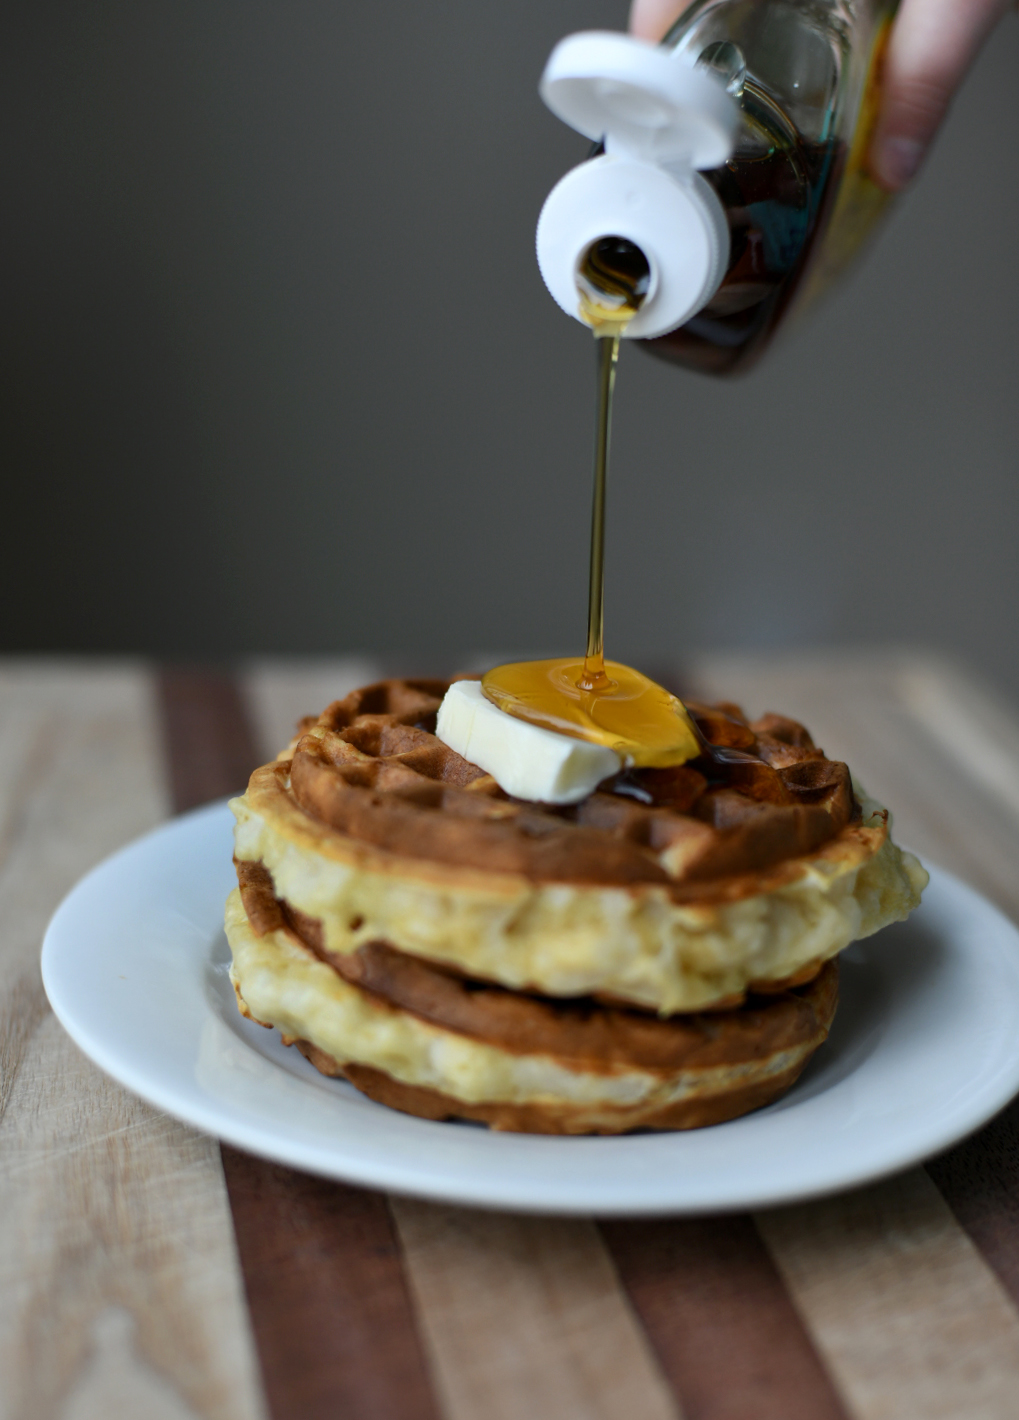
Serve them up the classic way with melted butter, fresh berries, and maple syrup. Some of our favorite ways to serve sourdough buttermilk waffles is with melted butter and a little strawberry jam or with cream cheese and sliced bananas on top.

sourdough buttermilk waffles


When you use active sourdough starter in this recipe, the sourdough buttermilk waffles come out extra fluffy and taste amazing. You also get the added health benefits from the wild yeast and beneficial lactic acid bacteria that are in the sourdough starter.

sourdough starter
Fiona, our active and bubbly sourdough starter

Need a starter? Buy your own dehydrated organic “Fiona” sourdough starter here. It comes with easy instructions and will last a lifetime of baking!

INGREDIENTS NEEDED

  • sourdough discard
  • flour
  • buttermilk
  • eggs
  • sugar or honey
  • butter
  • vanilla extract
  • salt
  • baking soda
  • baking powder

HOW TO MAKE SOURDOUGH BUTTERMILK WAFFLE AND PANCAKE BATTER

Step 1: Before you go to bed, whisk together the sourdough starter discard, buttermilk, honey, vanilla extract, melted butter and flour in a large bowl. Cover the bowl and allow the batter to sit at room temperature overnight.

Step 2: In the morning, add the eggs, salt, baking powder and baking soda to the batter and stir to incorporate. Let the batter rest for about 20 minutes before cooking.

The pancake batter can stay in the fridge for up to 2 days before using it to make the waffles and pancakes.

NOTE: The batter doesn’t have to ferment overnight if you’d like to cook these the same day. Mix ALL of the ingredients together, let the batter sit for 20 minutes and then proceed with cooking.

INSTRUCTIONS FOR MAKING WAFFLES

1. Preheat your waffle iron and lightly grease it with cooking oil spray. Pour ¾ cup of batter onto the center, gently spreading it out before closing the iron.

2. Cook according to your waffle iron’s manufacturer’s directions. (Typically about 5-6 minutes or until the steam is barely coming out.)

3. Once the waffle is fully cooked, use a fork or tongs to carefully remove it from the iron and serve hot!

INSTRUCTIONS FOR MAKING PANCAKES

1. Preheat your griddle until it’s smoking hot. Lightly grease with butter or oil.

2. Pour ¼ cup portions of the batter onto the griddle. Cook on the first side until bubbles form all over the tops of the pancakes and the bottoms are golden brown.

3. Flip the pancakes and continue to cook until throughly done. They should be nice golden brown on each side.

4. Stack the pancakes on a plate and serve with butter and maple syrup!

TIPS FOR SUCCESS

Letting the batter rest overnight gives you the benefit of fermentation and the added flavor from the sourdough starter discard. However, I know some of you are looking for a quick way to use your discard or to avoid food waste.

Be assured that this recipe can be mixed and cooked the same morning with great results if you are looking for a quick and easy sourdough discard recipe!

This recipe can be made with sourdough starter discard or active bubbly sourdough starter.

HOW TO STORE AND FREEZE

After cooking, store any leftovers in the fridge for up to 7 days. They can be put into a container with a lid or in a plastic bag.

The pancakes and waffles can also be frozen for up to 3 months. Separate them with parchment or wax paper and insert them into a freezer safe container.

The waffles are best reheated in a toaster oven to help crisp the outside and give it some crunch.

sourdough buttermilk waffles
Sourdough buttermilk waffle topped with cream cheese and sliced bananas
sourdough buttermilk waffles
Sourdough buttermilk waffle topped with strawberry jam
Posted on Leave a comment

Sourdough Granola Chocolate Chip Cookies

sourdough oatmeal chocolate chip cookies

Ooey, Gooey, and Decadent!

sourdough oatmeal chocolate chip cookies

These cookies are gone so fast in our house.

Sourdough granola chocolate chip cookies are best eaten warm fresh out of the oven on a cold winter day or any day of the year, really.

sourdough oatmeal chocolate chip cookies

When you use active sourdough starter in this recipe, it gives these ultra fluffy cookies a chewy texture and rich taste that are just to die for. Not only do these cookies taste amazing, but you get the added health benefits from the beneficial lactic acid bacteria and wild yeast that are in the sourdough starter. All that means less parental guilt when your kids slam down several of these bad boys in one sitting.

sourdough starter
Fiona, our active and bubbly sourdough starter

Need a starter? Buy your own dehydrated organic “Fiona” sourdough starter here. It comes with easy instructions and will last a lifetime of baking!


Sourdough Oatmeal Chocolate Chip Cookies Ingredients

  • 2 ¼ cups all-purpose flour
  • 2 tsp baking powder
  • 1 tsp salt
  • 2 ¼ cups rolled oats
  • 1 1/2 cups unsalted butter, softened
  • 1 1/2 cups brown sugar
  • 1 1/2 cups white sugar
  • 2 eggs
  • 2/3 cups sourdough discard or active starter
  • 1/2 Tbsp vanilla extract
  • 7 oz milk chocolate chunks

How to Make Sourdough Oatmeal Chocolate Chip Cookies

Unlike other sourdough recipes, this recipe doesn’t require an overnight ferment. As long as you use sourdough starter (discard or active both work), they only need at least one hour of rest time in the fridge before you bake.

Step #1: Mix the Dough

  • Preheat the oven to 350°F
  • In a medium-sized bowl, mix together the flour, baking powder, salt and oats.
  • In another bowl, beat together butter and sugars for about 1-2 minutes.
  • Add the eggs, vanilla, starter and beat again until combined.
  • Finally, add the dry ingredients and the chocolate chips until combined.

Step #2: Bulk Rise

Cover the dough with a damp cloth and chill the dough in the refridgerator for at least an hour.

Step #3: Shape the Cookies

  • Roll out balls onto on a baking sheet and press down firmly.

Step #4: Bake

  • Bake for 10-12 minutes or until preferred doneness.
  • Optional: sprinkle with flaky sea salt.
  • Transfer to a wire rack and leave till cooled.

How to Store Cookies

Your first batch of sourdough oatmeal chocolate chip cookies will be devoured immediately. They’re THAT good.

But, if you do have any leftover, store in a plastic bag or air tight container at room temperature for up to 2 days.

Sourdough cookies also freeze well; freeze them, covered in plastic wrap and a layer of foil, for up to 3 months. Warm in a low oven or toaster before serving.

Posted on Leave a comment

Sourdough Bagels

sourdough bagels

Fluffy. Chewy. Amazing!

If you’ve never had homemade sourdough bagels, you are seriously missing out. With just 10 minutes of prep, this easy overnight recipe uses active sourdough starter. It makes for soft and chewy New York-style bagels that are absolutely amazing!

sourdough bagels
The BEST sourdough bagels you’ll ever eat are so easy to make!

Sourdough bagels are the complete opposite of traditional yeasted bagels. They’re less dense and way more flavorful. The crust is thin, crispy and incredible. You really need to eat one or two warm out of the oven and thank me later.

Even though it might sound daunting, I promise the process is straight forward. This post breaks it down step-by-step, from making the dough, to shaping, boiling, and baking the bagels.

sourdough starter
Active sourdough starter

Sourdough Bagels Ingredients:

  • Bubbly, active sourdough starter
  • Good quality bread flour
  • Optional mixed toppings, such as Everything Bagel Spice, poppy, sesame, flax or sunflower seeds

How to Make Homemade Sourdough Bagels

Sourdough bagels include several steps, which can be broken down into manageable chunks. I recommend splitting the process over 2 days. Make the dough in the evening and let rise overnight; shape, boil and bake the bagels following day.

Step #1: Mix the Dough

  • Whisk the water, sourdough starter and sugar together in a large bowl. Add the flour and salt. Combine to form a rough dough; it will be very dry and stiff. Tip: you really need a large bowl. This dough is very strong and rises quite high especially when using King Arthur Flour.
  • Cover and let rest at room temperature for 1 hr to relax the gluten. Return to the bowl, and work the dough into a semi-smooth ball. You’re are now done with the dough.

TIP: Why is the dough so dry? Bagels require a low hydration dough. The dry, stiff texture is easy to shape and produces a tight-knit interior crumb. This is what you want for bagels. Do not be tempted to add more water!

Step #2: Bulk Rise

Cover the dough, and let rise overnight at room temperature until double in size. This should take about 10-12 hrs @ 68 F; 8-10 @ 70 F. 

Step #3: Shape the Bagels

  • Divide dough into 8 equal pieces, about 115 g each. Use a digital kitchen scale for accuracy.
  • Roll each piece into a ball. Place onto a parchment-lined sheet pan. Rest for 10-15 minutes.
  • Poke a hole into the center of each dough. Gently stretch the opening, using your fingers to roll it around.

Step #4: Second Rise

  • Now the dough needs to rise again, but only for a short period of time. Cover and let rest at room temperature for 20 minutes; the dough will puff up slightly.
  • Meanwhile, boil a pot of water. Add the honey (this adds color and flavor to the crust) and whisk well.
  • Preheat your oven to 425 F. Set up a topping station: add seeds to a rimmed tray or shallow bowl.

Step #5: Boil The Bagels

  • Gently lower 2-3 bagels into the pot and let float to the surface. Simmer for 30 seconds on each side.
  • With a large slotted spoon, transfer the bagels onto the sheet pan, rounded side up. They will look bumpy and feel slightly wet.

TIP: Why boil bagels? It helps to set the crust before baking. Otherwise the dough would puff up and rise too high. You can’t skip the boiling step- it’s what makes bagels different from bread.

Step #7: Top Bagels with Seeds

  • When the bagels are slightly cool but still wet, dip the rounded side into the toppings. Leave a few plain.
  • Place back onto the sheet pan.

Step #8: Bake the Bagels

  • Put the sheet pan into the oven and bake for 20-25 minutes @ 425 F.
  • Transfer to a wire rack to cool slightly (but please, eat one warm, straight from the oven!)
  • To serve, top with salted butter, cream cheese, smoked salmon etc. Or just eat plain. You can’t lose!

How to Store Bagels

Your first batch of homemade bagels will be devoured immediately. They’re THAT good.

But, if you do have any leftover, store in a plastic bag at room temperature for up to 2 days.

Bagels also freeze well; freeze them sliced, covered in plastic wrap and a layer of foil, for up to 3 months. Warm in a low oven or toaster before serving.

The chewy texture of bagels is best enjoyed when made fresh. Store in a plastic bag at room temperature for up to 2 days. Bagels also freeze well; freeze them whole or sliced, covered in plastic wrap and a layer of foil for up to 3 months.
Posted on Leave a comment

Pan Seared Oyster Mushrooms in Garlic Butter

A Crispy and Garlicky Home Run Every Time

The first time I ate wild oyster mushrooms foraged from our property, I made this recipe and it blew my mind. Not only was it the first time eating wild mushrooms ever, it was the first time I cooked mushrooms that weren’t soggy and boring button mushrooms from the supermarket.

Tearing the oyster mushrooms by hand into thin strips along the gills makes perfect size bites that crisp up nicely in the pan as long as each piece is given plenty of breathing room.

Add garlic and butter to your heart’s content. This makes the most scene stealing side dish to a nice steak or pork chop. Now, the challenge will be to control yourself from consuming them straight out of the pan long enough for there to be any left for the dinner plate!

Posted on Leave a comment

Slow Cooker Whole Pastured Chicken

Melts Off the Bone and Flavor Packed

This is a super easy way to get a whole chicken cooked without thinking about it and have shredded meat to use in a couple of different meals. You also come away with a delicious and nutrient dense broth. I like to throw everything in the crockpot in the morning and have the meat cooked by dinner time to make some quick taquitos or chicken nachos.

The Mexican inspired aromatics and spices get infused into the meat, and when it’s high quality, organically raised pastured chicken like we offer at Delgado Homestead, the finished result is loaded up with flavor like you wouldn’t believe!

The chicken literally melts off the bone and shreds apart with the lightest touch after it has cooked in the slow cooker. Here on the homestead, it is a weekly Sunday ritual to make this and meal plan for a few days.

Posted on Leave a comment

Chicken Taquitos

Mouth Watering Crunchy Deliciousness

Sooo good.

This recipe is one of my all-time favorite Mexican comfort food dishes. My mom made these for me growing up in Long Beach, CA and it reminds me of childhood every time I eat them. When I make these for my kids, who absolutely devour them, it brings joy to my heart!

When you use fresh, organically raised pastured chicken from a quality local farm like us, it makes these taquitos scream with flavor. This recipe calls for slow cooker shredded chicken so definitely check out our recipe to make the meat ahead of time. You can also use any leftover chicken and it will come out great.

The key for crispy taquitos is wrapping up the corn tortillas in a damp cloth and warming them up in the microwave so they become soft and pliable. Then, roll the chicken up one tortilla at a time keeping it as tight as possible. It may take a few tries. Fry in batches to golden perfection. It’s that easy!

It’s all in the toppings for me. In this household, we like sour cream, lettuce, queso fresco and a killer homemade salsa. This roasted tomatillo salsa recipe is a staple around here, especially when tomatillos and peppers are in season.

Posted on Leave a comment

Whole Roasted Citrus Marinated Pastured Chicken

Pastured Chicken Marinated in Citrus and Pineapple Juice Overnight for the BEST El Pollo Loco Copycat Recipe!

I was missing El Pollo Loco chicken recently since it’s been a few years since moving out of Southern California. I’m always looking for new ways to prepare our delicious farm raised pastured chicken, and I knew I had a winner with this copycat recipe.

It’s all in the overnight marinate for juicy meat and crispy skin thanks to the brick/skillet press with this one. Spatchcocking, or butterflying, the chicken is a great technique for roasting a grilling as it will cook faster and more evenly.

Sure you can make this with sad factory farmed chicken, but we highly recommend sourcing your meat from a local farmer who raises pastured chicken for best quality and flavor.

Serve with rice, slow cooked beans, pico de gallo, avocado and flour tortillas.

You can also make this in the slow cooker, crisp it up under the broiler for a minute and shred for tacos!

If you are wondering how we raise our pastured chicken and to check availability and online ordering, go to delgadohomestead.com/pastured-chicken/

Easy marinade and preparation packs a flavorful punch just like Pollo Loco’s recipe.