Sourdough ham and cheese pinwheels are awesome because they combine the rich, tangy flavor of sourdough with the savory goodness of ham and melted cheese. The sourdough provides a perfect balance of tartness and depth, creating a satisfying base that elevates the filling. With every bite, you get a delightful crunch on the outside and a gooey, comforting center that’s both filling and flavorful.
These pinwheels are also incredibly versatile and easy to make, perfect for a snack, appetizer, or even a casual meal. The combination of textures and flavors is irresistible, and the portability makes them ideal for parties or picnics. Whether served warm or at room temperature, sourdough ham and cheese pinwheels are always a crowd-pleaser that brings a burst of savory joy with every bite.
WHY YOU’LL LOVE THIS RECIPE:
SOFT AND FLUFFY: Every bite is pillowy and satisfying, with the perfect balance of tenderness and fluffiness.
GUT HEALTH BENEFITS: Unlike store-bought yeast, sourdough starter naturally breaks down the phytic acid found in flour, making these cinnamon rolls easier to digest. Plus, you get that signature tangy sourdough flavor that elevates the entire treat.
MAKE-AHEAD FRIENDLY: Prep these cinnamon rolls the night before for a super easy, fresh-baked breakfast the next morning. I’ve included my best tips below to save time and make your mornings a little easier.
INGREDIENTS
For exact measurements, scroll down to the recipe card at the bottom of the page.
FOR THE PINWHEELS:
Bread Flour – For the fluffiest, most tender rolls, bread flour is the way to go. Its higher protein content gives the dough a better rise, making for soft and chewy cinnamon rolls.
Milk – I used whole milk, but feel free to swap in your favorite non-dairy milk if needed.
Active Sourdough Starter – A bubbly, active starter is key for the best rise and flavor in your pinwheels.
Dark Brown Sugar – Dark brown sugar brings a rich, caramel-like flavor that really shines in these rolls. If you don’t have it, light brown sugar works fine too!
Unsalted Butter – Butter softens the dough and adds flavor, giving you that melt-in-your-mouth texture.
Large Egg – Adds moisture to the dough, helping it stay soft and rich.
Salt – I love using Redmond’s unrefined salt for an extra mineral boost, but any unrefined salt will work.
FOR THE FILLING:
Unsalted Butter – Softened to room temperature for easy spreading.
Cheddar Cheese – Grated or sliced, Tilamook is our brand of choice
Honey Ham – The sweetness and savory flavors of Boar’s Head honey ham really shine through.
FOR RIGHT BEFORE BAKING:
Butter – Melted butter
Parsley – Chopped fresh or dried
Garlic Powder – Everything savory is better with garlic.
SUPPLIES:
Stand Mixer
Bench Scraper
Rolling Pin
Rimmed Baking Sheet, Baking Pan, or Large Cast Iron Skillet
Parchment Paper
Need Your Own Sourdough Starter?
Order your own organic dehydrated (but very much alive) sourdough starter here!
Our homemade organic sourdough starter is named Fiona and was made from scratch using three ingredients.. organic flour, water, and wild yeast from an organic apple we picked from our very own orchard at Delgado Homestead.
Sample Baker’s Schedule
Day 1:
4 pm – Mix dough
10 pm – Shape the rolls and refrigerate overnight
Day 2:
6 am – Allow the rolls to rise
9 am – Bake
Note: This schedule is based on a 68-70°F environment. Warmer kitchens will speed up the process, while cooler temperatures will slow it down.
MAKE-AHEAD OPTION
If you’re planning to bake these Sourdough Ham and Cheese Pinwheels the next morning, here’s how to prep them the night before!
Prepare the dough and shape the rolls the night before. Cover the dish and refrigerate overnight.
When you’re ready to bake, remove the rolls from the fridge 2-4 hours before baking, allowing them to rise and puff up in a warm place.
Pro Tip: Since this is an enriched dough, the rise time may take longer. Cooler kitchens will lead to longer fermentation, while warmer kitchens will speed things up.
HOW TO MAKE SOURDOUGH HAM AND CHEESE PINWHEELS
Pro-tip: For the most accurate results, use a kitchen scale to measure ingredients!
DOUGH
In the bowl of a stand mixer, combine the active starter, brown sugar, and warm milk (make sure the milk is no hotter than 120°F to protect your starter). Mix on low speed until fully combined.
Add melted butter, salt, and the egg, and mix on low until everything is incorporated.
Switch to the dough hook attachment. Add 1 cup of flour (140g) at a time, mixing on medium speed. Scrape the sides of the bowl with a spatula between each addition. Continue adding flour until the dough pulls away from the bowl and feels tacky, not sticky (be careful not to add too much flour, or the dough may turn dense).
Knead the dough on medium speed for 5 minutes.
For the first rise, cover the bowl with a clean towel or plastic wrap, and let it rest in a warm spot until it has increased in size by at least 50% (this usually takes 3-7 hours, depending on your kitchen temperature).
SHAPE
Once the dough has risen, turn it out onto a lightly floured surface. Roll it into a 16×12 inch rectangle.
Spread softened butter over the entire surface of the dough.
Spread cheese across the surface of the dough then lay ham slices on top of the cheese.
Starting at the long edge closest to you, carefully roll up the dough into a log. Trim off the uneven edges, then cut into 9 even pieces using a sharp knife, unflavored dental floss, or string.
Alternatively, you can use a pizza cutter to slice the dough into 9 strips, then roll each strip into a separate roll for a polished look.
Grease a 9×13-inch baking dish (or similar-sized dish) and arrange the rolls inside, about 1/2-1 inch apart. Cover with a damp towel or plastic wrap, and let them rise for a second time. This usually takes 2-4 hours, depending on the warmth of your kitchen.
Not ready to bake yet? Cover the unbaked rolls with plastic wrap and refrigerate overnight. When you’re ready to bake, remove them from the fridge 2-4 hours beforehand to allow the dough to rise further.
BAKE
Preheat the oven to 375°F.
Before baking, mix melted butter, garlic powder and parsley in a small bowl and brush the mixture on the rolls with a pastry brush.
Bake for 40-45 minutes, or until the tops are golden brown.
Remove from the oven and cool slightly on a wire rack.
Sourdough Cinnamon Rolls are irresistibly soft, super fluffy, and absolutely mouthwatering! The cinnamon-sugar filling paired with a simple icing creates the perfect balance of sweetness and that signature sourdough tang we all adore. You won’t be able to stop at just one!
Sourdough breakfast treats are sooo good! Fore example, Sourdough Buttermilk Waffles are a family favorite and I can’t resist starting the day with something made from sourdough.
And these Sourdough Cinnamon Rolls? Total game-changer! What sets them apart is how each bite is ridiculously soft and fluffy. It’s like you’re savoring the gooey, melt-in-your-mouth center of the roll with every single bite.
Unlike your typical cinnamon rolls that use yeast, these are naturally leavened with sourdough starter, giving them an irresistible depth of flavor and that perfect balance of tang and sweetness. The fermentation also makes them easier to digest—so you can enjoy every bite without a second thought!
The filling is a luscious mix of dark brown sugar and warm cinnamon, bringing a rich, almost caramelized sweetness that makes these rolls extra indulgent. And, just when you think they can’t get any better, a simple cream cheese frosting is drizzled on top, melting into every crevice for an extra hit of creamy goodness.
Perfect for a special brunch or cozy Christmas morning, these Sourdough Cinnamon Rolls can be prepped the night before, making them an easy choice for fresh-baked mornings.
Serve them warm, right out of the oven, for an unforgettable treat that will have everyone coming back for seconds—and maybe thirds!
WHY YOU’LL LOVE THIS RECIPE:
SOFT AND FLUFFY: A true cinnamon roll fan knows the importance of a soft, chewy bite—and these Sourdough Cinnamon Rolls deliver just that! Every bite is pillowy and satisfying, with the perfect balance of tenderness and fluffiness.
GUT HEALTH BENEFITS: Unlike store-bought yeast, sourdough starter naturally breaks down the phytic acid found in flour, making these cinnamon rolls easier to digest. Plus, you get that signature tangy sourdough flavor that elevates the entire treat.
MAKE-AHEAD FRIENDLY: Prep these cinnamon rolls the night before for a super easy, fresh-baked breakfast the next morning. I’ve included my best tips below to save time and make your mornings a little easier.
INGREDIENTS
For exact measurements, scroll down to the recipe card at the bottom of the page.
FOR THE CINNAMON ROLLS:
Bread Flour – For the fluffiest, most tender rolls, bread flour is the way to go. Its higher protein content gives the dough a better rise, making for soft and chewy cinnamon rolls.
Milk – I used whole milk, but feel free to swap in your favorite non-dairy milk if needed.
Active Sourdough Starter – A bubbly, active starter is key for the best rise and flavor in your cinnamon rolls.
Dark Brown Sugar – Dark brown sugar brings a rich, caramel-like flavor that really shines in these rolls. If you don’t have it, light brown sugar works fine too!
Unsalted Butter – Butter softens the dough and adds flavor, giving you that melt-in-your-mouth texture.
Large Egg – Adds moisture to the dough, helping it stay soft and rich.
Salt – I love using Redmond’s unrefined salt for an extra mineral boost, but any unrefined salt will work.
FOR THE FILLING:
Unsalted Butter – Softened to room temperature for easy spreading.
Dark Brown Sugar – Again, for that deep, caramelized sweetness (light brown sugar is a fine substitute).
Ground Cinnamon – The classic spice that makes cinnamon rolls so irresistible.
FOR THE FROSTING:
Cream Cheese – Use room-temperature cream cheese for smooth mixing.
Butter – Room-temperature unsalted butter ensures easy blending with the cream cheese.
Heavy Cream – Adds richness to the frosting for a silky finish.
Powdered Sugar – Sweetens the frosting to perfection.
SUPPLIES:
Stand Mixer
Bench Scraper
Rolling Pin
Rimmed Baking Sheet, Baking Pan, or Large Cast Iron Skillet
Parchment Paper
Need Your Own Sourdough Starter?
Order your own organic dehydrated (but very much alive) sourdough starter here!
Our homemade organic sourdough starter is named Fiona and was made from scratch using three ingredients.. organic flour, water, and wild yeast from an organic apple we picked from our very own orchard at Delgado Homestead.
Sample Baker’s Schedule
Day 1:
4 pm – Mix dough
10 pm – Shape the rolls and refrigerate overnight
Day 2:
6 am – Allow the rolls to rise
9 am – Bake
Note: This schedule is based on a 68-70°F environment. Warmer kitchens will speed up the process, while cooler temperatures will slow it down.
MAKE-AHEAD OPTION
If you’re planning to bake these Sourdough Cinnamon Rolls the next morning, here’s how to prep them the night before!
Prepare the dough and shape the cinnamon rolls the night before. Cover the dish and refrigerate overnight.
When you’re ready to bake, remove the rolls from the fridge 2-4 hours before baking, allowing them to rise and puff up in a warm place.
Pro Tip: Since this is an enriched dough, the rise time may take longer. Cooler kitchens will lead to longer fermentation, while warmer kitchens will speed things up.
HOW TO MAKE SOURDOUGH CINNAMON ROLLS
Pro-tip: For the most accurate results, use a kitchen scale to measure ingredients!
DOUGH
In the bowl of a stand mixer, combine the active starter, brown sugar, and warm milk (make sure the milk is no hotter than 120°F to protect your starter). Mix on low speed until fully combined.
Add melted butter, salt, and the egg, and mix on low until everything is incorporated.
Switch to the dough hook attachment. Add 1 cup of flour (140g) at a time, mixing on medium speed. Scrape the sides of the bowl with a spatula between each addition. Continue adding flour until the dough pulls away from the bowl and feels tacky, not sticky (be careful not to add too much flour, or the dough may turn dense).
Knead the dough on medium speed for 5 minutes.
For the first rise, cover the bowl with a clean towel or plastic wrap, and let it rest in a warm spot until it has increased in size by at least 50% (this usually takes 3-7 hours, depending on your kitchen temperature).
SHAPE
Once the dough has risen, turn it out onto a lightly floured surface. Roll it into a 16×12 inch rectangle.
Spread softened butter over the entire surface of the dough.
In a small bowl, combine brown sugar and ground cinnamon, then sprinkle this mixture evenly over the dough.
Starting at the long edge closest to you, carefully roll up the dough into a log. Trim off the uneven edges, then cut into 9 even pieces using a sharp knife, unflavored dental floss, or string.
Alternatively, you can use a pizza cutter to slice the dough into 9 strips, then roll each strip into a separate roll for a polished look.
Grease a 9×13-inch baking dish (or similar-sized dish) and arrange the rolls inside, about 1/2-1 inch apart. Cover with a damp towel or plastic wrap, and let them rise for a second time. This usually takes 2-4 hours, depending on the warmth of your kitchen.
Not ready to bake yet? Cover the unbaked rolls with plastic wrap and refrigerate overnight. When you’re ready to bake, remove them from the fridge 2-4 hours beforehand to allow the dough to rise further.
BAKE
Preheat the oven to 350°F.
Before baking, pour heavy cream over the rolls—this adds moisture and helps them stay extra soft.
Bake for 30-35 minutes, or until the tops are golden brown.
Remove from the oven and cool slightly on a wire rack.
Cream Cheese Frosting
While the rolls are cooling, beat the room-temperature cream cheese and butter for 1-2 minutes.
Add heavy cream and powdered sugar, mixing until smooth.
Use an offset spatula to spread the frosting over the warm cinnamon rolls, letting it melt into all the cracks and crevices. Enjoy!
HOW TO SERVE
Nothing beats warm Sourdough Cinnamon Rolls fresh from the oven, topped with slightly melted cream cheese frosting! Serve them with a cup of your favorite tea or hot coffee for a blissful morning treat.
Want something heartier? Pair them with scrambled eggs, crispy bacon, and fresh fruit for a full breakfast!
HOW TO STORE
Store leftover cinnamon rolls in an airtight container in the fridge for up to 3 days. To serve, let them come to room temperature or warm them in the microwave for a few seconds.
FAQs
Can I use all-purpose flour instead of bread flour? You can, but I recommend bread flour for the best results. Bread flour’s higher protein content helps create a better rise, resulting in softer, chewier rolls. All-purpose flour will work, but the rolls may be denser.
Can I make these the night before and bake them in the morning? Yes, absolutely! Shape the rolls the night before, store them in the fridge, and let them rise for 2-4 hours the next morning before baking as usual. This will give you fresh rolls with minimal effort!
These Sourdough Cinnamon Rolls are unbelievably soft, incredibly fluffy, and utterly delicious! The sweet cinnamon-sugar filling and creamy, luscious frosting perfectly complement the tangy flavor of the sourdough, making every bite irresistible.
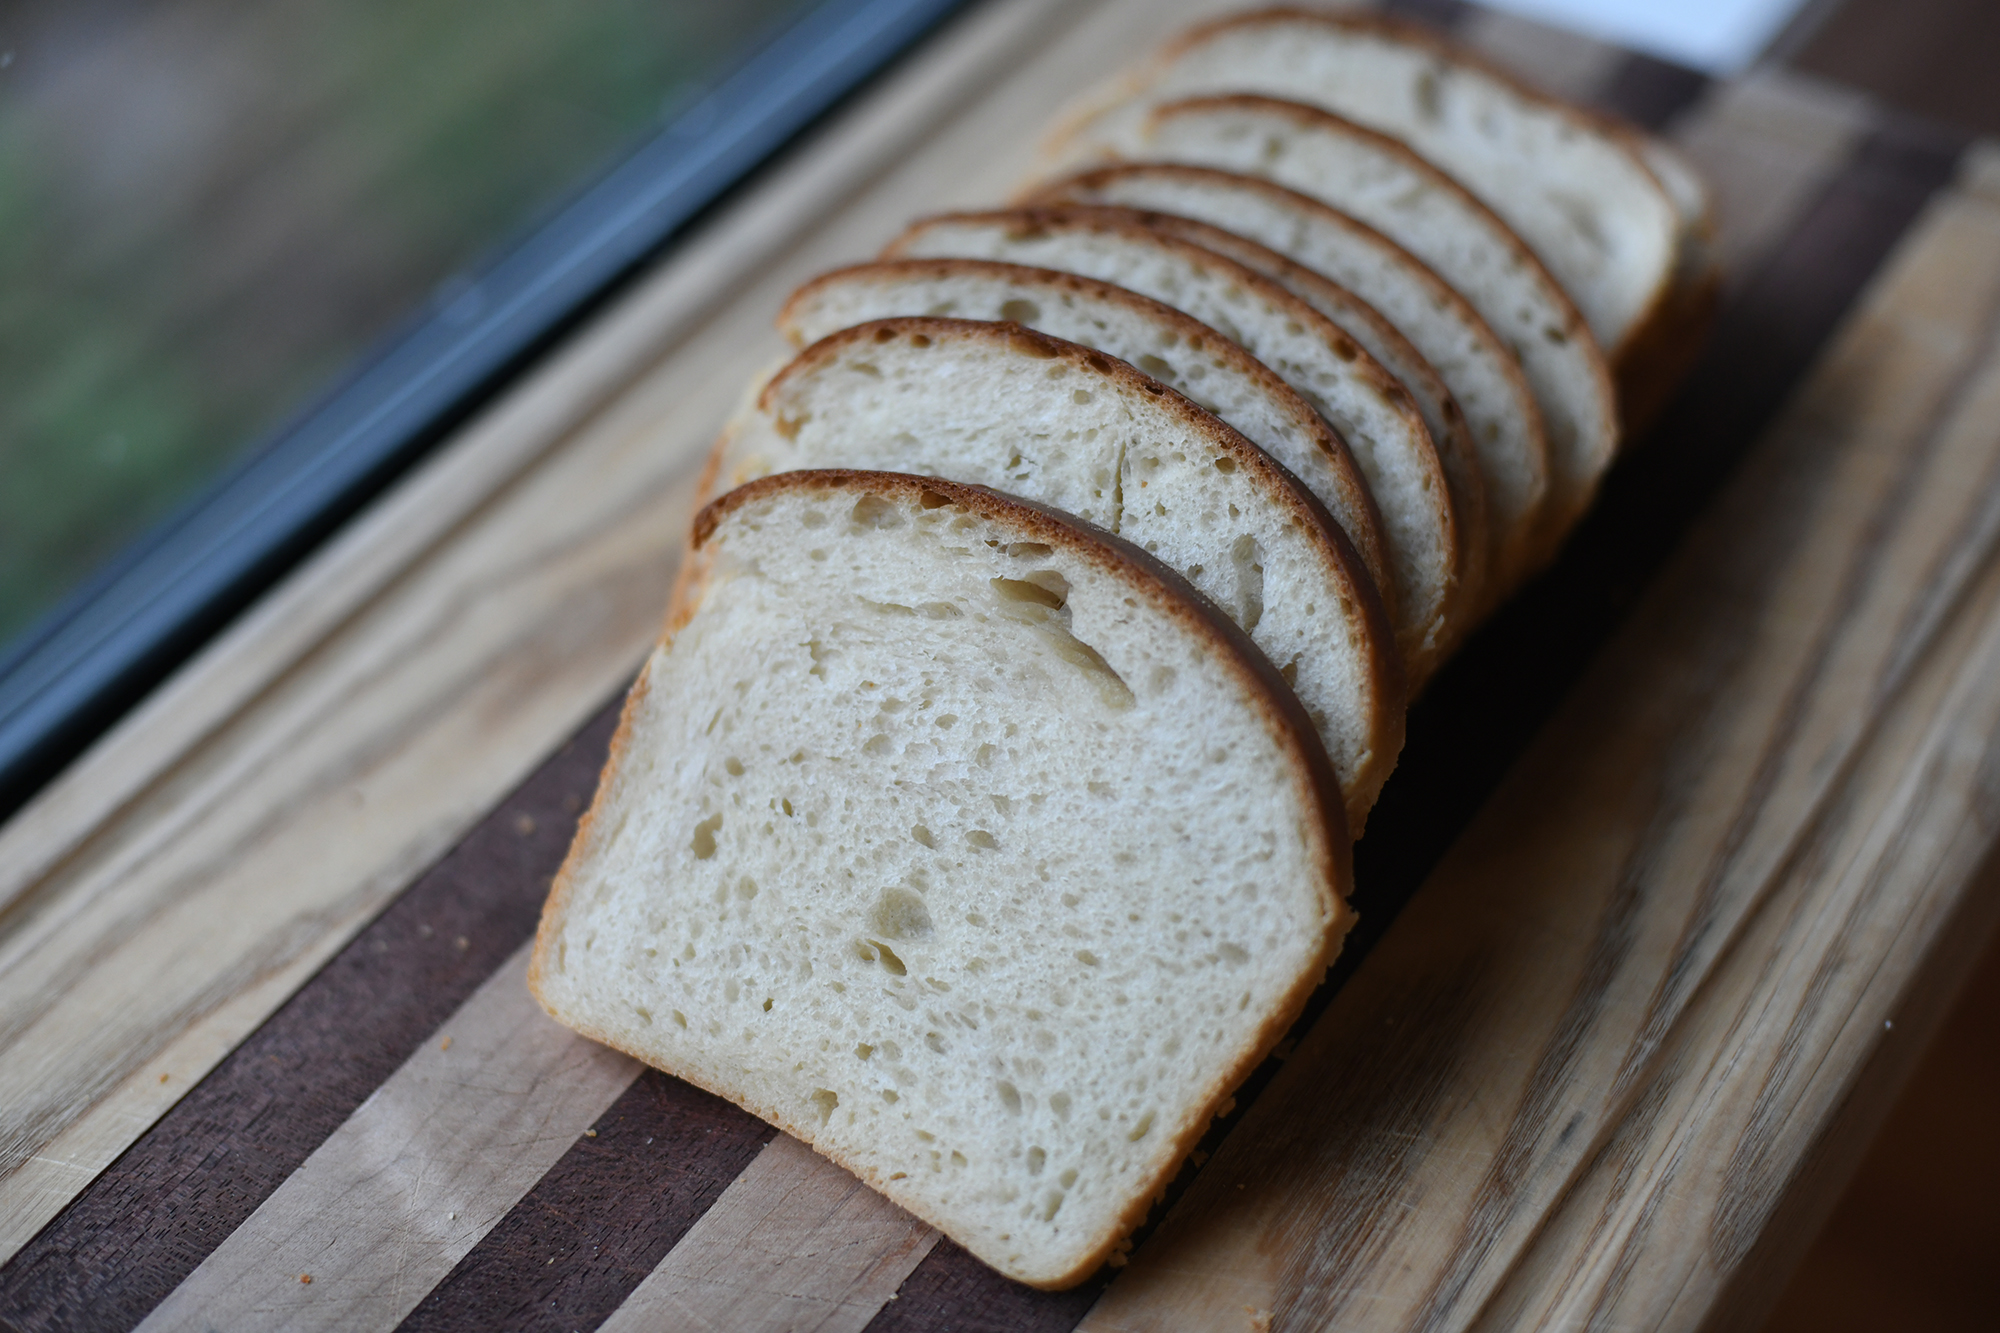
I was on a mission to replace store bought sandwich bread with a healthier homemade whole wheat option for a long time. This recipe is by far the winner. This soft and fluffy sourdough honey wheat sandwich bread is not heavy and dense but pillowy soft with a kiss of sourdough tang and honey sweetness. It’s absolutely delicious!
It’s the perfect loaf for toasting up for breakfast or slicing and enjoying with meats and cheeses for lunch. Individual slices keep perfectly in the freezer without all the additives from store bought bread.
I’ve also included 2 baking schedules to help you adjust to your busy schedules. This recipe can even be prepared and baked all in one day!
Why You’ll Love This Recipe
Soft and Nourishing Whole wheat bread can sometimes be dense, but not this one! The combination of milk, butter, and a mix of bread flour and whole wheat flour gives this loaf a soft, light texture while still delivering the extra nutrients from the whole wheat.
Minimal Kneading No need to spend hours kneading! Just 20 seconds of kneading is all it takes to get this dough ready. Simple and easy!
Made and Baked in One Day I’ve included two baker’s schedules to fit this recipe into your day. If you’re in a rush, you can have freshly baked bread in a single day—how’s that for convenience?
Ingredients Needed
(Scroll to the bottom for exact measurements on the recipe card)
Active Sourdough Starter – Make sure your starter is active and bubbly, at its peak of fermentation.
Milk – I used whole milk, but feel free to swap with your favorite dairy or non-dairy option. Just ensure the milk is warm, but not hotter than 120°F to protect the starter.
Honey – Adds a touch of sweetness and helps the crust achieve a golden, beautiful color as it bakes.
Melted Butter – Makes this bread soft and tender. You can substitute with olive oil or non-dairy butter if preferred.
Bread Flour – For the best texture and a taller, fluffier loaf, I recommend using bread flour. It has a higher protein content than all-purpose flour, which helps the dough rise.
Whole Wheat Flour – I love using King Arthur’s whole wheat flour for its flavor and texture.
Salt – Any unrefined salt works well, but I like using Redmond’s salt for its added minerals.
Supplies Needed
Large Mixing Bowl
Danish Dough Whisk
Bowl Cover
Rolling Pin
8.5 x 4.5-inch Loaf Pan
Need Your Own Sourdough Starter?
Order your own organic dehydrated (but very much alive) sourdough starter here!
Our homemade organic sourdough starter is named Fiona and was made from scratch using three ingredients.. organic flour, water, and wild yeast from an organic apple we picked from our very own orchard at Delgado Homestead.
Baker’s Schedule:
This guideline is for kitchens at 70°F (21°C). Warmer kitchens will rise faster, cooler ones will take longer.
Same-Day Baking:
9:00 AM: Make the Dough
10:00 AM: Knead the Dough
10:00 AM: First Rise
7:00 PM: Shape
7:00 PM: Second Rise
9:00 PM: Bake
Next-Day Baking:
9:00 PM: Make the Dough
10:00 PM: Knead the Dough
10:00 PM: First Rise
Next Morning:
7:00 AM: Shape
7:00 AM: Second Rise
9:00 AM: Bake
How to Make Whole Wheat Sourdough Bread
1. Feed Your Starter
Feed 25g of sourdough starter, 75g of warm water, and 75g of flour. Mix until fully incorporated and let it rise until bubbly and doubled in size. This usually takes about 12 hours in a 70°F kitchen. In warmer kitchens, this will take less time, and in cooler kitchens, more time. The starter should look bubbly with little craters on top when ready.
2. Make the Dough
In a large bowl, whisk together your active sourdough starter, warm milk, melted butter, and honey. Add the bread flour, whole wheat flour, and salt. Use a Danish dough whisk to combine until there are no dry patches. You can also use a bowl scraper to clean the sides of the bowl and make sure everything is mixed well. The dough will be a bit sticky.
Cover the bowl and let it rest for 30 minutes to hydrate the flour.
3. Knead the Dough
After the rest period, wet your fingers to prevent sticking. Take a piece of dough, pull it upwards, and fold it toward the center, pushing the heel of your hand into the dough. Turn the bowl a quarter turn and repeat. Knead for about 20 seconds, or until the dough becomes smoother and stiffer. If it tears, stop.
Grease another bowl with butter, place the dough in it, seam side down, and cover it again for the bulk fermentation.
4. Bulk Fermentation
Let the dough rise until it has doubled in size, which should take 10-12 hours in a 70°F kitchen. The first rise begins as soon as the ingredients are mixed, not after kneading.
5. Shape the Dough
Once the dough has doubled, punch it down gently to release any air bubbles. Transfer it to a clean surface and shape it into a rectangle, about 9 inches by 13 inches (it doesn’t have to be exact). Roll the dough tightly into a log, pinching the seams together at the end. If you’ve made sourdough before, you’ll notice that this dough feels denser due to the whole wheat flour.
6. Second Rise
Grease your loaf pan and place the shaped dough seam side down in the pan. Cover it and let it rise until it’s about 1 inch above the rim of the pan. This usually takes 1-2 hours in a 70°F kitchen. Patience here is key for a light, fluffy loaf!
7. Bake the Bread
Preheat your oven to 375°F. Place the loaf on the middle rack and bake for 30-35 minutes until the top is golden brown. If the crust begins to brown too quickly, cover the top with aluminum foil and continue baking for 20-25 minutes, for a total of 50-55 minutes. The internal temperature should reach 201°F.
For extra steam in the oven, place a cast iron skillet or baking sheet with ice cubes on the lower rack. This keeps the dough surface soft and helps it rise without tearing.
Once baked, let the bread sit in the pan for 5 minutes, then transfer it to a wire rack to cool completely.
To get a soft crust, I love spreading butter on top of the bread while it’s still warm.
8. Cool Before Slicing
Allow the bread to cool for at least 1 hour before slicing. Cutting too soon can result in a gummy texture.
How to Serve
This sourdough whole wheat bread is perfect for everything from toast in the morning to a hearty sandwich at lunch. It’s versatile and delicious! Even when it gets a bit stale, turn it into crunchy croutons or breadcrumbs for later use.
How to Store
This bread will stay fresh for 3-5 days when stored in a plastic bag at room temperature. For longer storage, I recommend freezing it. Slice the bread and place the slices in a gallon-size ziplock bag with small sheets of parchment paper between them to keep them from sticking together.
To refresh frozen slices, just bring them to room temperature or pop them straight into the toaster!
FAQs
Can I use all-purpose flour instead of bread flour? Yes, you can, though bread flour is recommended for a fluffier, taller loaf. Bread flour has more protein, which helps the dough rise better and creates a softer texture. All-purpose flour will still work, but the loaf may not be as airy or tall.
Why does my loaf have a gummy line at the bottom? This is usually a sign of underproofing or overproofing. If the dough hasn’t risen enough before baking, it may not rise properly in the oven. If it’s overproofed, the gluten might break down, leading to a dense, gummy bottom. Be sure to give your dough enough time to rise!
Do I have to add honey to the dough? Honey is highly recommended for its sweetness, color, and to help with fermentation. It also helps preserve the bread. However, it can be omitted if you prefer.
I was on a mission to replace store bought sandwich bread with a healthier homemade whole wheat option for a long time. This recipe is by far the winner. This sourdough sandwich loaf is not heavy and dense but super soft and fluffy with a kiss of sourdough tang. It’s absolutely delicious!
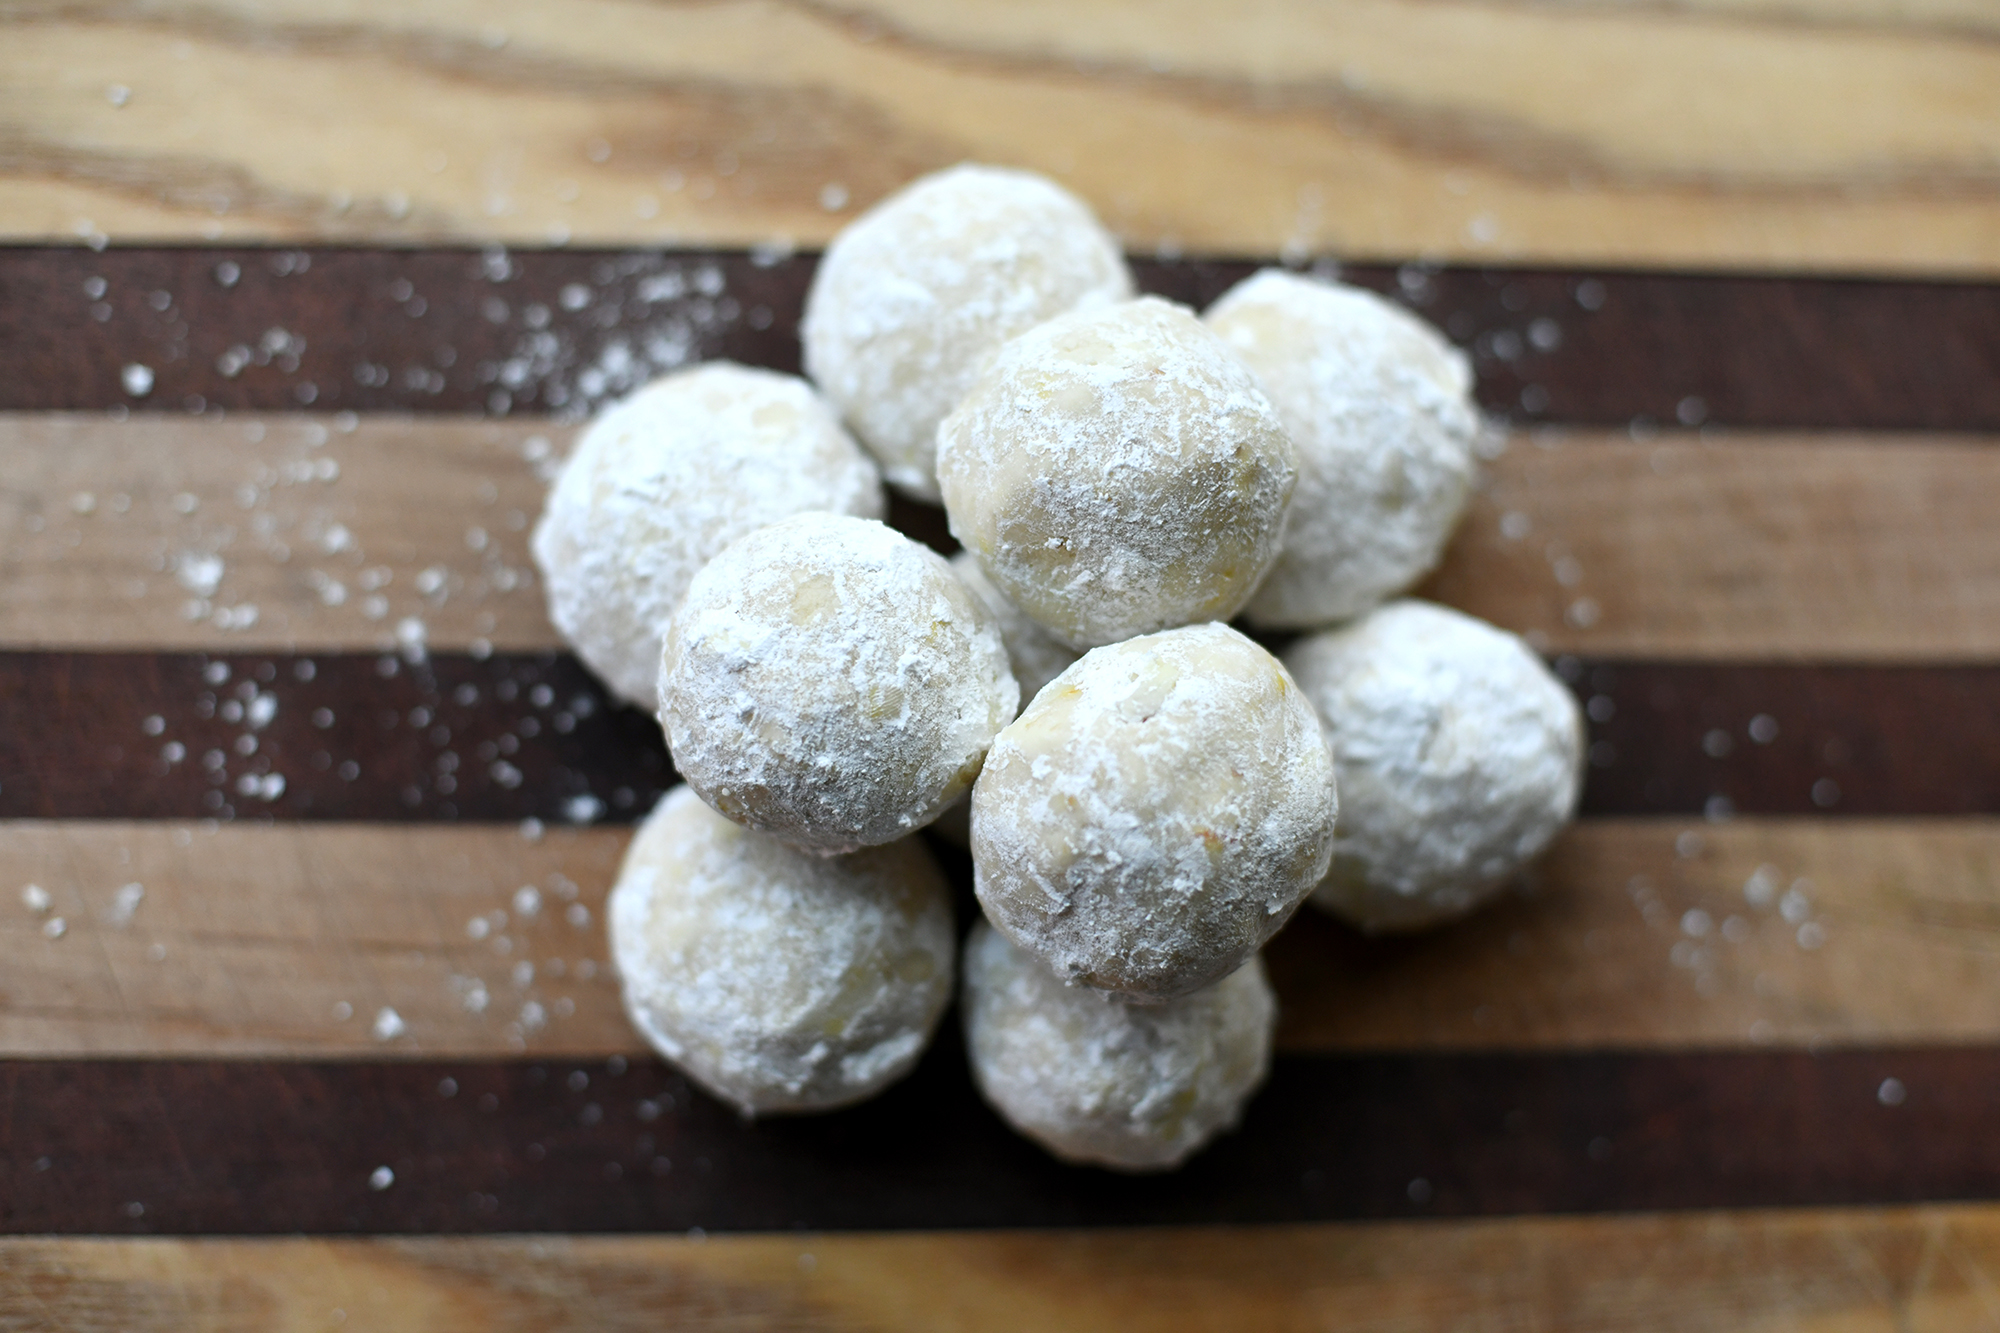
Also known as Polvorones, Snowball Cookies, Russian Tea Cakes, or Butter Balls, whatever you call them, sourdough Mexican wedding cookies are a classic recipe for the holiday season, but with a sourdough twist!
These Sourdough Mexican Wedding Cookies are a melt-in-your-mouth treat, buttery and sweetened with powdered sugar—perfect for any Christmas cookie tray. The addition of sourdough discard imparts a subtle tang, while chopped nuts bring a delightful crunch and texture to these rich, shortbread-like cookies.
Sourdough Snowball Cookies stand out because they’re made without eggs or granulated sugar in the dough. Instead, just six simple ingredients come together to create a light and airy sweet treat.
For added crunch and texture, fold in chopped nuts! While walnuts are my personal favorite, pecans are also a festive and delicious choice during the holiday season.
Once baked, roll these buttery cookies in powdered sugar two times. The confectioner’s sugar makes these the perfect holiday cookies as they look like little snowballs.
These cookies will melt in your mouth! Shortbread cookies are full of delicious buttery and sugary sweetness and they are the perfect Christmas cookies. Watch them disappear from your holiday cookie trays!
Why You’ll Love This Recipe:
Only 6 Ingredients Holiday shopping can be overwhelming, but this recipe keeps it simple! With just six basic pantry staples, you can whip up a batch of delicious cookies without running all over the store.
One-Bowl Recipe No need for a stand mixer or a ton of gadgets! All you need is a medium bowl and a hand mixer to make these cookies. It’s as easy as it gets!
Classic Christmas Cookie Each cookie is coated in a dusting of powdered sugar, giving them the look of freshly packed snowballs—perfect for any holiday cookie tray!
Great for Using Up Sourdough Discard If you’ve got extra sourdough discard hanging out in your fridge, this recipe is the perfect way to put it to good use without any waste.
Customizable Want to make these cookies your own? You can! Enjoy them with or without chopped nuts, or swap them out for mini chocolate chips. For a festive twist, try adding crushed peppermint candy canes to the dough. The possibilities are endless!
Ingredients
All-Purpose Flour – Be sure to measure the flour properly. If you don’t have a kitchen scale, spoon the flour into the measuring cup and level it off with a butter knife. Too much flour can make the cookies dry and crumbly.
Powdered Sugar – This recipe uses powdered (confectioners’) sugar in both the dough and as a coating, giving the cookies their signature sweet, melt-in-your-mouth texture.
Unsalted Butter – Let the butter come to room temperature for easier mixing and a smooth dough.
Vanilla – I prefer vanilla extract, but feel free to use any vanilla you have on hand.
Sourdough Discard – Use unfed sourdough starter (discard) that’s no older than 2 weeks for the best results. Need your own sourdough starter? Buy your own dehydrated sourdough starter here!
Salt – A pinch of salt helps to balance out the sweetness of these cookies.
Chopped Nuts (optional) – Walnuts are my favorite, but feel free to experiment with pecans, macadamia nuts, or ground almonds. If you have a nut allergy or prefer nut-free cookies, simply skip the nuts altogether.
Cookie Variations
For Chocolate Lovers – Instead of chopped nuts, try substituting 1/2 cup of mini chocolate chips. For an extra special treat, wrap the dough around a Hershey’s Kiss before baking!
For a Festive Twist – Stir in 1/2 cup of crushed peppermint candy canes or use holiday-colored sprinkles for a cheerful touch. You can also swap the vanilla extract for almond extract for a sweet, fruity flavor, or use peppermint extract for a more festive holiday feel.
Supplies
Large Bowl
Kitchen Scale (optional, but helpful)
Hand Mixer
Rubber Spatula
Baking Sheet
Parchment Paper
Wire Racks
How to Make Sourdough Mexican Wedding Cookies
Preheat the Oven Preheat your oven to 350°F (175°C).
Prepare the Nuts Chop the nuts by hand or use a food processor for a quick and even chop.
Cream the Wet Ingredients In a medium bowl, cream together the butter, powdered sugar, vanilla extract, and sourdough discard on medium speed for about 2 minutes, until the mixture is light and fluffy.
Add Dry Ingredients Add the flour, salt, and chopped nuts (if using) to the bowl. Mix on low speed until just combined. Scrape down the sides of the bowl with a rubber spatula to ensure all dry ingredients are incorporated. The dough will be crumbly, which is perfectly normal.
Shape the Dough Use your hands or a cookie scoop to form the dough into smooth, round balls, about 2 inches wide (or roughly 2 tablespoons of dough per cookie). Gently press the dough together as you shape it—make sure there are no cracks in the ball for the best texture.This recipe should yield about 14-16 cookies.
Prepare for Baking Line a rimmed baking sheet with parchment paper. Place the dough balls about 2 inches apart on the prepared sheet.
Bake the Cookies Bake in the preheated oven for 21-23 minutes, or until the bottoms of the cookies start to turn golden brown. It’s better to slightly underbake them than to overbake, so keep an eye on them.
Decorate with Powdered Sugar While the cookies are still warm, dip each one into a bowl of powdered sugar to coat. Set them on a wire rack to cool. The powdered sugar may melt a little at first.Once the cookies have cooled slightly, roll them in powdered sugar a second time for a nice, even dusting.
How to Serve
Sourdough Mexican Wedding Cookies are a treat on their own, but they pair wonderfully with a warm cup of hot chocolate or coffee. Enjoy!
How to Store
These cookies will stay fresh for up to two weeks when stored in an airtight container at room temperature.
Freezing Tips Sourdough Mexican Wedding Cookies freeze beautifully! To avoid crumbs, store them in a freezer-safe container instead of a zip-top bag. When you’re ready to enjoy them, simply thaw them on the countertop until they return to room temperature.
FAQs:
Why are my sourdough Mexican wedding cookies falling apart after baking? If your cookies crumble after baking, it could be because too much flour was added to the dough, or the cookies were baked too long. For accuracy, use a kitchen scale to measure the flour, or spoon the flour into your measuring cup and level it off with a butter knife.
Why are my cookies flat? Flat cookies may indicate that your oven temperature is too low. Double-check the temperature with an oven thermometer. Also, be sure to use room-temperature butter, not melted butter, as melted butter will cause the cookies to spread too much and lose their shape.
Recipe not foundMelt-in-your-mouth, buttery, and sweetened with powdered sugar, these Polvorones, aka Mexican Wedding Cookies are a must on anyone’s Christmas cookie tray. Adding sourdough discard gives this beloved holiday cookie a slight sourdough tang, while chopped nuts add delicious crunch and texture to these buttery shortbread cookies.
You Can Use Discard or Active Starter and Ferment for Extra Nutrition and Deliciousness!
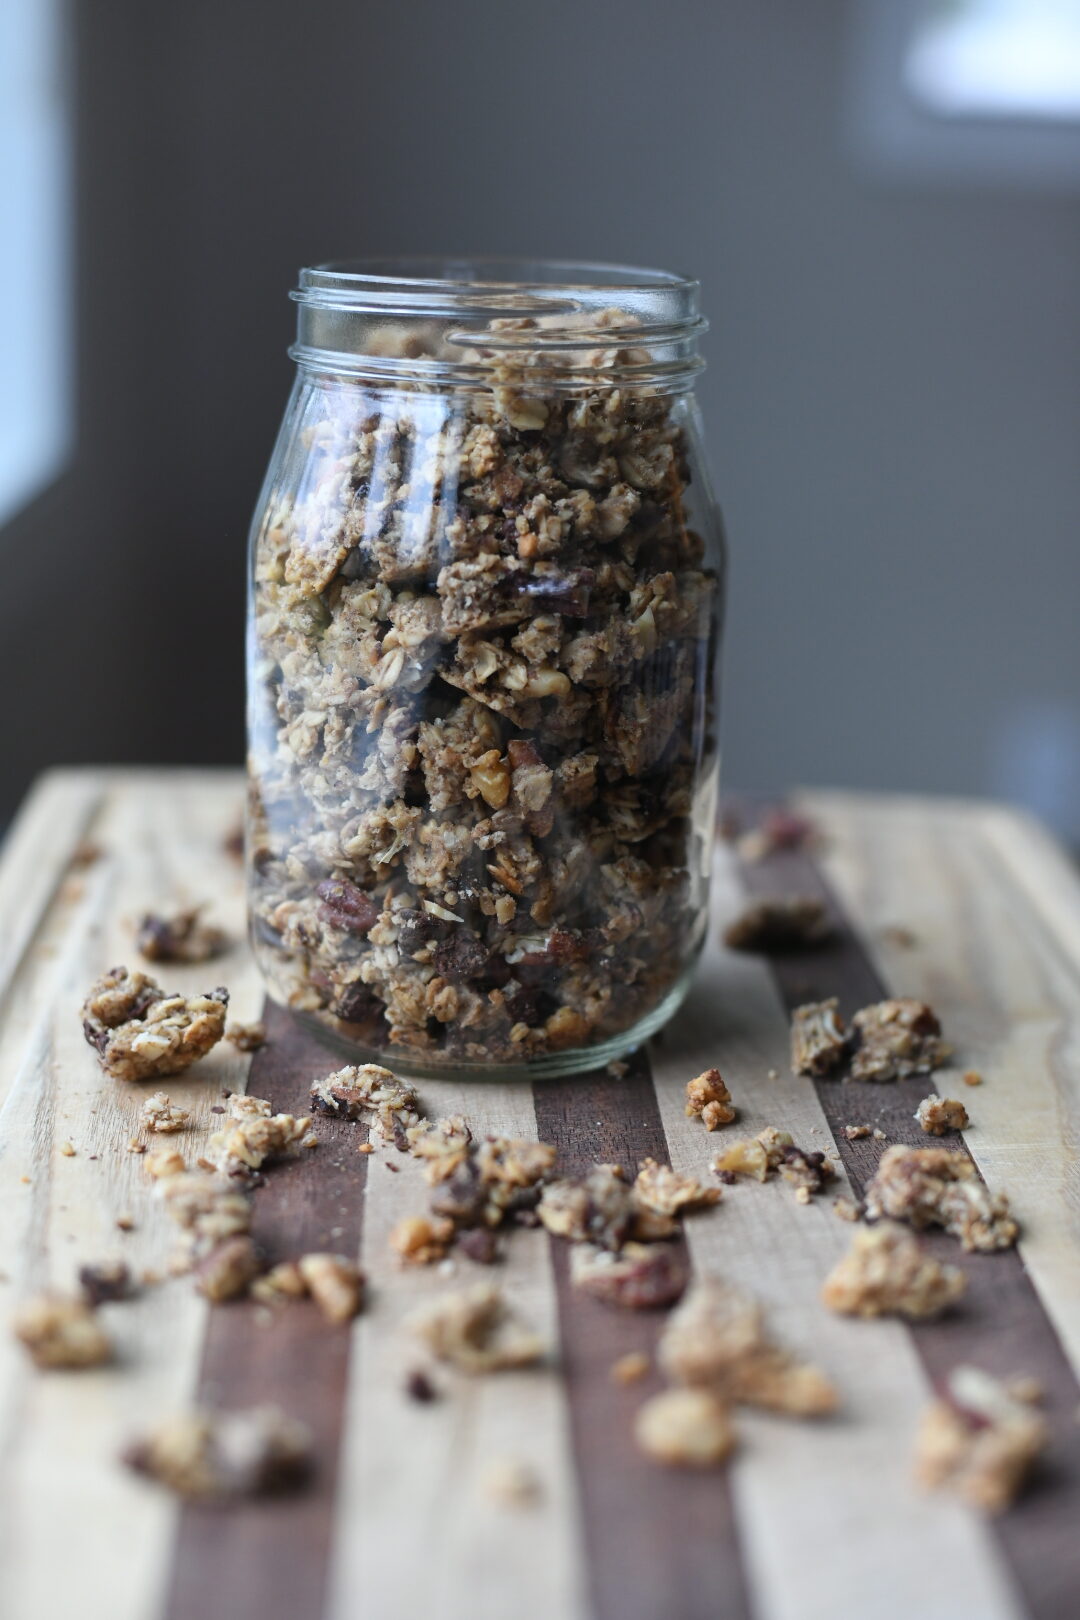
Sourdough chocolate chip granola… so good!
Come and discover the art of crafting homemade sourdough granola, whether you’re utilizing discard or active starter. It’s a straightforward process yielding delectable results! Our nutritious loaded sourdough granola recipe is delicately sweetened with natural maple syrup, boasting a medley of nuts and seeds rich in fiber and omega fatty acids. While we relish the aromatic blend of vanilla, cinnamon, and coconut in our sourdough discard granola, we’ve curated a variety of other flavor and seasoning suggestions for you to explore. Additionally, we’ve included instructions on fermenting sourdough granola, elevating its nutritional profile with added nutrients.
Granola paired with plain yogurt and fresh fruit constitutes a breakfast classic in our household. You just can’t go wrong with the the sweet crunchiness and nuttiness of homemade sourdough granola.
Here’s what you can expect from this sourdough granola recipe:
Chunkiness: Thanks to the sticky sourdough starter and ground flax meal, this granola boasts satisfyingly chunky clusters. These natural binders help maintain the crisp, toasted texture of the granola, allowing you to break it into small cereal-like pieces or enjoy it in larger, snackable clusters, depending on your preference.
Healthier and Less Sweet: Unlike commercial granola, this recipe is healthier and less sweet. Free from refined sugar and puffed rice, it features a high nut and seed-to-oat ratio, providing ample protein and fewer carbs. Additionally, the inclusion of hemp hearts and ground flax seed meal enriches the granola with protein, fiber, omega-3 and omega-6 essential fatty acids, vitamin E, and minerals. If fermented first, these nutrients become even more bioavailable.
Flexibility: This recipe offers flexibility in customization. Whether you use discard or active starter, incorporate your favorite nuts and seeds, experiment with various spices and seasonings, add nut butter, or include dried fruit, the choice is yours. You can bake it immediately or opt to let it ferment. Moreover, individuals baking with gluten-free sourdough starter can easily adapt this recipe to create gluten-free sourdough granola. Embrace your creativity and savor the versatility of this recipe!
Fiona, our active and bubbly sourdough starter
If you need sourdough starter, feel free to pick up a dry (but alive!) organic sourdough starter from the Delgado Homestead shop. All it needs a little water, flour, and few days to get active again.
Achieving that perfect crunch in homemade granola requires some patience and technique. Here are some key tips:
Low and Slow Baking: To ensure optimal crunchiness, bake the granola at a low temperature for an extended period. This allows moisture to evaporate gradually without risking over-toasting or burning. The nuts, seeds, flax meal, and coconut oil in this sourdough discard granola recipe also contribute to its satisfying crunchiness.
Proper Storage: Store your homemade granola in a good-quality, airtight container to preserve its crunchiness. This helps prevent exposure to moisture, which can soften the granola over time.
Patience: While it may not seem super crunchy right out of the oven, homemade granola crisps up significantly as it cools and dries. Allow it to cool completely before transferring it to a storage container to maintain its desired texture.
By following these tips and techniques, you can enjoy homemade granola with the perfect balance of crunchiness and flavor.
Sourdough granola wet ingredients
Here’s how to make fermented sourdough granola for an extra nutritional boost:
Prepare the Mixture: Combine all the wet ingredients in a mixing bowl: sourdough starter, maple syrup, melted coconut oil or butter, ground flaxseed, vanilla extract, cinnamon, sea salt, and water (if fermenting). Mix well to ensure all ingredients are evenly incorporated.
Add the Dry Ingredients: Add the rolled oats, nuts, seeds, hemp hearts, and optional coconut flakes to the wet mixture. Stir until everything is evenly coated with the wet ingredients.
Fermentation: If fermenting the granola, cover the bowl loosely and let it sit at room temperature for 2 to 6 hours. For longer fermentation, move the mixture to the refrigerator (e.g., overnight). Keep in mind that longer fermentation may result in a more sour taste and potentially less crunchiness.
Preheat the Oven: Preheat your oven to 300°F (150°C) while the granola mixture is fermenting.
Baking: Spread the fermented granola mixture evenly on a lined baking sheet. Bake in the preheated oven for 30 to 40 minutes, stirring every 10 minutes to ensure even browning. The granola is ready when it’s golden brown and crisp.
Cooling and Storage: Allow the granola to cool completely on the baking sheet before transferring it to an airtight container for storage. If adding dried fruit, mix it in once the granola has cooled.
This fermented sourdough granola is packed with nutrients and flavor, making it a delicious and wholesome breakfast or snack option. Enjoy it with yogurt, milk, or as a topping for smoothie bowls!
Sourdough granola with chocolate chips after fermenting at room temp and ready to bake
Here’s a step-by-step guide on how to make sourdough granola:
Preheat Oven: Preheat the oven to 315°F (157°C).
Combine Wet Ingredients: In a medium to large mixing bowl, combine the wet ingredients: sourdough starter, maple syrup, melted oil or butter, vanilla extract, salt, cinnamon, and ground flax meal. Mix thoroughly to ensure all ingredients are well combined.
Add Dry Ingredients: Add the rolled oats, nuts, seeds, coconut, and hemp hearts to the bowl with the wet ingredients. Toss and stir until all the dry ingredients are evenly coated with the wet mixture.
Optional Fermentation: Optionally, cover the bowl loosely and let the granola mixture ferment for 2 to 6 hours at room temperature, or longer in the refrigerator, before baking. If refrigerated overnight, allow it to soften and warm up at room temperature for a couple of hours before baking.
Spread on Baking Sheet: Spread the raw granola mixture onto a large baking sheet, greased or lined with parchment paper. Press the mixture down firmly into a solid, flat sheet about ½ inch thick, ensuring all the granola bits are touching.
Bake: Bake the granola in the preheated oven for about 20 minutes or until lightly toasted. Once the outer edges start to brown, remove the baking sheet from the oven and let it cool for about 5 minutes.
Break into Clusters: Using a spatula or your hands (if cool enough), gently break up the granola into large clusters or chunks. Stir, flip, and rotate the clusters on the tray to promote even toasting. Move pieces from the outer edge of the pan inward and vice versa.
Your sourdough granola is now ready to enjoy! You can serve it with yogurt, milk, or eat it as a standalone snack. Store any leftovers in an airtight container for future use.
Looking for sourdough discard recipes? Come try our healthy loaded sourdough granola recipe – with chunky clusters of oats, nuts, seeds, coconut, flax, maple syrup, hemp seeds, vanilla, cinnamon and more. You can make sourdough granola with active or discard starter, or make it fermented!
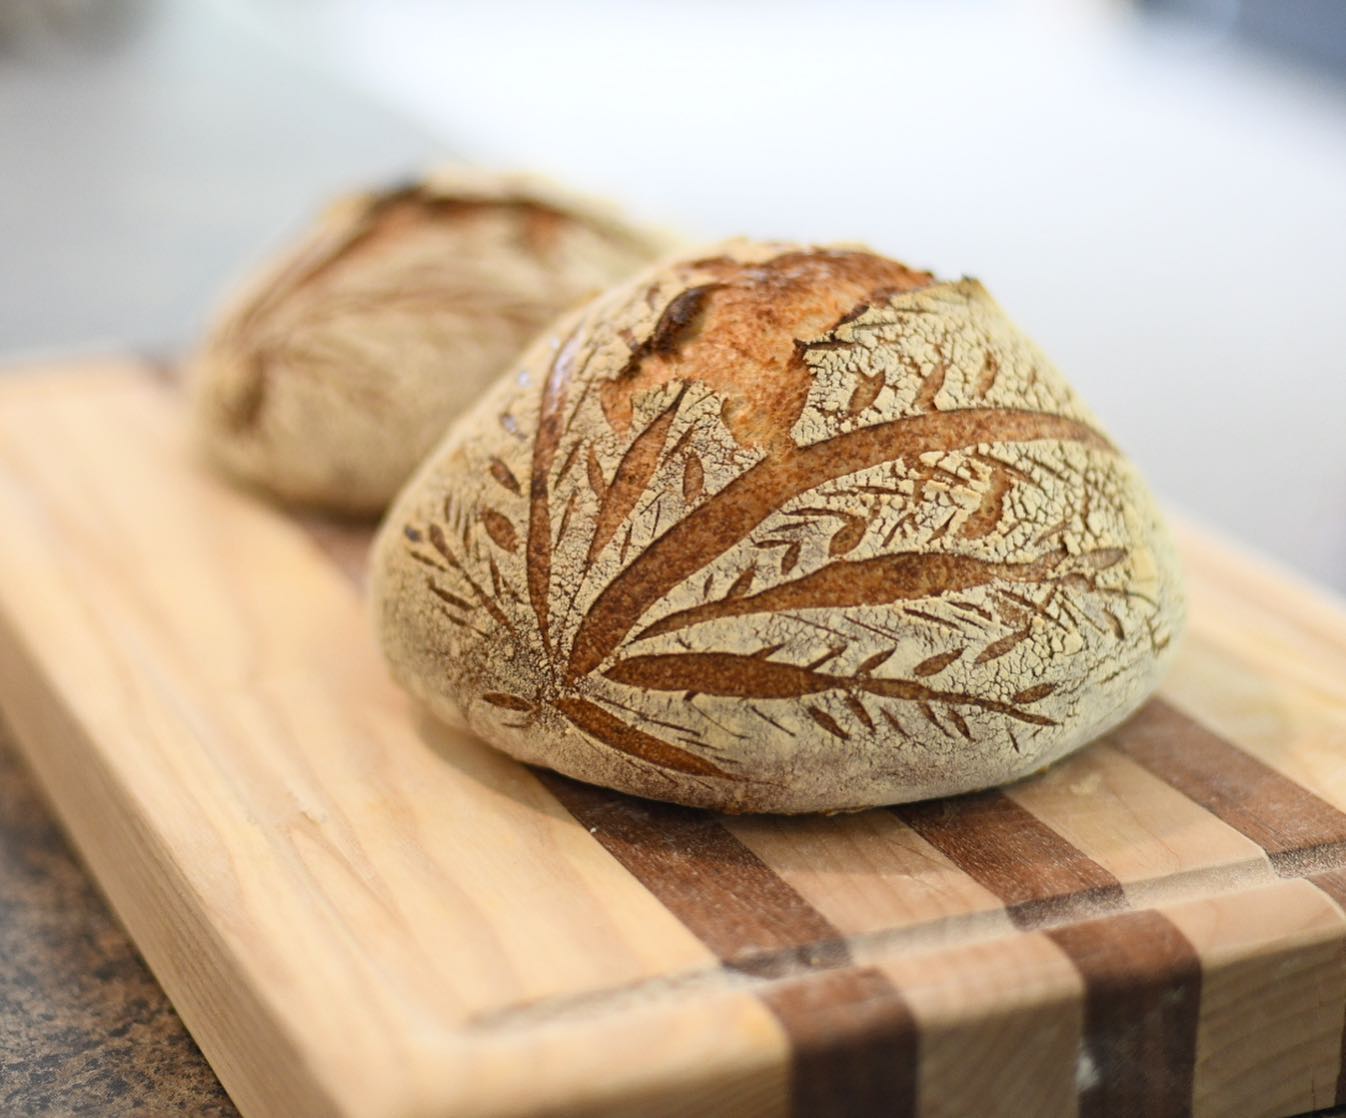
A Delicious No-Knead Recipe That is Simple and Delicious
A fresh, crusty, fluffy loaf of homemade sourdough is truly hard to beat. Contrary to popular belief, it’s not as challenging to make as you might think! While there are several steps to follow and become familiar with, it’s well within your capabilities. I have full confidence in you! Despite making sourdough every weekend, I don’t consider myself much of a “baker” at all. Besides bread, we hardly bake anything else.
By following the simple, step-by-step instructions outlined in this article, you’ll soon be crafting your own nutritious, mouthwatering, no-knead sourdough at home with ease! Once you’ve dipped your toes (or, uh… hands) and gained some experience with this basic recipe and process, the possibilities are endless. You’ll have the freedom to experiment with creative variations: adjusting flour ratios, incorporating dried or fresh herbs, nuts and seeds, fruit, and much more!
As we embarked on our journey of bread-making, we delved into and gleaned the basic process from the exceptional sourdough expert, Maurizio. Our preferred recipe is loosely adapted from one of the beginner loaves featured on his blog, The Perfect Loaf. However, perfection isn’t our primary objective here on our homestead. Our aim is simply to create fuss-free, delicious, organic, homemade bread. And that’s precisely what I aim to share with you here! Of course, if it happens to look beautiful, that’s an added bonus.
That being said, I won’t delve too deeply into the intricacies of baker’s terminology, hydration ratios, and other technical jargon. While I may define certain terms here and there to help acquaint you with some common vocabulary, I don’t intend to speak like a professional baker. Because I’m not one.
We aren’t meticulous in our baking endeavors. We lead busy lives, and sometimes our timing is a bit off. Each loaf turns out differently—some may be less fluffy or aesthetically pleasing than others. But what matters most to us is that they all taste good!
What are the advantages of baking sourdough at home?
There are numerous compelling reasons, some more apparent than others. Naturally, the foremost benefit is the freshness that comes with homemade bread. Additionally, the ability to dictate the ingredients to suit your preferences, whether it be opting for whole wheat or selecting all-organic components, adds another layer of appeal. Moreover, as previously mentioned, the creative possibilities are boundless – from experimenting with various flavors to crafting unique designs. The thrill and satisfaction of unveiling the meticulously prepared loaf from the dutch oven or combo cooker is truly exhilarating.
Once you’ve gathered all the necessary supplies, producing sourdough at home proves to be significantly more economical compared to purchasing bread from the store, particularly artisanal sourdough made locally. In certain areas, a single loaf from specialty bakeries may command prices as high as $17. While indulging in such a treat occasionally was feasible, now the prospect of enjoying something even more superior every weekend, at a fraction of the expense, and without the need to step outside becomes a definite win-win situation.
Did you know?
Homemade sourdough isn’t actually sour? Surprising, isn’t it? While there are methods to enhance its tanginess if desired, homemade sourdough differs significantly from the conventional “sourdough” loaves found in stores. Its name stems from the fermentation process it undergoes, not its inherent sourness. Made through a slow fermentation process utilizing wild yeasts present in the sourdough starter, it achieves its rise without the aid of commercial yeast.
Interestingly, naturally-fermented sourdough is often well-tolerated by individuals with mild gluten sensitivities or irritable bowel syndrome (IBS) who typically steer clear of bread consumption. I happen to fall into this category! The scientific explanation lies in the fermentation process. Raw wheat or rye contains certain carbohydrates that can be challenging for some individuals to digest. Through fermentation, these carbs are significantly reduced, leading to a decrease in bloating, gas, and discomfort associated with their consumption, and sometimes even complete elimination of these symptoms. Furthermore, the fermentation process enhances the bioavailability of nutrients in the bread, making them easier for your body to absorb. This makes homemade sourdough not only a culinary delight but also a health-conscious choice worth considering!
Supplies & Ingredients
Ingredients
Sourdough starter– approximately 100 grams will be used in the recipe. If you need sourdough starter, feel free to pick up a dry (but alive!) organic sourdough starter from the Delgado Homestead shop. All it needs a little water, flour, and few days to get active again.
Flour– 455 grams total. A combo or organic white bread flour and whole wheat flour is used. A little rye flour is optional.
Salt – 10 grams. Sea salt, kosher salt, or Himalayan salt is preferred over iodized table salt.
Filtered water – 345 grams (about 1.5 cups) *Note that if you live in a very humid climate like Florida, Hawaii or the Pacific Northwest, you’ll want to scale back on the water content. Start off with 1.25 cups and add more if needed.
Supplies
Liquid measuring cup
A large mixing bowl and/or dough tub
A kitchen scale
A dutch oven or cast iron combo cooker
Proofing Basket, aka banneton. Choose between a round “boule” shape or an oval “batard” shape.
A lint-free tea towel
High-heat oven mitts
Thermometer – Either a food probe thermometer or an ambient room thermometer
Dough scraper
A warm location
Instructions
Before delving into the detailed steps, here’s a brief overview: Sourdough baking typically spans over two days, with much of the time allocated to the dough’s fermentation stages. Don’t fret; most of the time, the dough is simply left to ferment at various intervals. I’ll provide comprehensive instructions shortly, but it’s beneficial to keep this timeline in mind.
For example, let’s consider baking a loaf on Saturday morning. Assuming your sourdough starter resides in the fridge, you’ll need to remove it on Thursday evening to allow it to gradually reach room temperature overnight. On Friday, you’ll feed it once or twice and prepare the dough with the active starter late in the afternoon. The dough undergoes proofing in the refrigerator overnight and is ready for baking on Saturday morning. This schedule has proven effective for us and is simpler than it might initially seem. You’ll soon establish your rhythm effortlessly.
It’s worth noting that many sourdough recipes yield two loaves. They typically begin with doubled ingredients, then divide the dough during proofing. However, if a single loaf suffices for your needs, our recipe accommodates just that. Should you desire two loaves, feel free to double the ingredients as desired!
Step 1: Feed Sourdough Starter
In baking circles, the process of nurturing and preparing your starter for baking is often referred to as “building your levain.” Essentially, levain is another term for sourdough starter—a crucial leavening agent responsible for initiating fermentation and facilitating dough rise. If the concept of “feeding” your starter is unfamiliar to you, it may be beneficial to revisit our previous discussion on creating and maintaining a sourdough starter.
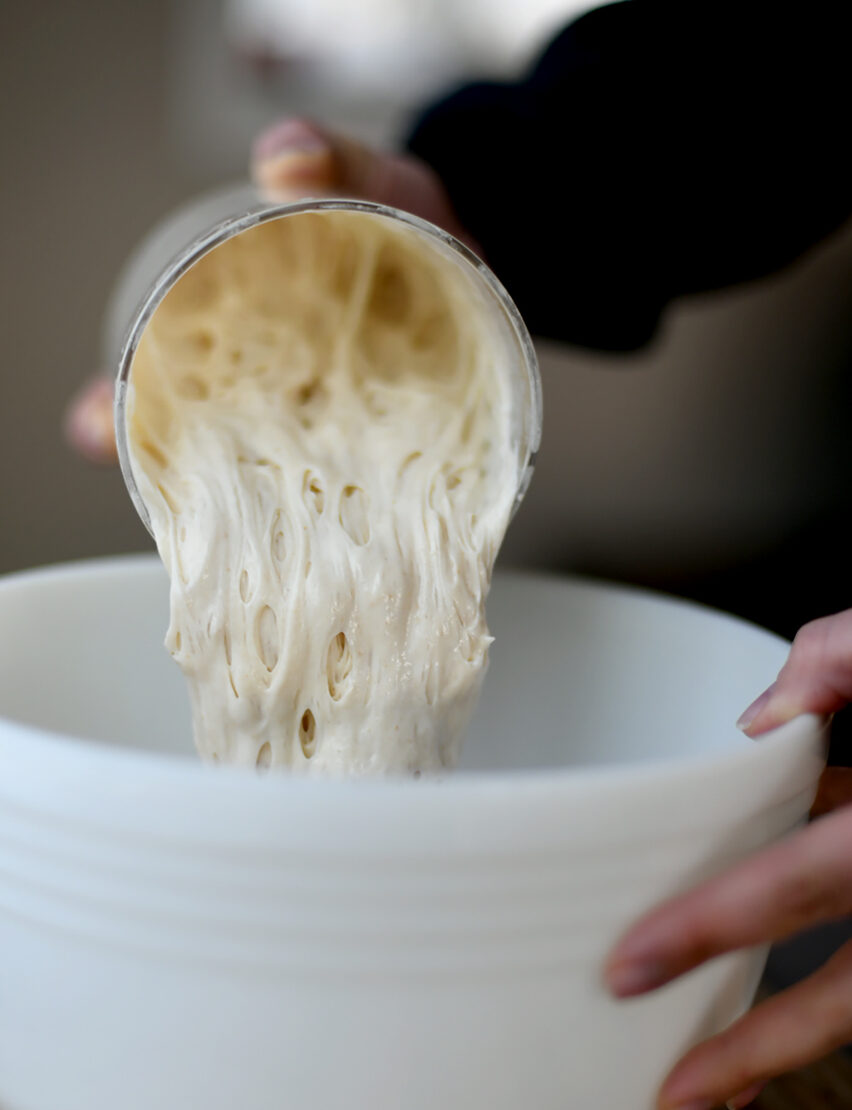
When incorporating your starter into the dough, it’s imperative that it reaches its peak activity level. Peak activity is indicated by vigorous bubbling within its container, a doubling or more in volume, and a stable stage where it no longer expands or rises further but has yet to collapse or deflate.
The duration required for a starter to reach peak activity can vary significantly from one home to another, influenced by factors such as yeast strains, their potency, ambient temperature conditions, and the type of flour used in feeding. The optimum temperature for activating a sourdough starter is typically around 75°F. We’ll delve further into temperature management in subsequent sections.
Occasionally, you may opt to feed your starter twice before baking to ensure it achieves a robust peak. For example, if your starter has been refrigerated for a week or two, it may benefit from two feeding sessions before use. If you store your starter in the refrigerator like we do, some pre-planning is necessary. We typically remove the starter from the refrigerator the night before we plan to make our dough, allowing it to gradually reach room temperature overnight. Subsequently, we discard and feed it in the morning upon waking and sometimes repeat this process midday to early afternoon before proceeding to step 2.
If you maintain your starter at room temperature consistently, ensure it’s adequately fed and thriving on the day you intend to prepare the dough, following the same guidelines outlined above.
Fiona, our active and bubbly sourdough starter
Step 2: Make Autolyse
An “autolyse” refers to the process of combining flour and water, allowing them to mingle and hydrate for about an hour before incorporating the salt and sourdough starter. When you sense that your starter is nearing its peak activity, it’s time to initiate your autolyse. It may take a bit of practice to gauge this timing accurately, but don’t stress too much about it. There have likely been occasions where we’ve used the starter without it being precisely at its peak, as long as it shows clear signs of activity and bubbling.
Flour
Begin by adding a total of 455 grams of flour to a large mixing bowl. While our preferred basic loaf typically comprises approximately 65% white bread flour, 30% whole wheat, and 5% rye, feel free to adjust these ratios according to your preference. For instance, for this example, you would use about 295 grams of bread flour, 137 grams of whole wheat, and 23 grams of rye flour, totaling 455 grams. The exact precision to the gram is unnecessary; simply ensure that the total amount is approximately 455 grams.
It’s worth noting the significance of weighing ingredients rather than relying on volume measurements like cups. In the world of sourdough baking, precision in ingredient quantities matters greatly. Different types and brands of flour possess varying densities, making volume measurements less accurate. While both bread flour and all-purpose flour can be utilized for sourdough, the slightly higher protein content in bread flour aids in achieving a better rise. Whole wheat and rye flours contribute to the nutritional value of the bread but can also affect its texture, making it denser if used excessively. Moreover, incorporating whole wheat or rye flour into your sourdough starter can noticeably boost its activity level.
Water
The recipe specifies a total of 345 grams of water, but we won’t be adding all of it at once! Opt for filtered water and avoid chlorinated tap water, as passing it through a basic carbon filter like a Brita will eliminate the chlorine.
To measure your water, follow the same process as you did with the flour, but with a liquid measuring cup. A handy tip I’ve learned is that 345 grams of water is nearly equivalent to 1.5 cups, at least in our measuring cup. By weighing this amount once and noting it down, you can skip the need to weigh the water each time you bake. For convenience, I recommend trying the same approach. Remember, if you reside in a humid climate, start with slightly less water (about 1.25 cups) and adjust as necessary.
It’s advisable to incorporate warm water. Adding cold water may lower the dough temperature, potentially slowing down the fermentation process. The ideal temperature is around 90 degrees Fahrenheit. You can either allow it to sit out to warm up or, as we prefer, quickly microwave it for 30 seconds. (Our water typically starts off very cold because we use the filtered spigot from our refrigerator.) If you have a probe thermometer on hand, even better! Check the temperature and aim for lukewarm water, neither too hot nor too cold to the touch.
Next, add most of the lukewarm water to your 455 grams of flour, reserving about 25 grams to add later. Similarly to before, I recommend gauging what 25 grams looks like in your measuring cup for future reference, eliminating the need for constant weighing. However, truth be told, I typically add most of it and save a small splash for later.
Mix & Sit
It’s time to roll up your sleeves and dive in! But before you do, make sure to wash your hands thoroughly. It’s also a good idea to remove any rings to avoid getting dough stuck in them. Now, immerse your hands in the mixture and thoroughly combine the 455 grams of flour with the 320 grams of water you’ve added. Be prepared, it’s likely to be quite sticky and messy at this stage.
As you mix, consider using a dough scraper to help scrape any bits off the sides of the bowl and your hands, aiding in the thorough incorporation of ingredients.
Congratulations! You’ve just completed the autolyse. Now, allow this mixture to rest for an hour at around 75°F. We typically cover our bowl with a damp tea towel to prevent the dough from drying out. If you’re using a dough tub, simply set the lid loosely on top. During this resting period, the flour becomes hydrated, activating enzymes that kickstart the fermentation process and promote gluten development.
Maintaining the optimal fermentation range of 70-80°F for your sourdough starter, autolyse, and final dough (in the subsequent step) is crucial. Many common frustrations, such as inactive starters or dough that fails to rise, often stem from less-than-ideal temperature conditions. It’s essential to avoid extreme temperature fluctuations, as excessive heat can accelerate proofing too rapidly, resulting in suboptimal outcomes.
Consider implementing these strategies to ensure your sourdough remains warm and content:
Position your sourdough in the warmest area of your home, particularly during cooler seasons like winter. Areas near a fireplace, heater, or on countertops adjacent to the stove can provide adequate warmth.
Utilize the heat emitted by household appliances, such as placing your sourdough near or atop a refrigerator, bearing in mind that heat rises.
Wrap your mixing bowl or container with traditional holiday string lights. This technique, often used for maintaining warmth in kombucha crocks during winter, is effective due to the gentle heat emitted. Opt for classic lights, as newer LED variants produce minimal heat.
Consider using a seedling heat mat if one is available, as it provides controlled warmth ideal for encouraging fermentation.
Store your sourdough inside the oven (turned off) with the oven light switched on, creating a cozy environment conducive to fermentation.
To monitor temperature levels accurately, you can employ either a food probe thermometer to gauge the dough’s temperature directly or an ambient thermometer positioned next to the bowl to assess the overall conditions in that specific spot.
In addition to temperature regulation, adjusting the feeding regimen can revitalize a sluggish sourdough starter. Incorporating whole wheat or rye flour during feeding can quickly invigorate the starter’s activity levels. A common practice involves feeding the starter a mixture of half bread flour and half whole wheat or rye flour to promote robust fermentation.
Step 3: It’s Dough Time!
Once the autolyse, consisting of the flour and water mixture, has been left to rest for approximately an hour and your starter has reached its peak activity, it’s time to combine them! Place a bowl on the scale once again and measure out roughly 100 grams of active starter into it. Precision isn’t crucial here; you can add anywhere from 95 to 105 grams. However, always ensure you retain at least half a cup of starter for future use—simply return any excess starter to the fridge if that’s where you store it. No need to feed it again at this point.
Add the 100 grams of sourdough starter, along with 10 grams of salt and the remaining 25 grams of water, into your autolyse. Mix by hand once more, using a pinching and folding motion to thoroughly incorporate the ingredients. The dough is likely to feel much wetter and looser compared to the previous mixing stage.
To help the dough firm up slightly, I highly recommend proceeding to Step 4! It significantly aids in achieving the desired consistency. However, if you prefer not to, that’s perfectly fine. Simply mix the dough as well as possible and allow it to rest in the bottom of the bowl before proceeding to Step 5.
Step 4: Slap & Fold
This step is pretty much what it sounds like. Don’t worry, I will show you in a video below. On a clean counter top, flop the dough down, fold it over itself, pick it up, flop it down again, fold, and repeat. The dough will start to tighten up almost immediately! Continue until it’s formed, but stop once the dough starts to get extra sticky on the counter. If needed, use a dough scraper to ease it back into your bowl or dough tub.
Step 5: Bulk Ferment
Now that your dough ball has been formed and nestled within its bowl or tub, it’s time to initiate the bulk fermentation process. During this phase, the starter begins to interact with the flour from the autolyse, kickstarting the fermentation process. You may notice the appearance of air bubbles in the dough as it undergoes bulk fermentation.
Cover the bowl with a damp tea towel or loosely fitting lid for your container, and find a warm spot to tuck it away once more. The dough will undergo bulk fermentation for approximately four hours, though occasionally, we extend this period by an hour or two without significant impact.
As mentioned earlier, the term “bulk ferment” denotes that the dough, if intended for multiple loaves, undergoes fermentation together as one cohesive mass at this stage. It’s during Step 7 that the dough is divided into individual portions for shaping. If you’ve doubled our recipe, fear not! Simply continue following the instructions as outlined.
Step 6: Stretch & Fold
In the initial phase of bulk fermentation, you’ll engage in several rounds of a technique known as “stretch and fold.” This method is aimed at enhancing the dough’s elasticity, facilitating the formation of a robust loaf, and introducing air into the mixture. Performing approximately 3 to 4 sets of stretch and fold is recommended during this period, spaced about half an hour apart, hence this process takes place “during the first half of bulk ferment.”
A single “set” of stretch and fold comprises the following steps: Using clean, moistened hands, gently lift and grasp one side of the dough ball. Handling sticky dough is easiest with wet hands. As the dough may have relaxed since it was placed in the bowl half an hour ago, slide your hands underneath and pull up on one side until you encounter resistance—this is the stretch. Next, fold the dough over itself, essentially creating a half-fold. Avoid pressing down on the dough after folding, as trapping air between the folds is beneficial. Rotate your bowl 90 degrees and repeat the process: stretch and fold.
Once you’ve completed a full rotation around the bowl, stretching and folding as you go, one set is finished. Some bakers may opt to go around the bowl more than once, aiming to achieve a consistent dough tension. I prefer to gauge the process by feel rather than adhering strictly to a set number of repetitions. If the dough becomes challenging to stretch without tearing, or if signs of tearing become apparent, it’s advisable to conclude the set to avoid compromising the gluten structure—the very strands responsible for providing the bread with optimal rise and structure. Repeat this process 2 or 3 more times, spaced approximately half an hour apart, before allowing the dough to rest for the remainder of the bulk fermentation period.
Optional: Add Goodies
When adding ingredients such as herbs, nuts, seeds, or dried fruit into the dough, we typically do so during the initial set of stretch and fold. This timing allows ample opportunity for the additions to be thoroughly mixed during subsequent stretch and fold cycles.
Alternatively, these additions could be incorporated earlier, at the same time as adding the sourdough starter, salt, and remaining water to the autolyse. We’ve experimented with both approaches, and both yield satisfactory results. If you’re adding ingredients that may pose a challenge to fully mix and distribute evenly, such as grated carrot, it’s advisable to add them earlier along with the starter.
Step 7: Form the Loaf
Once the dough has undergone bulk fermentation for approximately 4 hours, it’s time to begin the shaping process. Since the dough may have relaxed in the bowl during fermentation, give it one final stretch and fold to help tighten it up a bit. Next, transfer the dough ball onto a lightly floured surface. If you’ve doubled the recipe, this is where you’d divide the bulk dough into two equal portions before shaping each individually.
To shape the dough into a boule (round) shape, grasp the sides of the dough from opposite ends and pull and pinch them together at the center. Repeat this process on the alternate sides of the dough. Then, flip the dough ball over so that it’s resting on top of its pinched side.
For oval “batard” loaves, a similar process is followed, focusing more on pulling, pinching, and tucking from two sides to encourage a longer loaf shape.
Bench rest
Most bakers allow the dough to rest on “the bench” (counter) for about 10 minutes after the initial forming. After a 10 minute rest, repeat the forming process from above one last time before adding it to your proofing basket.
Proofing basket
A proofing basket, aka banneton, is a tool used in baking to help form the loaf, keeping its shape while it rises. The baskets are made from breathable materials and wick moisture away from the dough, which contributes to a good rise and really nice crust on the bread!
After forming the dough for the last time, ease your dough ball into a lightly floured proofing basket. Keep the pinched side of the dough down – that also helps keep the shape you formed.
We usually keep the cloth lining in, dusting it lightly with flour using a small stainless steel strainer, though the cloth can be removed and you could flour the wooden part directly instead. In place of a banneton, a small mixing bowl lined with a flour-dusted tea towel could work.
STEP 8: Proof
Now that the dough has been shaped and snugly nestled in its banneton, it’s time to let it proof overnight in the refrigerator. Cover the banneton and dough with a damp tea towel, beeswax wrap, or another suitable cover to prevent drying out. Proofing, in this context, refers to the final fermentation and rise of the dough.
Why the refrigerator? Let’s delve into the benefits of allowing the dough to undergo a prolonged, slow fermentation process:
Extended fermentation time allows beneficial bacteria to work longer, further breaking down and transforming carbohydrates into probiotics, making the bread healthier and easier to digest. This extended fermentation period also contributes to a more tangy, developed, and complex flavor profile. Loaves that undergo an extended proofing period in the fridge typically retain their shape better during baking. Moreover, refrigerating the dough offers flexibility in your baking schedule, as the duration for overnight proofing is quite adaptable. Aim for a cold proof of at least 6 hours; however, our dough typically stays in the fridge for approximately 10 to 12 hours, with some bakers opting for up to 18 hours. Feel free to experiment with proofing times based on your schedule and desired results.
STEP 9: Prepare to Bake
The following morning, with your dough proofed overnight, it’s time to proceed to baking. But first, a few preparatory steps:
Preheat the oven: Begin by preheating the oven to 475-500°F about an hour before baking. Adjust the temperature based on your oven’s specifications and performance. This preheating time is crucial to ensure the oven reaches its full temperature and to heat up your dutch oven or cast iron combo cooker thoroughly. Place the cooker in the oven during preheating to ensure it’s piping hot when the dough is added. Why use a Dutch oven or combo cooker? While it’s possible to bake sourdough on a flat oven sheet or pizza stone, utilizing a Dutch oven or combo cooker offers a significant advantage: steam! By enclosing the dough within the pot, you create a steamy environment that promotes a superior rise and results in a more moist loaf.
Additionally, the combo cooker’s versatility allows for various cooking methods, enhancing convenience. Retrieve the dough: Once the oven (and cooker) has been preheating for an hour, remove the dough from the refrigerator. To transfer the dough from its proofing basket or bowl, place a piece of parchment paper slightly larger than the basket size on top, followed by a cutting board. Flip the assembly upside down, gently lift the basket away, and the dough should now be on the cutting board, ready for baking. Remember, you can reuse the parchment paper for subsequent bakes.
Scoring (optional)
Using a bread lame, you may choose to score your loaf before baking. This means to make cuts in the top of the dough. Before doing so, I usually lightly dust the top of the dough with flour, using a small stainless steel strainer/sifter. Gently rub the flour around to evenly cover the dough before scoring with the lame. A bread lame is basically a razor blade, attached to a handle for ease of use and safety. This is not just for creating pretty patterns, though that is one fun use for it!
If you don’t give your dough a nice deep slash somewhere across the top or side before baking, its crust will sort of haphazardly split open somewhere (or, everywhere) during the rapid oven rise. It’s not a huge deal and won’t “ruin” your loaf, but most bakers prefer more controlled splitting.
Where you score the loaf will be the place that it splits open most. Deeper scores are used for directing that rapid expansion. It may create a nice little lip on your loaf. Bakers call this the “ear”. Smaller, shallow scoring can be used to create beautiful designs. Doing all of this while the loaf is still cold makes it much easier! It reduces the “drag” through the dough as you score.
STEP 10: Bake
Once you’ve flipped the chilled dough onto the cutting board (and optionally scored it), it’s time to swiftly transfer it into the oven! Carefully guide the loaf and parchment paper into the preheated Dutch oven or combo cooker. The combo cooker proves particularly useful here. Position the cutting board near the edge of the (quite hot!) bottom pan section, grasp the parchment paper’s sides, and gently slide the entire assembly off the board and into the cooker. Cover with the lid and place it in the oven.
You’ll likely want to invest in high-heat rated oven mitts as standard ones aren’t designed to withstand temperatures up to 500°F and could even melt. It’s crucial to protect yourself, as second-degree burns from such high temperatures are no laughing matter.
Bake covered for 35 minutes at 475-500°F. Say hello to steam! Then, remove it from the oven and uncover it for the exciting part – the big reveal! But don’t linger too long; swiftly return it to the oven to finish baking, uncovered, for a final 7-10 minutes. Once baked, promptly transfer the loaf from the hot pan to a cooling rack.
Tip to Prevent a Burned Bottom: Here’s a fantastic tip from one of our blog followers, Bobbi, to prevent the bottom of the loaf from becoming overly crispy. During baking, place a cookie sheet on the empty oven rack just below the one holding your baking vessel (e.g., combo cooker or Dutch oven). This sheet absorbs and blocks the excess heat from reaching your precious loaf, preventing it from burning.
STEP 11: ENJOY!
Allow the loaf to cool for a few hours before slicing into it. I know, the temptation to dive right in is nearly irresistible! However, it’s essential to resist the urge as the steam continues to work its magic inside, and you don’t want to release it prematurely.
Once it’s sufficiently cooled, grab a knife and carefully cut into it. If you find that your knife is mashing and tearing the bread, it might be time to invest in a decent bread knife.
Now, take a peek inside! How does it look? Are you absolutely thrilled? Snap a “crumb shot” and flaunt it to your friends! Not familiar with the term? A crumb shot is a photo of a loaf cut in half, revealing its inner structure, as depicted below. The “crumb” refers to the pattern, texture, and holes inside the bread.
Even if your loaf doesn’t boast massive air pockets, don’t fret! In my opinion, bigger holes don’t necessarily equate to better bread. While some bakers take pride in towering loaves with an airy, open crumb, I believe a slice of bread packed with holes can make it challenging to load up with delicious toppings like avocado or hummus!
And there you have it!
I understand that it might not initially seem straightforward; in fact, it might even feel a bit overwhelming at first glance. Trust me, I’ve been there. That’s exactly how I felt when we embarked on this hobby. But don’t let that deter you! Dive right in and give it your best shot. Remember, perfection isn’t the aim here. Just enjoy the process! With practice, you’ll master it.
As for storing fresh bread, our preferred method is wrapping the loaf in a clean tea towel before placing it inside a brown paper bag. Storing bread in just a bag tends to lead to quick drying, while sealing it in a container can result in it becoming soft, stale, or even moldy. Homemade bread inevitably loses some of its freshness after a few days, but fear not! A quick toast or broil can easily revive it when needed.
Follow this recipe to make your own fresh, crusty, fluffy loaf of homemade sourdough bread. Combining white bread flour with some whole wheat and touch of rye makes for a well-balanced, nutritious loaf. You’ll need an established sourdough starter for this recipe, which is what will give the bread rise – using natural yeasts and beneficial bacteria. If you don’t have a sourdough starter yet, you can bring home a portion of our healthy established organic sourdough starter culture to create your own here!
Step-by-step Guide to Reactivating Your Dehydrated Living Sourdough Starter Culture
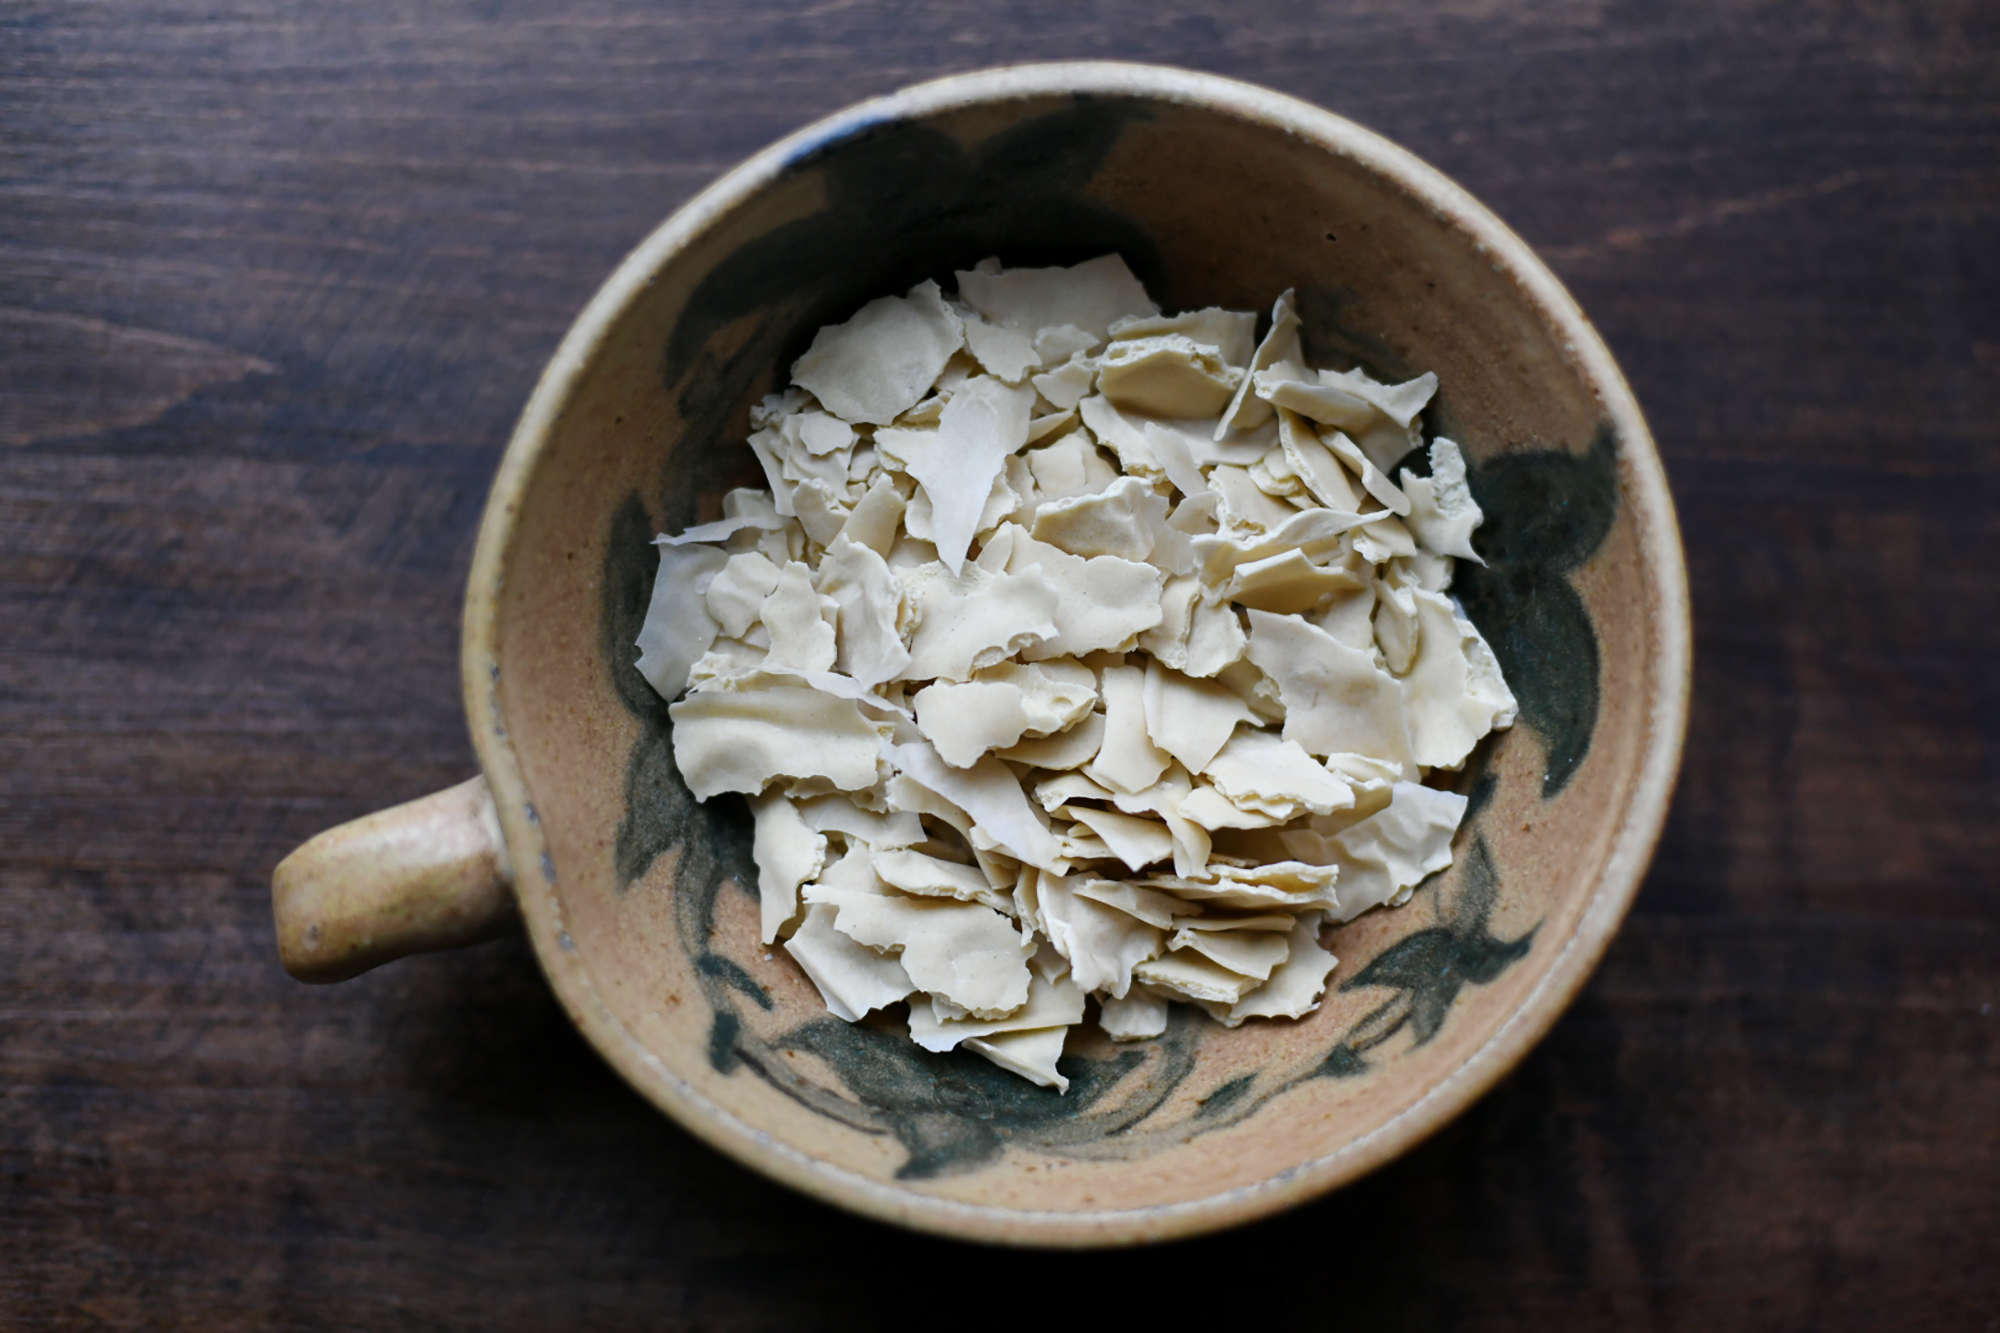
Dehydrated (but very much alive!) organic sourdough starter
Welcome to your step-by-step guide on how to reactivate a dry sourdough starter. The whole process takes just under a week, but is very easy to do! By the end, a small bit of dry sourdough starter powder will transform into a voluminous, bubbly, active sourdough starter – ready to bake with. With a little love and weekly care, one sourdough starter will provide you with years of delicious, nutritious, and rewarding sourdough baking at home.
If you bought your dehydrated organic sourdough starter from us here at Delgado Homestead, thank you! The process explained here will work to reactivate any dehydrated sourdough starter – though you may need to tweak the water ratios a bit, as explained in the consistency section below.
Jump ahead to the end of this article to get a printable, condensed version of these instructions. Once you complete the sourdough starter activation process, head over to our ongoing sourdough starter feeding, maintenance and storage guide.
What is a dry sourdough starter?
Dry sourdough starter is made by dehydrating a portion of an active, healthy sourdough starter. When we dry our organic starter, we do so on a very low “living foods” setting in a food dehydrator. This preserves the beneficial lactic acid bacteria and wild yeasts that are inside the starter. They are responsible for making a sourdough starter bubble, and sourdough bread rise. The dry starter is still very much alive! It is simply in a dormant state and needs to be reactivated.
Using a dry sourdough starter is a great way to kick-start your sourdough baking journey. It is almost fool-proof! We created our original sourdough starter from scratch. Most people find that process to be pretty straight forward, though it does take more ingredients to get going. Some people have struggled to make a starter from scratch, and ended up with either moldy or non-active starters. By using a dry sourdough starter, you’re working with a healthy established culture from the start.
How to Reactivate a Dry Sourdough Starter
Your powdered dry sourdough starter needs to be rehydrated and fed to feel alive once again. The colonies of lactobacillus and yeast within the sourdough starter feed on starches in flour. However, you can’t simply mix a little dry sourdough starter in with a large bowl of flour and water. Too much flour and water will overwhelm the dry starter at first. She isn’t strong enough for all that yet. Rather, we need to start small and slowly build up the volume of starter, flour, and water gradually. That is why the process of reactivating a dry sourdough starter usually takes about a week. The final result will be several cups of active starter!
Before we get into it, let’s go over a few tips and expectations.
Consistency
These instructions were developed using Delgado Homestead’s Fiona dry sourdough starter culture. They will work with other other dehydrated sourdough starters, though the measurements and consistency may vary slightly depending on the particular dry sourdough starter you use. Every individual home environment (e.g. different elevations and humidity) could also lead to some variations.
No matter your starter or home environment, the goal throughout this process is to maintain a thick gooey starter. It should settle smoothly into the bottom of the container (meaning, not clump into a firm ball of dough like cookie batter) but it shouldn’t be easy to pour or runny like pancake batter. The sourdough starter should be somewhere in between. Eventually, an active sourdough starter will be fluffy and spongy.
If at any time throughout this process you feel that your starter has become too stiff or too thin, feel free to add a sprinkle more flour or splash of water until the desired consistency is reached. Do so in small quantities, such as a teaspoon at a time (especially in the first few days).
Temperature
The beneficial bacteria and yeast that live in your sourdough starter are most happy, active and balanced in a temperature range of about 70 to 75°F. Cooler conditions will lead to slower activation and a generally less vigorous starter. Warmer temperatures may make the process go faster.
It is okay if your house is cooler or warmer than “ideal” – just keep in mind that it can lead to a slightly different timetable and starter behavior than shown here.
Timing
To reactivate your dry sourdough starter, you are going to need to feed it once per day for the duration of about a week. It is best if the feedings occur about 24 hours apart, though it doesn’t need to be exact. Choose a time of day to start that you’re usually available and will be easy to remember.
Once the starter is reactivated, it won’t need daily feeding (unless you choose to store it at room temperature). We store ours in the refrigerator and only take it out to feed/bake on the weekend.
Let’s do this!
SUPPLIES NEEDED
1 package of dry sourdough starter powder or flakes (approximately 1 heaping half-tablespoon)
All purpose flour or bread flour. We have experimented with reactivating a dry sourdough starter with both types of flours, and it works perfectly with both. Note that we use certified organic flour, which the microbes generally prefer but isn’t absolutely necessary. If you’d like to transition your starter to whole wheat or rye in the future, you absolutely can! However, I suggest using simple white flour when first reactivating the dry sourdough starter.
Filtered water or spring water. Ideally, the water used to activate and maintain a sourdough starter is free of chlorine.
A pint size mason jar (or similar). Given the small volume, you can start the process of reactivating your dry sourdough starter in an average jar, glass, or other similar size container.
A larger glass storage container. On day five of this process, we will transfer the activated sourdough starter into a larger container – its forever home! We use this really cool gizmo called a Goldie by Sourhouse. It keeps the starter at the perfect temperature and you never have to worry about it being too cold or too hot in the house.
INSTRUCTIONS
Day 1
In a clean pint-size mason jar or similar, combine one full Delgado Homestead package of Fiona dry sourdough starter (approximately 1 heaping half-tablespoon) with 1.5 tablespoons of filtered lukewarm water. Avoid using cold water throughout this process, as it will slow down the activity of the starter. Allow the dry sourdough starter and water to sit for several minutes to soften and combine. Use a fork or spoon to stir it on occasion.
Then, mix in 1 tablespoon of flour. Mix thoroughly. Try to avoid making a huge mess of the sides of your jar. Use a small spatula to clean up any hefty smears.
Cover the jar with a lid. It doesn’t necessarily need to be air-tight; the purpose is to prevent it from drying out or allowing mold spores in. I only lightly screw on BPA-free plastic jar lids. If you’re using a drinking glass or other container that doesn’t have a lid, simply set a plate on top, add plastic wrap, or a reusable beeswax wrap on top.
Finally, set the container in a moderately warm location. Come back in about 24 hours.
Day 2
Into the same jar as yesterday, add 1 tablespoon of flour and 2 teaspoons of water to the starter. Mix well. Cover the jar or container again, and allow it to sit for another 24 hours.
Have you thought about a name for your sourdough starter yet? There is a tradition in the sourdough baking world to name your sourdough starter. In fact, it is considered bad luck if you don’t! Today sounds like a good day to pick a name.
Day 3
By day three, you may start to see fermentation bubbles in the starter! Repeat the same process as yesterday, adding 1 tablespoon of flour and 2 teaspoons of water. Mix, cover, and set aside.
During the next 24 hours, your starter may start to rise. Just for fun, mark the level of the starter on the side of the container after mixing (either with a washable glass marker or with a rubber band around the jar) and watch how much it rises.
Day 4
Today, we are going to step up the volume more than before. The growing sourdough starter should smell really nice by now, like sourdough and yeast – reminiscent of a brewery or bakery! That is an excellent sign she is getting stronger and can handle more food.
This time, add 1/3 cup flour and 1/4 cup water.
Mix well, until it looks like most of the flour clumps are broken up and the starter is fairly smooth.
Cover the container, note the level of the starter on the side of the container, and set it aside again. If you’re using a pint jar, it should be about ⅓ full now.
Within 12 to 24 hours, your starter should bubble, rise, and nearly double in size! If your starter doesn’t appear to rise at this stage, see the troubleshooting notes at the bottom of this article. You may need to adjust your consistency, but it doesn’t mean the starter isn’t alive! If it is too runny, it won’t rise well. Different types of flours, humidity levels, and even measuring spoon sets can lead to some variation between our starter consistency and your own.
On the other hand, if your starter doubles in size and then quickly falls back down to the original starting point, you can move on to the next step sooner if you wish. That is a signal that she is getting hungry. (Smears on the side of the container are a sign that it rose and fell.) For example, if you added flour and water in the morning, it rose by midday, and fell back down by the evening – you could do the next feeding that same evening. Or, simply wait until the next morning. Either way is fine.
Day 5
If your starter is now actively bubbling, rising and falling – congratulations! You have successfully reactivated the dry sourdough starter. When a starter rises to double its size and then stays elevated, that is considered “peak activity”. Technically, it is ready to bake with at that point! However, at this stage in our reactivation journey, we don’t have quite enough volume for ongoing baking and maintenance. Every time you bake sourdough you must leave behind at least a half a cup of starter to feed and continue on. Therefore, we need to add a bit more bulk to the starter, and also move it into a larger container – her forever home.
Transfer your starter from the mason jar into a clean mixing bowl.
Now, add 1 scant cup of fresh flour and 1/2 cup of filtered lukewarm water. These measurements are approximately equal weights of flour and water in grams, which is the recommended flour-to-water ratio for ongoing starter maintenance.
Mix well, and then transfer the starter into a new larger container of choice. Set it aside at room temperature once again.
Choosing a final storage container:
We like to store our sourdough starter in a flip top 1-liter glass container (34 ounces) or a 1-liter Goldie by Sourhouse. It provides sufficient space for the starter to be fed and double in size, and it also fits well in our fridge. We only ever bake one sourdough loaf or recipe at a time, and most of our sourdough recipes call for about 1/2 to 1 cup of active starter on average.
However, if you plan to make several loaves of bread or many sourdough goodies at once, you will want to use at least a 1.5 liter to even a 2 liter container and maintain a larger volume of starter than we do. You can always scale up later if you decide to!
*If you choose to use a larger container (1.5 to 2 liter) from the get-go, allow the starter to rise and fall once in the new large container. That will likely take several hours to one day. Then, feed the starter again in the same manner (1 scant cup flour and 1/2 cup water) to increase your overall volume once more before proceeding to the next step.
Fiona, our active and bubbly sourdough starter
My sourdough starter is active! Now what?
At this time, I suggest you head on over to ourarticle about sourdough starter ongoing maintenance. There, I go over the various ways you can feed and store your starter. A sourdough starter needs to be periodically fed. When it goes unfed, the starter will shrink down and eventually develop a layer of fermentation byproduct called hooch. That is a sure sign it is hungry. If enough time passes, a starved sourdough starter may die.
The feeding frequency depends on if you choose to keep your starter at room temperature or in the refrigerator. Maintaining a starter at room temperature requires significantly more work (and flour!) – as it needs to be fed once or twice per day! I would only recommend this for serious bakers who are using their starter many times per week. On the other hand, you can store your starter in the refrigerator like we do. Then, it will only need to be fed once every week or two.
If you get to the final step and aren’t sure how to proceed, simply put the active starter in the refrigerator for now.
Going forward
Clearly, you can’t infinitely add more flour and water to your container… the starter will quickly outgrow it’s home! In our starter maintenance article, you’ll learn a new style of feeding that is a bit different than what we’ve been doing to build up our starter here. Now when you feed your sourdough starter, you’ll almost always discard a portion before adding fresh flour and water. That may mean removing some to use in a recipe for baking, or simply removing some starter from the container to make space for more. The discarded portion can be used to make crackers or pancakes, fed to chickens, or added to a compost pile.
Transitioning your sourdough starter to a different kind of flour
If you want to feed your sourdough starter whole wheat, rye, or another type of flour, feel free to do so! In fact, many starters become even more vigorously active with wheat and rye flour. I suggest easing the starter into the change, by gradually adding the new flour type mixed with the original flour that it is accustomed to eating.
For example, if you’re currently feeding your starter all-purpose flour, try using 3/4 cup AP and 1/4 cup whole wheat for the first feeding, see how it responds, then increase to half and half, and so on with subsequent feedings.
TROUBLESHOOTING
My starter isn’t rising!
A couple of issues may cause a sourdough starter to not rise well. For one, it could be too cold in your home – though there should be at least some activity, even in the coolest conditions. A more common cause is the starter consistency.
Starter is too wet
When a starter is too wet or runny, the fermentation bubbles may rise right through and out of the mixture, rather than being trapped inside. The starter is very much alive, but doesn’t have enough structure to grow. If at any time your starter doesn’t rise and also seems easy to pour (like thin pancake batter), is it probably too wet. Stir in more flour to stiffen it up, adding just a few tablespoons at a time until it becomes more thick and gooey (but not a solid ball of dough). In a more stiff sourdough starter, fermentation bubbles become trapped inside the mixture, causing it to grow and become more spongy.
House is too cold
If your house is on the cool side, you could store your sourdough starter near a warm appliance, use an electric heating pad or seedling heat mat nearby (next to but not right against it – that would likely be too warm).
Last but not least, our favorite easy way to keep both sourdough starter and proofing bread dough warm during the cold winter months is to keep it inside the oven – with the oven OFF, but the oven light on! It creates the perfect cozy home. It if gets too warm in the oven, keep the door cracked open slightly. Remember to monitor temperatures in the area of the starter container with an ambient thermometer. We only do this when it is below 65°F in the house.
It is hungry.
Once your starter rises and falls, it won’t rise again until it is fed again. The yeast and bacteria within the sourdough starter colony can be self-limiting, and will only actively grow when there is “food” (fresh flour) left to consume. So, if it has been sitting out for a few days and it hasn’t risen yet, it won’t magically start doing so! In fact, if it sits too long it will develop a layer of fermentation byproduct called hooch, described below.
If your starter has seemed to stagnate, try discarding half of the contents in the container and then feeding it with a scant 1 cup of fresh flour plus 1/2 cup of lukewarm filtered water. It should perk back up! Then, continue to the ongoing starter care and maintenance instructions and either store it in the fridge or continue feeding daily.
What is that dark liquid on the top of my sourdough starter?
When the yeast in a sourdough starter has eaten up all of its available food and is hungry for more, it produces a thin dark layer of liquid on top. This is an indication that your starter is more active than you’re feeding it. It is a naturally-occurring alcohol created by the yeast, called hooch. This is totally normal! It will most likely happen after the starter has risen to peak activity, fallen back down, and has neglected to be fed. Or, if the starter is ignored in the refrigerator for several weeks. You can either pour the hooch off the top, or simply mix it back in, then discard and feed as usual.
And that is how you reactivate Fiona dry sourdough starter!
By starting with an established healthy colony of lactic acid bacteria and yeast, you’re already ahead of the game. You’ll be baking your first loaf of sourdough bread in no time!
Follow this step-by-step guide to reactivate Fiona, your dry sourdough starter. The process takes about a week, but is very easy to do! By the end, a small amount of dry sourdough starter will transform into a voluminous, bubbly, active culture – ready to bake with. With a little love and weekly care, one sourdough starter will provide you with years and years of delicious, nutritious, and rewarding sourdough baking at home.
Oh, the remarkable sourdough starter! That ravenous, effervescent, gurgling entity residing in your kitchen. Your latest companion. And much like any living companion, nourishing your sourdough starter is essential for its well-being! Fortunately, tending to your sourdough starter can be as effortless or as intricate as you prefer, based on your storage method and baking frequency. Unlike conventional pets, however, a sourdough starter expresses gratitude for your attention and affection by yielding mouthwatering, artisanal sourdough bread! Truly a rewarding endeavor.
Keep reading to discover the steps for nourishing your sourdough starter to ensure its vitality and contentment! We’ll explore methods for feeding it using either weight or volume measurements. Additionally, we’ll delve into considerations like selecting the appropriate flour for feeding and determining the storage location—whether in the refrigerator or at room temperature— which influences the feeding schedule. Lastly, we’ll cover preparing a sourdough starter for baking bread and address common inquiries regarding sourdough starter well-being.
If you happen to be starting out with a dehydrated sourdough starter (like the organic dry starter we offer here) you’ll want to tune into this article – specifically about how to reactivate a dry sourdough starter culture.
Don’t miss the printable cheat-sheet at the end!
FEEDING A SOURDOUGH STARTER: BACKGROUND
What is “Feeding” a Sourdough Starter?
Within the ecosystem of your sourdough starter reside thriving communities of yeast and lactic acid bacteria. As these beneficial microorganisms consume carbohydrates present in the flour, they undergo fermentation, transforming those starches into CO2. This natural process is responsible for the delightful airy rise observed in sourdough bread! However, when their food source is depleted, these microbes become hungry, their activity diminishes, and the sourdough starter loses its ability to leaven properly. If neglected and deprived of nourishment for too long, the microbial colony may perish entirely.
Although commonly referred to as “feeding” among bakers, the process involves more than simply adding fresh ingredients. Feeding a sourdough starter typically entails discarding a portion of the existing starter before replenishing it with flour and water. This practice of removing a portion of the colony, along with accumulated metabolic byproducts, while simultaneously introducing a new food source, helps maintain equilibrium within the starter. It also prevents the accumulation of excess starter beyond the capacity of the storage container.
How Much Sourdough Starter to Maintain
The quantity of sourdough starter you opt to maintain and nourish is contingent upon your baking requirements. For instance, if your weekend baking routine involves crafting two or more loaves of bread simultaneously, each loaf will necessitate a specific quantity of starter.
In our basic sourdough bread recipe, approximately 100 grams of active starter is recommended. Consequently, you would require a minimum of 200 grams, with some remaining to sustain and perpetuate the starter. It’s essential never to exhaust all of your starter in a single recipe! Conversely, if you typically bake only one loaf at a time, a smaller amount of starter suffices for maintenance.
Storage Container & Size
Store your sourdough starter in a container that has enough space for the starter itself, plus room for at least tripling in size while it is active. A glass container is a great choice. There are mixed opinions about whether or not it should have an air tight lid. The conclusion we’ve come to is this: it works both ways. However, you never want to leave your container completely open without some type of cover to prevent debris, dust, or fruit flies from getting in! Therefore, either keep a lid sitting loosely on top, or cover it with a coffee filter or lint-free, tight woven cloth.
We keep our starter in a 1 liter (about 1 quart) flip-top glass container. The seal is not perfectly air tight even when clamped closed, so it does allow for some gasses (and starter) to escape. If you want to maintain a larger starter, consider using a 2 liter or half-gallon container.
Where to Store Your Sourdough Starter: Room Temperature or Refrigerator
When preparing your starter for baking, the optimal temperature for reaching peak activity ranges from 70 to 75 degrees Fahrenheit. However, this doesn’t imply that you must maintain this temperature consistently! Healthy sourdough starters can be stored either at room temperature or in the refrigerator. Refrigeration is an excellent option for individuals with busy schedules and serves as an ideal solution during vacations away from home. For longer periods exceeding a couple of weeks, a starter can be frozen, remaining completely dormant until thawed and fed once more.
Here are some key distinctions between a refrigerated and room temperature sourdough starter:
Flavor
Sourdough starters acquire distinct flavor profiles based on their storage location, influenced by the strains of yeast and lactic acid bacteria present in different environments. Storage temperature plays a significant role.
A sourdough starter kept at room temperature develops a sharper, more acidic “sour” flavor profile, whereas those stored in cooler conditions yield a tangy taste reminiscent of yogurt.
Strive to establish a regular feeding regimen. Consider feeding your sourdough starter at consistent intervals, whether daily or weekly. It appears that the yeast and lactic acid bacteria adapt to this routine, intuitively gauging the time and food available before the next feeding, and regulating their activity accordingly. Clever little organisms!
How often should I feed my sourdough starter?
If you bake frequently or have the time to attend to your starter daily, storing it on your countertop is ideal. However, at room temperature, the sourdough starter remains highly active and requires daily feeding. Some dedicated bakers even feed theirs twice a day!
Conversely, sourdough starters kept in the refrigerator only need weekly feeding. The cooler temperatures maintain the microbes’ viability while reducing their activity, necessitating less frequent feeding. This option suits individuals who bake intermittently, like us, just a few times per month.
Occasionally, we extend the intervals between feedings for our refrigerated starter, sometimes even leaving it untouched for several weeks—and it fares quite well! Though I wouldn’t necessarily recommend pushing it to a couple of months. A robust, established starter can endure some neglect. However, the longer the gap between feedings, the slower the starter may become, requiring multiple feedings before use.
Additionally, be aware that a harmless layer of dark liquid called “hooch” may accumulate over time. Further information on that is provided below. Unsure if your neglected starter is still viable? As long as it lacks visible fuzzy mold and perks up after feeding, it’s safe to use!
The moment has arrived to feed your sourdough starter!
FEEDING A SOURDOUGH STARTER: INSTRUCTIONS
Preparing to Feed
Prepare for Activation: If opting to store your sourdough starter in the refrigerator, allow it to awaken and reach room temperature before initiating feeding. Typically, we retrieve ours from the fridge the night before a planned day of feeding and baking or in the morning, commencing feeding later in the day.
Portion Reduction: Whether your starter has been actively fermenting on the countertop or residing in the refrigerator in a quiescent state, it’s imperative to discard a portion of the active sourdough starter before feeding. The amount discarded should align with the quantity you intend to feed, as detailed below.
To discard, gently stir the starter to expel any trapped air. Then, gradually extract small amounts from the container until the desired quantity remains. We typically transfer these removed portions to a separate bowl, using them to feed chickens, create sourdough discard recipes such as starter crackers or granola, or compost them.
Following the removal of the portion, it’s time to incorporate fresh flour and water into the starter!
How to Feed a Sourdough Starter Using Weight:
Some bakers advocate feeding the starter by weight, insisting it’s the superior method. Undoubtedly, it offers the utmost precision and consistency, considering the varying weights and volumes of different flours. To feed a sourdough starter by weight, simply mix equal portions of starter, flour, and water, like 100 grams of each for a standard feeding, or 200 grams for a larger starter.
For this approach, knowing the empty weight of your starter storage container proves invaluable, aiding in the effortless determination of the remaining starter after discarding. Naturally, a kitchen scale is indispensable.
However, we’ve shifted away from weighing ingredients during feedings. While weighing is crucial during initial starter creation or when preparing dough for a loaf, we’ve found it burdensome for routine feedings. Instead, we rely on a blend of traditional cup measurements and a hint of good old-fashioned estimation.
How to Feed a Sourdough Starter Using Volume Measurements:
To feed a sourdough starter using traditional volume measurements, simply combine 1 part remaining sourdough starter, 1 part water, and slightly less than 2 parts flour. For instance, 1 cup of starter, 1 cup of water, and nearly 2 cups of flour. In our kitchen, we incorporate approximately 1 scant cup of flour and 1/2 cup of filtered water with the remaining ½ to ¾ cup of starter left in its storage container after discarding. Since we typically bake one loaf at a time, this modest quantity suits our needs perfectly.
For those who favor this method, consider this handy tip: measure the exact starter quantity once and visually note how much it fills your starter storage container. Our usual half to three-quarter cup of starter fills the container to about a knuckle or inch deep. Nowadays, I simply estimate the starter volume, eliminating an additional step in measurement.
Now Feed
Incorporate the correct proportions of flour and water into your starter, ensuring thorough stirring to eliminate any flour clumps. We typically do this directly in the starter storage container. However, some bakers prefer transferring everything to a separate bowl, combining the ingredients, and then returning it to the original container or transferring it to a fresh one. The choice is yours!
What Type of Flour & Water to Feed Sourdough Starter
Water
When feeding a sourdough starter, it’s advisable to utilize room temperature to slightly warm water. This is especially crucial if your household tends to be cooler, and you’re aiming to prepare the starter for baking promptly. Adding cold water to the mixture will decelerate the activity of the microbes and prolong the activation process. In instances when time is limited, we occasionally microwave the water for a brief 30 seconds. However, it’s important to avoid adding hot water—just lukewarm water suffices.
Furthermore, opt for filtered or non-chlorinated water for all your sourdough (and other fermenting!) endeavors whenever feasible. Chlorine can impede the growth of our beneficial bacteria and disrupt the process. We typically filter our water through a basic carbon filter, such as the one in the fridge dispenser, with satisfactory results. Alternatively, you can let a container of water sit out on the counter for 12 to 24 hours to allow the chlorine to dissipate.
Flour
The choice of flour you use to nourish your sourdough starter is entirely up to your preference! With numerous options available, it’s worth experimenting to see the results you achieve. One popular choice is white all-purpose flour. In our case, we opt for organic bread flour to fulfill the “white” flour component of our starter and dough. Bread flour, with its slightly higher protein content, contributes to a stronger structure.
When feeding our starter, we often combine half bread flour with either whole wheat or rye flour for the remaining portion. Whole wheat and rye are renowned for swiftly boosting the activity and rise of the starter due to their richer nutrient content. Additionally, maintaining a sourdough starter with alternative flours such as einkorn flour or non-wheat options like brown rice flour is entirely feasible.
Getting Your Starter Ready for Baking
Many sourdough recipes require the sourdough starter to be “active” or added at “peak activity”. But what exactly does that entail? A sourdough starter is deemed at peak activity when it’s visibly expanded and bubbly. It should have at least doubled in size or more, showing no further growth but not yet beginning to deflate.
The duration for your starter to reach peak activity after feeding varies based on several factors. These factors include what and how it was fed, the ambient temperature it’s stored at, and the vigor and maturity of the starter. Warmer temperatures accelerate activity, while cooler temperatures slow it down.
If your starter is stored at room temperature, reaching peak activity is relatively effortless as it peaks daily. However, for those of us who store our starters in the refrigerator, it requires some advance planning to prepare for baking. When we anticipate baking in the next day or two, we take the resting sourdough starter out of the fridge and place it on the counter to warm up. Then, we feed it at least twice before using it in a recipe to ensure it reaches peak activity.
Our active and bubbly starter ready for baking
You will develop your own feeding and baking schedule with time.
Here’s a breakdown of our typical routine: Let’s say we plan to bake a loaf on Saturday morning. We remove the starter from the fridge on Thursday evening, allowing it to warm up overnight. Then, on Friday morning, we feed it once, followed by another feeding early Friday afternoon. Ideally, the last feeding should be administered at least three to four hours before beginning the dough-making process. We prepare the dough on Friday evening, allow it to proof overnight in the fridge, and bake it on Saturday morning.
What to do after removing a portion of your sourdough starter to bake with:
Once you’ve taken some starter for a recipe, you have several options for what to do next—and each method is effective! An established sourdough starter is quite forgiving.
One option is to feed your starter once more (adding flour and water, but skipping the discard step since you essentially did that to use in the recipe), allowing it to sit out at room temperature for an hour or two to “feed.” Then, return it to the refrigerator—assuming that’s where you store it.
Alternatively, you can feed the starter and immediately return it to the refrigerator once you’re finished using it. It will still ferment at cooler temperatures, albeit more slowly.
Finally, sometimes we return our starter to the fridge right after use, either at peak activity or just afterward, without feeding it again that day. However, keep in mind that this may result in a slightly lower volume the next time you use it. In such cases, you may want to feed it with flour and water but skip the discard step during the next baking session when waking it up.
What is that dark liquid on the top of my sourdough starter?
This, my friends, is a clear indicator that you haven’t been maintaining your starter’s feeding schedule to its satisfaction. The thin layer of dark liquid that occasionally forms on top of sourdough starter is known as hooch. It signifies that your starter is more active than you’ve been feeding it, has depleted its food source, and is craving more—more than just hungry, it’s hangry.
But fear not, as it’s a simple issue to address and poses no harm! Hooch is a natural byproduct of fermentation (alcohol) created by the hungry yeast and bacteria. It typically emits a strong acidic scent reminiscent of vinegar. When you encounter it, you can either pour off the hooch or simply mix it back into the starter, then proceed with discarding and feeding as usual. However, it’s important to take it as a cue that your feeding schedule may need adjustment. Our starter often develops hooch when we’ve missed a week of feeding.
What if my sourdough starter is bubbling, but not rising?
If your sourdough starter is actively bubbling but fails to rise within a few hours of feeding, the mixture may be excessively wet or runny. Variances in home humidity and flour types can result in different consistencies. When a starter is overly wet and thin, fermentation bubbles may easily escape from the mixture. Ideally, the air bubbles should be mostly contained within the starter, causing it to expand and become spongy.
To remedy this issue, simply incorporate more flour to thicken the mixture. Gradually add a couple of tablespoons at a time until the starter reaches the desired consistency—somewhere between pancake batter and thick, stiff dough.
Now you know how to feed your sourdough starter. Don’t make it hangry!
Stay tuned for more sourdough recipes to come! Thank you for reading. Please feel free to ask questions, and spread the sourdough love by sharing this post.
Handmade Tortillas That Are Warm, Flaky and Really Really Good
Sourdough flour tortillas are easy to make and super tasty!
Who doesn’t love tacos? Once you make them with real tortillas, you will discover how much more you can love tacos.
It was way too long since I ate a fresh, handmade flour tortilla from our favorite Mexican restaurant in San Diego, Old Town Mexican Cafe. There’s nothing like eating a handmade flour tortilla fresh off the comal. These ladies would throw it down at the front of the restaurant so everybody can smell the goodness and watch the magic happen while they wait for their table.
Since moving our family from Southern California to the Pacific Northwest, we have really missed authentic Mexican food. So, it has made me seriously step my game up at home. This includes trying my hand at making tortillas.
We eat so many tortillas in this household. Our kids will eat any meat as long as it’s wrapped in some kind of tortilla. Whether it’s fried corn tortillas or warm and buttered flour tortillas, it is a staple around here. So after we got into the sourdough game, it feels good to know we are feeding our family tortillas that are made by hand without all the bullshit additives.
The flour you use will make a huge difference. If you can, go with Sonora wheat, which is a low-protein, soft white wheat. We often use pastry flour which will give you a similar soft and tender tortilla. If you can’t use either Sonora wheat or pastry flour, you can use all-purpose flour, but the tortillas won’t be quite as tender and soft (but still delicious).
When you make flour tortillas with sourdough starter, they come out extra flaky and springy with a delightful tangy finish. You also get the added health benefits from the wild yeast and beneficial lactic acid bacteria that are in the sourdough starter.
Fiona, our active and bubbly sourdough starter
Need a starter? Buy your own dehydrated organic “Fiona” sourdough starter here. It comes with easy instructions and will last a lifetime of baking!
Put the flour into a medium bowl. Add the lard and, using your fingers, blend the lard into the flour until the mixture is crumbly and the pieces of lard are pea-sized. In a small bowl, combine the water and salt, stirring until the salt is dissolved. Stir in the starter. Pour the water mixture into the flour mixture. Using a spoon or your hand, stir until well combined. Knead the dough by hand a few times, just until the dough holds together and forms a cohesive ball. Wrap the dough in a clean kitchen towel or beeswax paper, or put it in a sealable container. Refrigerate for at least 2 hours and up to 2 days. Remove the dough from the fridge and unwrap it. Divide the dough into 18 equal pieces, each about the size of a small apricot. Roll the pieces between your palms or against the table until they are evenly round.
On a very lightly floured work surface, use your hands to flatten each ball into a disc. Then, using a rolling pin, roll each disc until it is about 6 inches in diameter. (If you have a tortilla press, you can use it to flatten the balls, but you’ll probably want to finish them with a rolling pin anyway—these are best when they are pretty thin.)
Transfer each tortilla to a sheet of parchment or waxed paper, stacking the tortillas between sheets of paper so that they are flat and not touching. Freeze the tortillas for about 1 hour.
Preheat a cast-iron skillet, griddle, or comal over medium-high heat (if you’re using a cast-iron skillet, you may want to smear a little vegetable oil very lightly on it before preheating). The baking surface needs to be plenty hot, so give it a few minutes to preheat. Griddle the tortillas one at a time until both sides have golden-brown blisters, about 60 seconds per side. The tortillas may puff up a little as they cook, but they will flatten as they cool. Keep the finished tortillas in a covered dish or wrap them in a clean kitchen towel to keep them warm while you work.
The tortillas are best served right away. If you have some left over, you can store them in an airtight container for a few days and quickly reheat them in a hot skillet before serving, or freeze for up to 1 month.
A Crunchy and Delicious Way to Use Sourdough Starter Discard!
Learn how to make healthy, whole wheat sourdough crackers with your discarded sourdough starter. You won’t regret it! These are perfect for holidays, parties, or simply as a healthier cracker snack option for your family. We love to use lots of fresh local honey or fresh herbs from the garden.
The process involved with maintaining a healthy sourdough starter and baking hobby can get a little wasteful. All that feeding and dumping, feeding and dumping… But it doesn’t have to be a waste! There are a number of ways you can put that discarded sourdough starter to good use. A great way to use discarded starter is in other baking recipes –like these delectable, crispy, savory sourdough crackers!
This recipe is loosely based off the popular King Arthur version – but with our own personal twists! We love to use fresh local honey for a sweet snack, add fresh herbs and garlic from the garden for a savory treat, or mix in cheddar cheese to make the best “Cheezit” copycat cracker ever. The best thing about this recipe is that you can make it your own. I hope you love our take on this classic!
Need a starter? Buy your own dehydrated organic “Fiona” sourdough starter here. It comes with easy instructions and will last a lifetime of baking!
Fiona, our active and bubbly sourdough starter
How to Make Sourdough Honey Wheat Crackers
Equipment
Rolling pin
Pastry Wheel or Pizza Cutter
Mixing bowl
Parchment Paper
Basting Brush
Ingredients
1/2 Cup Whole wheat flour
1/2 Cup Unbleached bread flour or white all-purpose flour
1 Cup Sourdough starter
1/4 Cup honey
1/4 Cup olive oil or melted butter
1/2 Tsp Sea salt
Olive oil for brushing
1/4 Cup Optional: Fresh herbs of choice, e.g. rosemary, sage, thyme, oregano (Or 2 tbsp dried)
1/4 Tsp Optional: garlic powder
Instructions
1) Mix dough
In a large mixing bowl, combine whole wheat flour, white flour, sourdough starter, honey, salt, and melted butter or olive oil. If you are making herb or cheese crackers, add your fresh herbs/cheese. If you have only one type of flour available, you can just use whole wheat or white on their own. We like to add 1/8 tsp garlic powder to this step too.
Thoroughly mix the dough until it is uniform. I usually start mixing with a fork or spoon, but then finish mixing with my hands. It should not be sticky
2) Split, Squish & Cool
Divide the large dough ball into two roughly equal smaller balls. Using your hands, form each ball into a flattened rectangle, about the size of your hand and about half an inch thick. Repeat for the second ball.
Place each squished dough rectangle on a plate, and cover/wrap with parchment paper. The goal is to not allow the dough to dry out. I cut a piece just larger than the dough and tuck it in around the edges.
Refrigerate the dough for at least 30 minutes, up to a couple hours. You could even let the dough sit overnight if needed, but be sure it is well-wrapped or even tucked inside an airtight container to prevent it from drying out. The longer it sits in the fridge, the more it will ferment (and become easier to digest!) yet it will also become increasingly cold and firm – and more challenging to roll out thin. So, if the dough is refrigerated for more than a couple of hours, I suggest allowing it to warm up at room temperature for 15 to 30 minutes before rolling out.
3) Roll Out
Preheat the oven to 350°F.
Once they’ve had their time to chill, remove the cracker dough from the fridge. Cut a piece of parchment paper to about the size of a cookie sheet, or use a silicone baking sheet liner. Lightly dust the parchment paper/liner with flour. Carefully unwrap one chunk of flattened dough, place it in the center of the floured parchment paper, and lightly flour the top of the dough. I like to do this on a large cutting board, which makes it easy to transfer onto a cookie sheet.
Using a floured rolling pin, roll out the dough until it is nice and thin. The goal is about 1/16th of an inch thick – or as thin as you can make it. It’s OK if the edges will be a little ragged. Just work it back and forth and side to side to get it spread as evenly as possible while still maintaining a relatively rectangular shape.
4) Oil, Slice, & Poke
Once the dough is rolled out, lightly brush the surface with olive oil. Then sprinkle some coarse salt over it as well.
Next, cut the dough into rows of square crackers. Anything from 1 to 2 inches is good! The use of a rolling pizza cutter works well for this. We love to use a pastry/pasta cutter to get fun wavy edges.
Finally, poke the top of each cracker with a fork a couple of times.
Repeat Steps 3 and 4 for the second piece of dough.
5) Bake
Slide the parchment paper with cut and poked cracker dough onto a baking sheet. Each batch will need its own cookie sheet. We bake two trays at one time, but if you only have one cookie sheet to work with, have them take turns.
Bake on 350°F for 20 to 25 minutes, until the crackers turn light golden brown. Rotate the cookie sheets halfway through.
When they are done baking, immediately transfer the finished sourdough crackers on to a cooling rack.
6) Enjoy!
Finally, the moment we’ve all been waiting for! I’m sure you’ve already snacked on a few while they were cooling and now can’t help yourself but keep snacking.
After fully cooling, store your sourdough crackers in an air-tight container to maintain maximum freshness and crunch. They will stay fresh for 2-3 days.
These sourdough honey wheat crackers are so good and a healthier alternative to most other types of crackers. You can enjoy them with cheese and olives, or dunked in hummus and other dips. Sourdough crackers are our a hit for holiday and party platters. People are always impressed to learn they’re homemade!