Sourdough ham and cheese pinwheels are awesome because they combine the rich, tangy flavor of sourdough with the savory goodness of ham and melted cheese. The sourdough provides a perfect balance of tartness and depth, creating a satisfying base that elevates the filling. With every bite, you get a delightful crunch on the outside and a gooey, comforting center that’s both filling and flavorful.
These pinwheels are also incredibly versatile and easy to make, perfect for a snack, appetizer, or even a casual meal. The combination of textures and flavors is irresistible, and the portability makes them ideal for parties or picnics. Whether served warm or at room temperature, sourdough ham and cheese pinwheels are always a crowd-pleaser that brings a burst of savory joy with every bite.
WHY YOU’LL LOVE THIS RECIPE:
SOFT AND FLUFFY: Every bite is pillowy and satisfying, with the perfect balance of tenderness and fluffiness.
GUT HEALTH BENEFITS: Unlike store-bought yeast, sourdough starter naturally breaks down the phytic acid found in flour, making these cinnamon rolls easier to digest. Plus, you get that signature tangy sourdough flavor that elevates the entire treat.
MAKE-AHEAD FRIENDLY: Prep these cinnamon rolls the night before for a super easy, fresh-baked breakfast the next morning. I’ve included my best tips below to save time and make your mornings a little easier.
INGREDIENTS
For exact measurements, scroll down to the recipe card at the bottom of the page.
FOR THE PINWHEELS:
Bread Flour – For the fluffiest, most tender rolls, bread flour is the way to go. Its higher protein content gives the dough a better rise, making for soft and chewy cinnamon rolls.
Milk – I used whole milk, but feel free to swap in your favorite non-dairy milk if needed.
Active Sourdough Starter – A bubbly, active starter is key for the best rise and flavor in your pinwheels.
Dark Brown Sugar – Dark brown sugar brings a rich, caramel-like flavor that really shines in these rolls. If you don’t have it, light brown sugar works fine too!
Unsalted Butter – Butter softens the dough and adds flavor, giving you that melt-in-your-mouth texture.
Large Egg – Adds moisture to the dough, helping it stay soft and rich.
Salt – I love using Redmond’s unrefined salt for an extra mineral boost, but any unrefined salt will work.
FOR THE FILLING:
Unsalted Butter – Softened to room temperature for easy spreading.
Cheddar Cheese – Grated or sliced, Tilamook is our brand of choice
Honey Ham – The sweetness and savory flavors of Boar’s Head honey ham really shine through.
FOR RIGHT BEFORE BAKING:
Butter – Melted butter
Parsley – Chopped fresh or dried
Garlic Powder – Everything savory is better with garlic.
SUPPLIES:
Stand Mixer
Bench Scraper
Rolling Pin
Rimmed Baking Sheet, Baking Pan, or Large Cast Iron Skillet
Parchment Paper
Need Your Own Sourdough Starter?
Order your own organic dehydrated (but very much alive) sourdough starter here!
Our homemade organic sourdough starter is named Fiona and was made from scratch using three ingredients.. organic flour, water, and wild yeast from an organic apple we picked from our very own orchard at Delgado Homestead.
Sample Baker’s Schedule
Day 1:
4 pm – Mix dough
10 pm – Shape the rolls and refrigerate overnight
Day 2:
6 am – Allow the rolls to rise
9 am – Bake
Note: This schedule is based on a 68-70°F environment. Warmer kitchens will speed up the process, while cooler temperatures will slow it down.
MAKE-AHEAD OPTION
If you’re planning to bake these Sourdough Ham and Cheese Pinwheels the next morning, here’s how to prep them the night before!
Prepare the dough and shape the rolls the night before. Cover the dish and refrigerate overnight.
When you’re ready to bake, remove the rolls from the fridge 2-4 hours before baking, allowing them to rise and puff up in a warm place.
Pro Tip: Since this is an enriched dough, the rise time may take longer. Cooler kitchens will lead to longer fermentation, while warmer kitchens will speed things up.
HOW TO MAKE SOURDOUGH HAM AND CHEESE PINWHEELS
Pro-tip: For the most accurate results, use a kitchen scale to measure ingredients!
DOUGH
In the bowl of a stand mixer, combine the active starter, brown sugar, and warm milk (make sure the milk is no hotter than 120°F to protect your starter). Mix on low speed until fully combined.
Add melted butter, salt, and the egg, and mix on low until everything is incorporated.
Switch to the dough hook attachment. Add 1 cup of flour (140g) at a time, mixing on medium speed. Scrape the sides of the bowl with a spatula between each addition. Continue adding flour until the dough pulls away from the bowl and feels tacky, not sticky (be careful not to add too much flour, or the dough may turn dense).
Knead the dough on medium speed for 5 minutes.
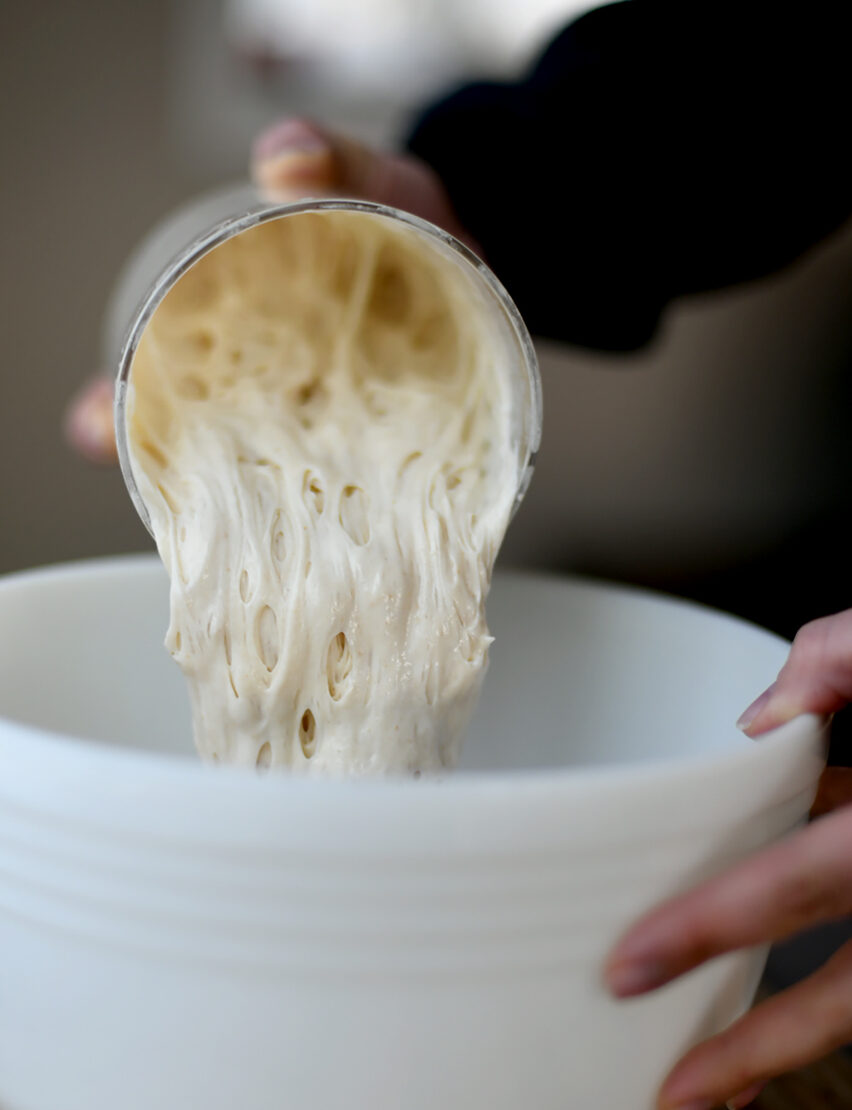
For the first rise, cover the bowl with a clean towel or plastic wrap, and let it rest in a warm spot until it has increased in size by at least 50% (this usually takes 3-7 hours, depending on your kitchen temperature).
SHAPE
Once the dough has risen, turn it out onto a lightly floured surface. Roll it into a 16×12 inch rectangle.
Spread softened butter over the entire surface of the dough.
Spread cheese across the surface of the dough then lay ham slices on top of the cheese.
Starting at the long edge closest to you, carefully roll up the dough into a log. Trim off the uneven edges, then cut into 9 even pieces using a sharp knife, unflavored dental floss, or string.
Alternatively, you can use a pizza cutter to slice the dough into 9 strips, then roll each strip into a separate roll for a polished look.
Grease a 9×13-inch baking dish (or similar-sized dish) and arrange the rolls inside, about 1/2-1 inch apart. Cover with a damp towel or plastic wrap, and let them rise for a second time. This usually takes 2-4 hours, depending on the warmth of your kitchen.
Not ready to bake yet? Cover the unbaked rolls with plastic wrap and refrigerate overnight. When you’re ready to bake, remove them from the fridge 2-4 hours beforehand to allow the dough to rise further.
BAKE
Preheat the oven to 375°F.
Before baking, mix melted butter, garlic powder and parsley in a small bowl and brush the mixture on the rolls with a pastry brush.
Bake for 40-45 minutes, or until the tops are golden brown.
Remove from the oven and cool slightly on a wire rack.
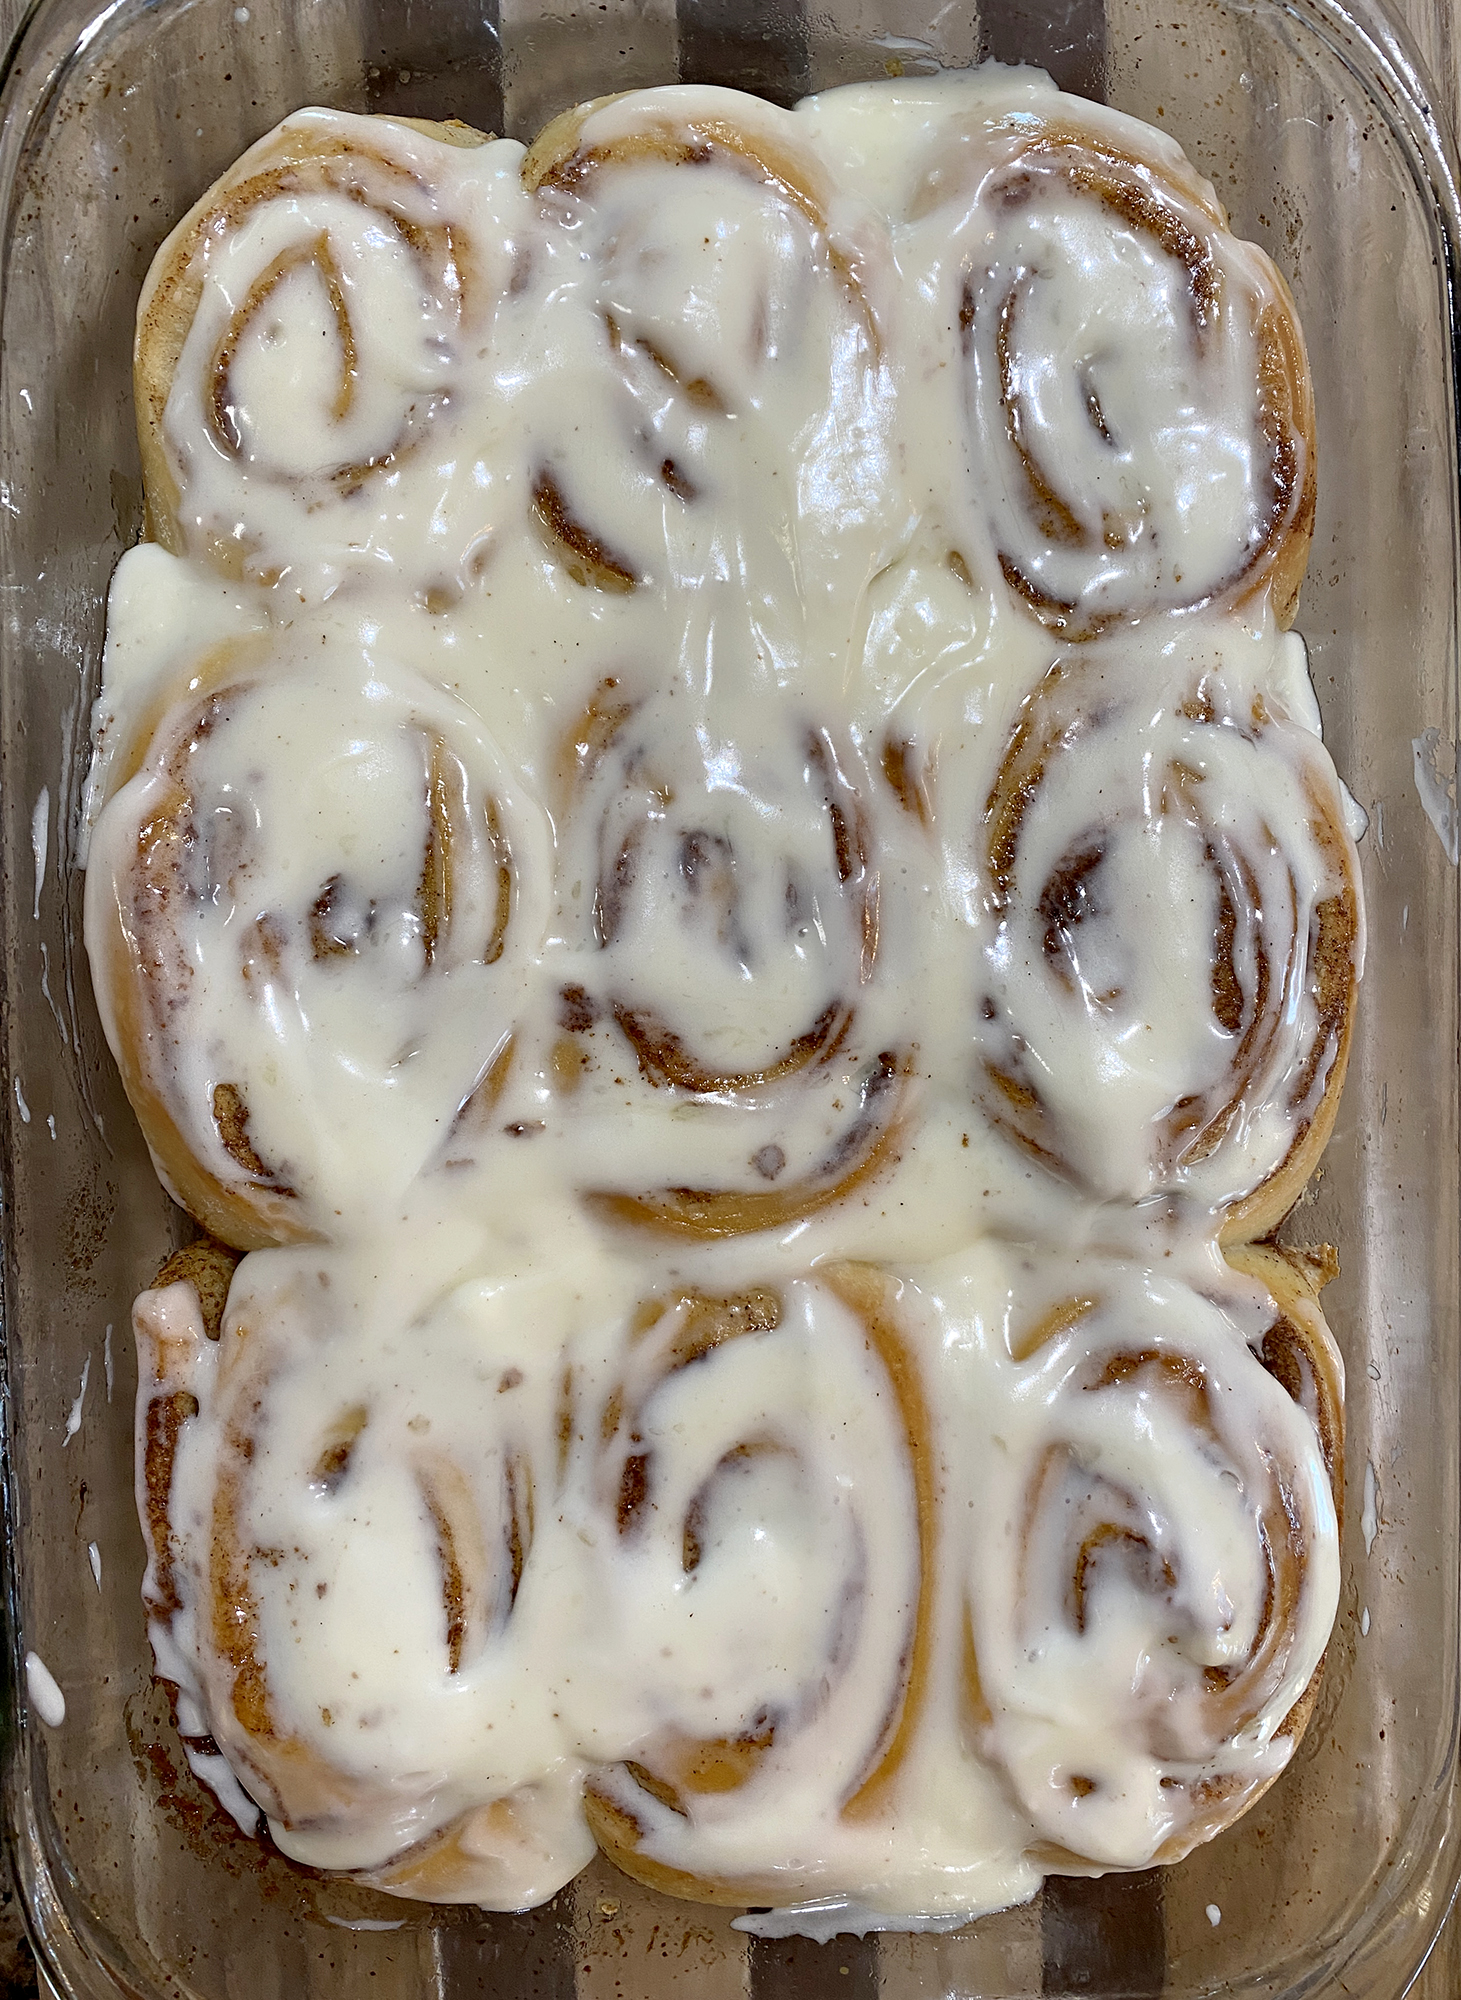
Sourdough Cinnamon Rolls are irresistibly soft, super fluffy, and absolutely mouthwatering! The cinnamon-sugar filling paired with a simple icing creates the perfect balance of sweetness and that signature sourdough tang we all adore. You won’t be able to stop at just one!
Sourdough breakfast treats are sooo good! Fore example, Sourdough Buttermilk Waffles are a family favorite and I can’t resist starting the day with something made from sourdough.
And these Sourdough Cinnamon Rolls? Total game-changer! What sets them apart is how each bite is ridiculously soft and fluffy. It’s like you’re savoring the gooey, melt-in-your-mouth center of the roll with every single bite.
Unlike your typical cinnamon rolls that use yeast, these are naturally leavened with sourdough starter, giving them an irresistible depth of flavor and that perfect balance of tang and sweetness. The fermentation also makes them easier to digest—so you can enjoy every bite without a second thought!
The filling is a luscious mix of dark brown sugar and warm cinnamon, bringing a rich, almost caramelized sweetness that makes these rolls extra indulgent. And, just when you think they can’t get any better, a simple cream cheese frosting is drizzled on top, melting into every crevice for an extra hit of creamy goodness.
Perfect for a special brunch or cozy Christmas morning, these Sourdough Cinnamon Rolls can be prepped the night before, making them an easy choice for fresh-baked mornings.
Serve them warm, right out of the oven, for an unforgettable treat that will have everyone coming back for seconds—and maybe thirds!
WHY YOU’LL LOVE THIS RECIPE:
SOFT AND FLUFFY: A true cinnamon roll fan knows the importance of a soft, chewy bite—and these Sourdough Cinnamon Rolls deliver just that! Every bite is pillowy and satisfying, with the perfect balance of tenderness and fluffiness.
GUT HEALTH BENEFITS: Unlike store-bought yeast, sourdough starter naturally breaks down the phytic acid found in flour, making these cinnamon rolls easier to digest. Plus, you get that signature tangy sourdough flavor that elevates the entire treat.
MAKE-AHEAD FRIENDLY: Prep these cinnamon rolls the night before for a super easy, fresh-baked breakfast the next morning. I’ve included my best tips below to save time and make your mornings a little easier.
INGREDIENTS
For exact measurements, scroll down to the recipe card at the bottom of the page.
FOR THE CINNAMON ROLLS:
Bread Flour – For the fluffiest, most tender rolls, bread flour is the way to go. Its higher protein content gives the dough a better rise, making for soft and chewy cinnamon rolls.
Milk – I used whole milk, but feel free to swap in your favorite non-dairy milk if needed.
Active Sourdough Starter – A bubbly, active starter is key for the best rise and flavor in your cinnamon rolls.
Dark Brown Sugar – Dark brown sugar brings a rich, caramel-like flavor that really shines in these rolls. If you don’t have it, light brown sugar works fine too!
Unsalted Butter – Butter softens the dough and adds flavor, giving you that melt-in-your-mouth texture.
Large Egg – Adds moisture to the dough, helping it stay soft and rich.
Salt – I love using Redmond’s unrefined salt for an extra mineral boost, but any unrefined salt will work.
FOR THE FILLING:
Unsalted Butter – Softened to room temperature for easy spreading.
Dark Brown Sugar – Again, for that deep, caramelized sweetness (light brown sugar is a fine substitute).
Ground Cinnamon – The classic spice that makes cinnamon rolls so irresistible.
FOR THE FROSTING:
Cream Cheese – Use room-temperature cream cheese for smooth mixing.
Butter – Room-temperature unsalted butter ensures easy blending with the cream cheese.
Heavy Cream – Adds richness to the frosting for a silky finish.
Powdered Sugar – Sweetens the frosting to perfection.
SUPPLIES:
Stand Mixer
Bench Scraper
Rolling Pin
Rimmed Baking Sheet, Baking Pan, or Large Cast Iron Skillet
Parchment Paper
Need Your Own Sourdough Starter?
Order your own organic dehydrated (but very much alive) sourdough starter here!
Our homemade organic sourdough starter is named Fiona and was made from scratch using three ingredients.. organic flour, water, and wild yeast from an organic apple we picked from our very own orchard at Delgado Homestead.
Sample Baker’s Schedule
Day 1:
4 pm – Mix dough
10 pm – Shape the rolls and refrigerate overnight
Day 2:
6 am – Allow the rolls to rise
9 am – Bake
Note: This schedule is based on a 68-70°F environment. Warmer kitchens will speed up the process, while cooler temperatures will slow it down.
MAKE-AHEAD OPTION
If you’re planning to bake these Sourdough Cinnamon Rolls the next morning, here’s how to prep them the night before!
Prepare the dough and shape the cinnamon rolls the night before. Cover the dish and refrigerate overnight.
When you’re ready to bake, remove the rolls from the fridge 2-4 hours before baking, allowing them to rise and puff up in a warm place.
Pro Tip: Since this is an enriched dough, the rise time may take longer. Cooler kitchens will lead to longer fermentation, while warmer kitchens will speed things up.
HOW TO MAKE SOURDOUGH CINNAMON ROLLS
Pro-tip: For the most accurate results, use a kitchen scale to measure ingredients!
DOUGH
In the bowl of a stand mixer, combine the active starter, brown sugar, and warm milk (make sure the milk is no hotter than 120°F to protect your starter). Mix on low speed until fully combined.
Add melted butter, salt, and the egg, and mix on low until everything is incorporated.
Switch to the dough hook attachment. Add 1 cup of flour (140g) at a time, mixing on medium speed. Scrape the sides of the bowl with a spatula between each addition. Continue adding flour until the dough pulls away from the bowl and feels tacky, not sticky (be careful not to add too much flour, or the dough may turn dense).
Knead the dough on medium speed for 5 minutes.
For the first rise, cover the bowl with a clean towel or plastic wrap, and let it rest in a warm spot until it has increased in size by at least 50% (this usually takes 3-7 hours, depending on your kitchen temperature).
SHAPE
Once the dough has risen, turn it out onto a lightly floured surface. Roll it into a 16×12 inch rectangle.
Spread softened butter over the entire surface of the dough.
In a small bowl, combine brown sugar and ground cinnamon, then sprinkle this mixture evenly over the dough.
Starting at the long edge closest to you, carefully roll up the dough into a log. Trim off the uneven edges, then cut into 9 even pieces using a sharp knife, unflavored dental floss, or string.
Alternatively, you can use a pizza cutter to slice the dough into 9 strips, then roll each strip into a separate roll for a polished look.
Grease a 9×13-inch baking dish (or similar-sized dish) and arrange the rolls inside, about 1/2-1 inch apart. Cover with a damp towel or plastic wrap, and let them rise for a second time. This usually takes 2-4 hours, depending on the warmth of your kitchen.
Not ready to bake yet? Cover the unbaked rolls with plastic wrap and refrigerate overnight. When you’re ready to bake, remove them from the fridge 2-4 hours beforehand to allow the dough to rise further.
BAKE
Preheat the oven to 350°F.
Before baking, pour heavy cream over the rolls—this adds moisture and helps them stay extra soft.
Bake for 30-35 minutes, or until the tops are golden brown.
Remove from the oven and cool slightly on a wire rack.
Cream Cheese Frosting
While the rolls are cooling, beat the room-temperature cream cheese and butter for 1-2 minutes.
Add heavy cream and powdered sugar, mixing until smooth.
Use an offset spatula to spread the frosting over the warm cinnamon rolls, letting it melt into all the cracks and crevices. Enjoy!
HOW TO SERVE
Nothing beats warm Sourdough Cinnamon Rolls fresh from the oven, topped with slightly melted cream cheese frosting! Serve them with a cup of your favorite tea or hot coffee for a blissful morning treat.
Want something heartier? Pair them with scrambled eggs, crispy bacon, and fresh fruit for a full breakfast!
HOW TO STORE
Store leftover cinnamon rolls in an airtight container in the fridge for up to 3 days. To serve, let them come to room temperature or warm them in the microwave for a few seconds.
FAQs
Can I use all-purpose flour instead of bread flour? You can, but I recommend bread flour for the best results. Bread flour’s higher protein content helps create a better rise, resulting in softer, chewier rolls. All-purpose flour will work, but the rolls may be denser.
Can I make these the night before and bake them in the morning? Yes, absolutely! Shape the rolls the night before, store them in the fridge, and let them rise for 2-4 hours the next morning before baking as usual. This will give you fresh rolls with minimal effort!
These Sourdough Cinnamon Rolls are unbelievably soft, incredibly fluffy, and utterly delicious! The sweet cinnamon-sugar filling and creamy, luscious frosting perfectly complement the tangy flavor of the sourdough, making every bite irresistible.
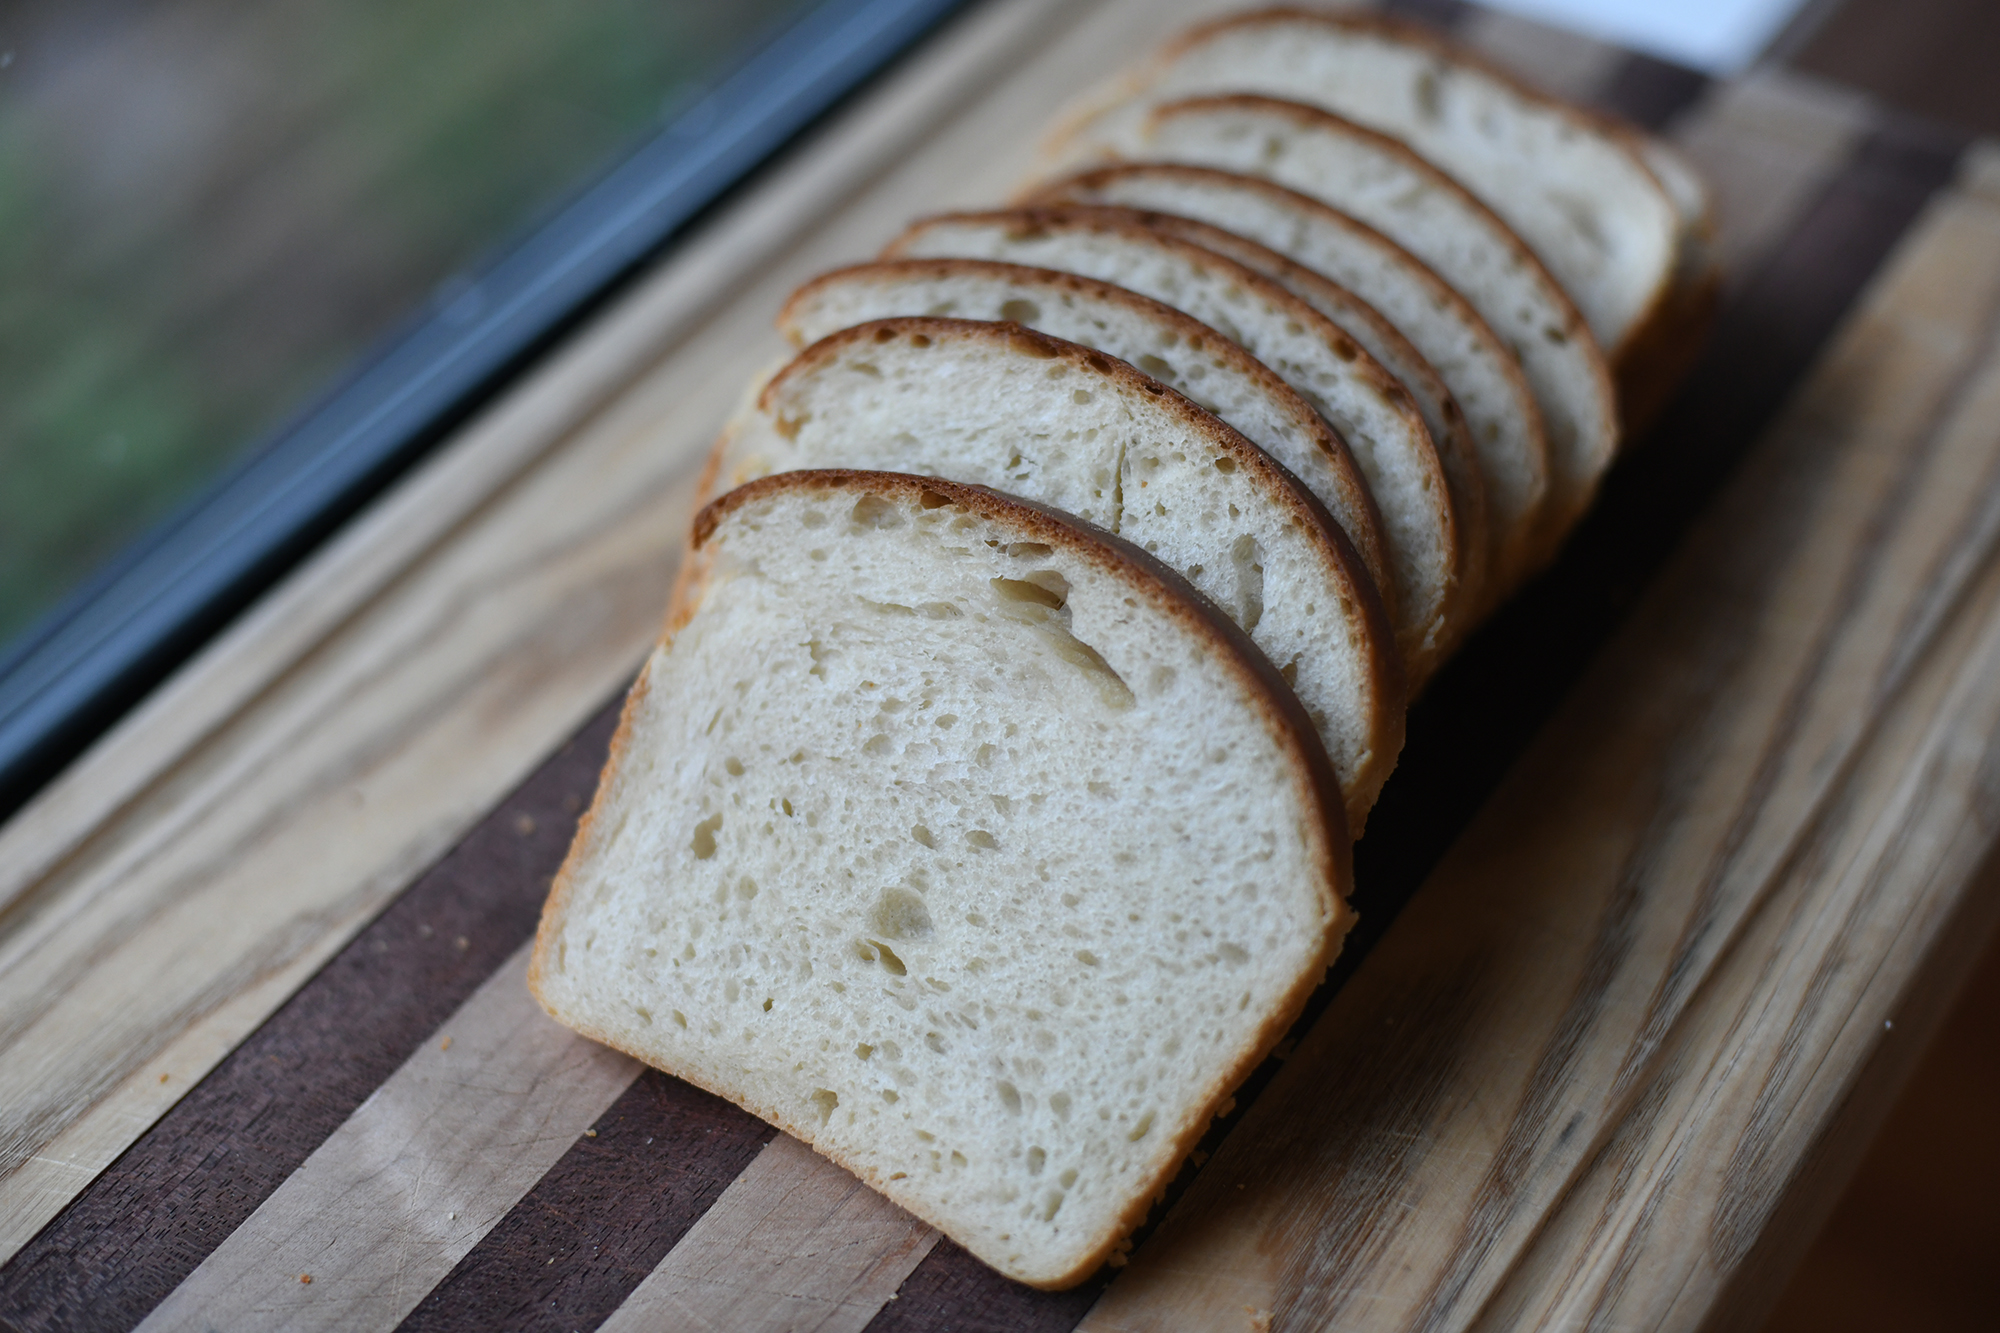
I was on a mission to replace store bought sandwich bread with a healthier homemade whole wheat option for a long time. This recipe is by far the winner. This soft and fluffy sourdough honey wheat sandwich bread is not heavy and dense but pillowy soft with a kiss of sourdough tang and honey sweetness. It’s absolutely delicious!
It’s the perfect loaf for toasting up for breakfast or slicing and enjoying with meats and cheeses for lunch. Individual slices keep perfectly in the freezer without all the additives from store bought bread.
I’ve also included 2 baking schedules to help you adjust to your busy schedules. This recipe can even be prepared and baked all in one day!
Why You’ll Love This Recipe
Soft and Nourishing Whole wheat bread can sometimes be dense, but not this one! The combination of milk, butter, and a mix of bread flour and whole wheat flour gives this loaf a soft, light texture while still delivering the extra nutrients from the whole wheat.
Minimal Kneading No need to spend hours kneading! Just 20 seconds of kneading is all it takes to get this dough ready. Simple and easy!
Made and Baked in One Day I’ve included two baker’s schedules to fit this recipe into your day. If you’re in a rush, you can have freshly baked bread in a single day—how’s that for convenience?
Ingredients Needed
(Scroll to the bottom for exact measurements on the recipe card)
Active Sourdough Starter – Make sure your starter is active and bubbly, at its peak of fermentation.
Milk – I used whole milk, but feel free to swap with your favorite dairy or non-dairy option. Just ensure the milk is warm, but not hotter than 120°F to protect the starter.
Honey – Adds a touch of sweetness and helps the crust achieve a golden, beautiful color as it bakes.
Melted Butter – Makes this bread soft and tender. You can substitute with olive oil or non-dairy butter if preferred.
Bread Flour – For the best texture and a taller, fluffier loaf, I recommend using bread flour. It has a higher protein content than all-purpose flour, which helps the dough rise.
Whole Wheat Flour – I love using King Arthur’s whole wheat flour for its flavor and texture.
Salt – Any unrefined salt works well, but I like using Redmond’s salt for its added minerals.
Supplies Needed
Large Mixing Bowl
Danish Dough Whisk
Bowl Cover
Rolling Pin
8.5 x 4.5-inch Loaf Pan
Need Your Own Sourdough Starter?
Order your own organic dehydrated (but very much alive) sourdough starter here!
Our homemade organic sourdough starter is named Fiona and was made from scratch using three ingredients.. organic flour, water, and wild yeast from an organic apple we picked from our very own orchard at Delgado Homestead.
Baker’s Schedule:
This guideline is for kitchens at 70°F (21°C). Warmer kitchens will rise faster, cooler ones will take longer.
Same-Day Baking:
9:00 AM: Make the Dough
10:00 AM: Knead the Dough
10:00 AM: First Rise
7:00 PM: Shape
7:00 PM: Second Rise
9:00 PM: Bake
Next-Day Baking:
9:00 PM: Make the Dough
10:00 PM: Knead the Dough
10:00 PM: First Rise
Next Morning:
7:00 AM: Shape
7:00 AM: Second Rise
9:00 AM: Bake
How to Make Whole Wheat Sourdough Bread
1. Feed Your Starter
Feed 25g of sourdough starter, 75g of warm water, and 75g of flour. Mix until fully incorporated and let it rise until bubbly and doubled in size. This usually takes about 12 hours in a 70°F kitchen. In warmer kitchens, this will take less time, and in cooler kitchens, more time. The starter should look bubbly with little craters on top when ready.
2. Make the Dough
In a large bowl, whisk together your active sourdough starter, warm milk, melted butter, and honey. Add the bread flour, whole wheat flour, and salt. Use a Danish dough whisk to combine until there are no dry patches. You can also use a bowl scraper to clean the sides of the bowl and make sure everything is mixed well. The dough will be a bit sticky.
Cover the bowl and let it rest for 30 minutes to hydrate the flour.
3. Knead the Dough
After the rest period, wet your fingers to prevent sticking. Take a piece of dough, pull it upwards, and fold it toward the center, pushing the heel of your hand into the dough. Turn the bowl a quarter turn and repeat. Knead for about 20 seconds, or until the dough becomes smoother and stiffer. If it tears, stop.
Grease another bowl with butter, place the dough in it, seam side down, and cover it again for the bulk fermentation.
4. Bulk Fermentation
Let the dough rise until it has doubled in size, which should take 10-12 hours in a 70°F kitchen. The first rise begins as soon as the ingredients are mixed, not after kneading.
5. Shape the Dough
Once the dough has doubled, punch it down gently to release any air bubbles. Transfer it to a clean surface and shape it into a rectangle, about 9 inches by 13 inches (it doesn’t have to be exact). Roll the dough tightly into a log, pinching the seams together at the end. If you’ve made sourdough before, you’ll notice that this dough feels denser due to the whole wheat flour.
6. Second Rise
Grease your loaf pan and place the shaped dough seam side down in the pan. Cover it and let it rise until it’s about 1 inch above the rim of the pan. This usually takes 1-2 hours in a 70°F kitchen. Patience here is key for a light, fluffy loaf!
7. Bake the Bread
Preheat your oven to 375°F. Place the loaf on the middle rack and bake for 30-35 minutes until the top is golden brown. If the crust begins to brown too quickly, cover the top with aluminum foil and continue baking for 20-25 minutes, for a total of 50-55 minutes. The internal temperature should reach 201°F.
For extra steam in the oven, place a cast iron skillet or baking sheet with ice cubes on the lower rack. This keeps the dough surface soft and helps it rise without tearing.
Once baked, let the bread sit in the pan for 5 minutes, then transfer it to a wire rack to cool completely.
To get a soft crust, I love spreading butter on top of the bread while it’s still warm.
8. Cool Before Slicing
Allow the bread to cool for at least 1 hour before slicing. Cutting too soon can result in a gummy texture.
How to Serve
This sourdough whole wheat bread is perfect for everything from toast in the morning to a hearty sandwich at lunch. It’s versatile and delicious! Even when it gets a bit stale, turn it into crunchy croutons or breadcrumbs for later use.
How to Store
This bread will stay fresh for 3-5 days when stored in a plastic bag at room temperature. For longer storage, I recommend freezing it. Slice the bread and place the slices in a gallon-size ziplock bag with small sheets of parchment paper between them to keep them from sticking together.
To refresh frozen slices, just bring them to room temperature or pop them straight into the toaster!
FAQs
Can I use all-purpose flour instead of bread flour? Yes, you can, though bread flour is recommended for a fluffier, taller loaf. Bread flour has more protein, which helps the dough rise better and creates a softer texture. All-purpose flour will still work, but the loaf may not be as airy or tall.
Why does my loaf have a gummy line at the bottom? This is usually a sign of underproofing or overproofing. If the dough hasn’t risen enough before baking, it may not rise properly in the oven. If it’s overproofed, the gluten might break down, leading to a dense, gummy bottom. Be sure to give your dough enough time to rise!
Do I have to add honey to the dough? Honey is highly recommended for its sweetness, color, and to help with fermentation. It also helps preserve the bread. However, it can be omitted if you prefer.
I was on a mission to replace store bought sandwich bread with a healthier homemade whole wheat option for a long time. This recipe is by far the winner. This sourdough sandwich loaf is not heavy and dense but super soft and fluffy with a kiss of sourdough tang. It’s absolutely delicious!
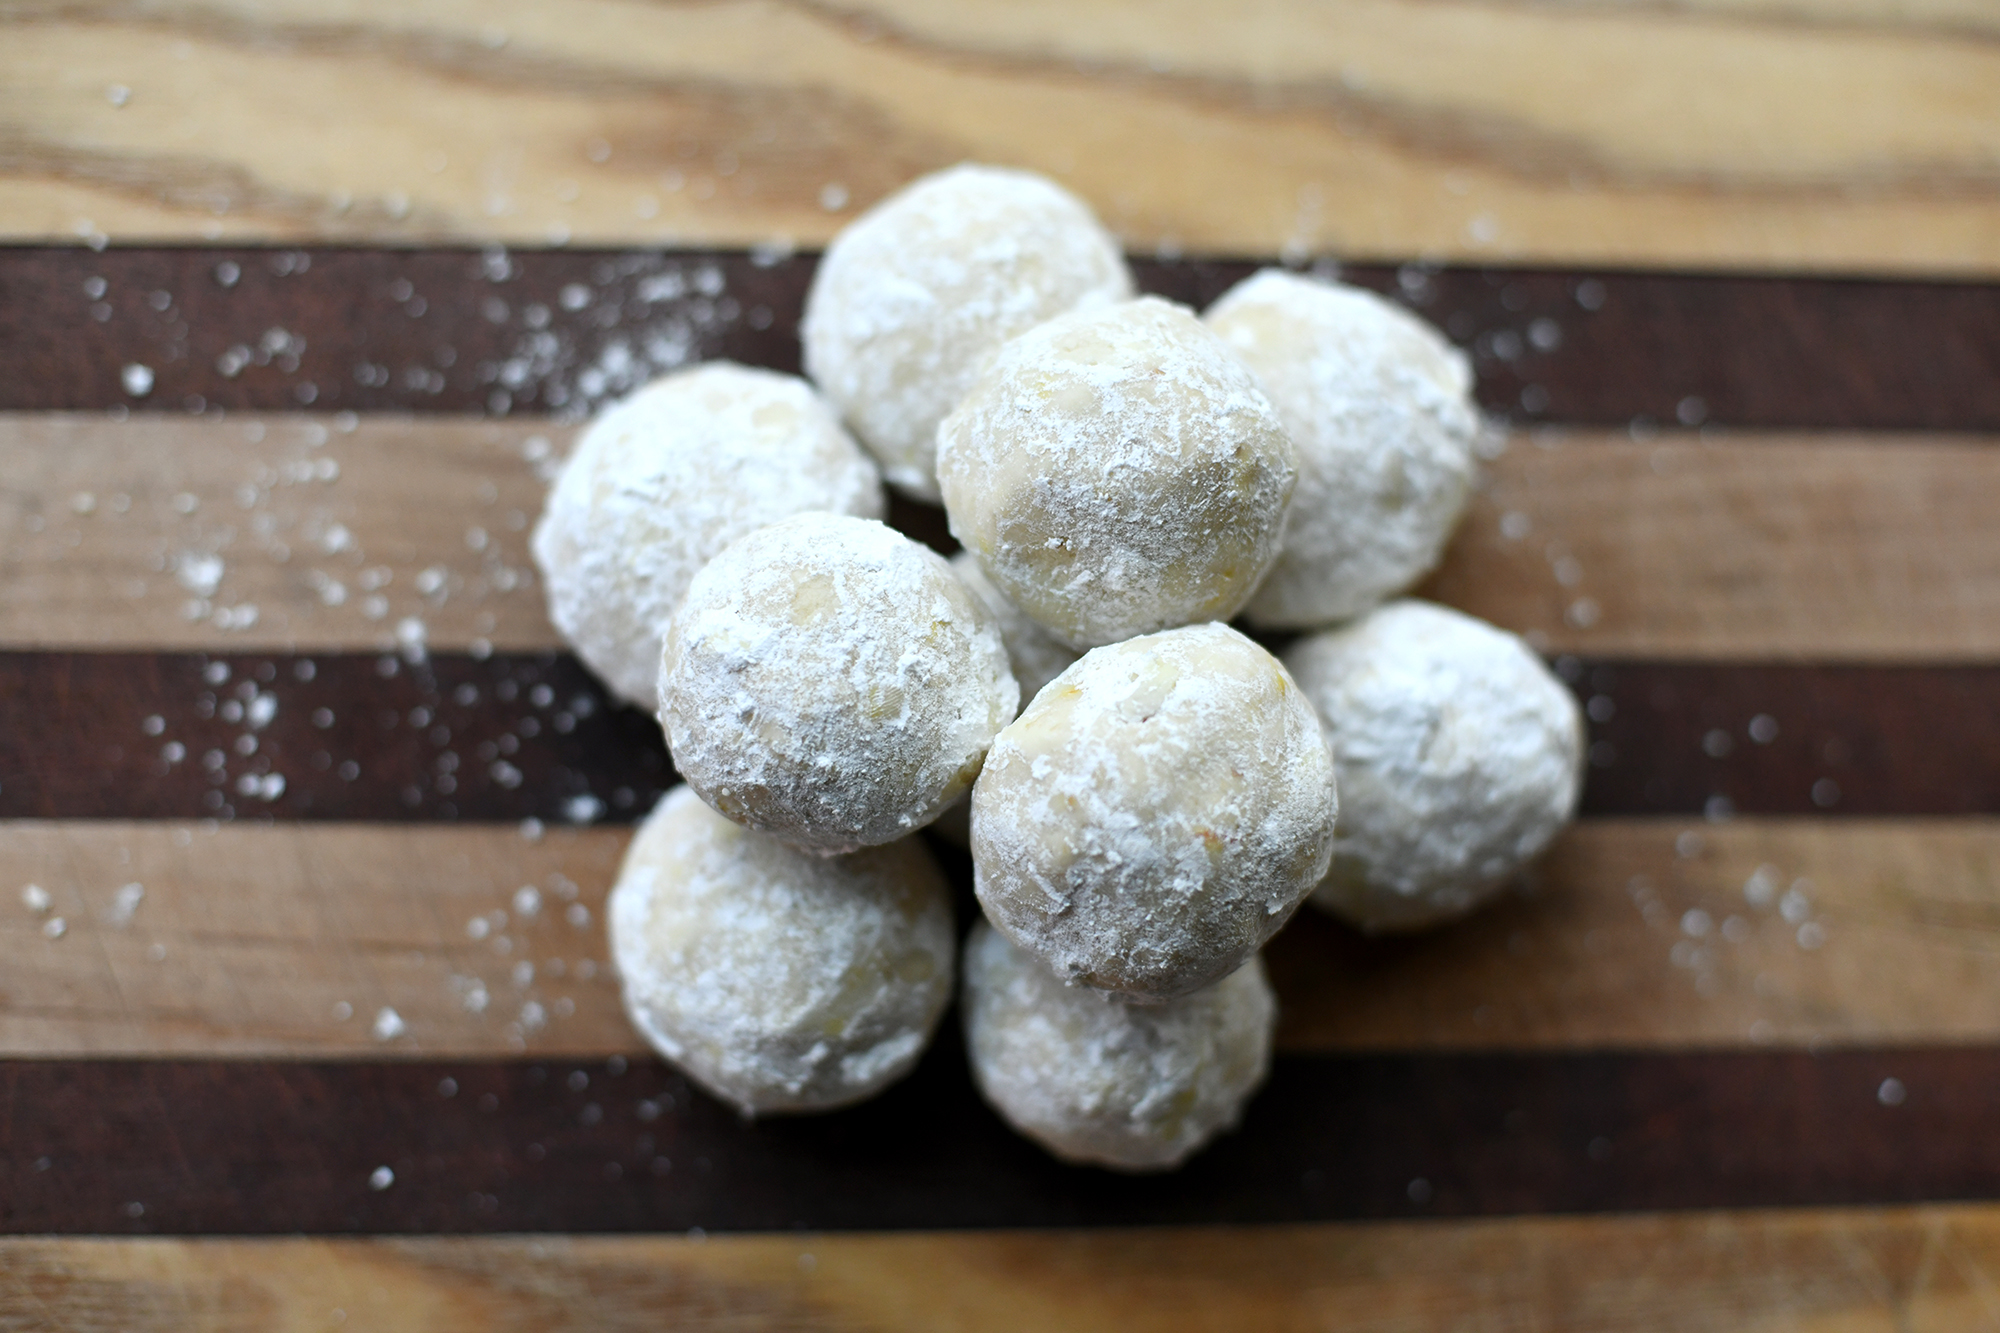
Also known as Polvorones, Snowball Cookies, Russian Tea Cakes, or Butter Balls, whatever you call them, sourdough Mexican wedding cookies are a classic recipe for the holiday season, but with a sourdough twist!
These Sourdough Mexican Wedding Cookies are a melt-in-your-mouth treat, buttery and sweetened with powdered sugar—perfect for any Christmas cookie tray. The addition of sourdough discard imparts a subtle tang, while chopped nuts bring a delightful crunch and texture to these rich, shortbread-like cookies.
Sourdough Snowball Cookies stand out because they’re made without eggs or granulated sugar in the dough. Instead, just six simple ingredients come together to create a light and airy sweet treat.
For added crunch and texture, fold in chopped nuts! While walnuts are my personal favorite, pecans are also a festive and delicious choice during the holiday season.
Once baked, roll these buttery cookies in powdered sugar two times. The confectioner’s sugar makes these the perfect holiday cookies as they look like little snowballs.
These cookies will melt in your mouth! Shortbread cookies are full of delicious buttery and sugary sweetness and they are the perfect Christmas cookies. Watch them disappear from your holiday cookie trays!
Why You’ll Love This Recipe:
Only 6 Ingredients Holiday shopping can be overwhelming, but this recipe keeps it simple! With just six basic pantry staples, you can whip up a batch of delicious cookies without running all over the store.
One-Bowl Recipe No need for a stand mixer or a ton of gadgets! All you need is a medium bowl and a hand mixer to make these cookies. It’s as easy as it gets!
Classic Christmas Cookie Each cookie is coated in a dusting of powdered sugar, giving them the look of freshly packed snowballs—perfect for any holiday cookie tray!
Great for Using Up Sourdough Discard If you’ve got extra sourdough discard hanging out in your fridge, this recipe is the perfect way to put it to good use without any waste.
Customizable Want to make these cookies your own? You can! Enjoy them with or without chopped nuts, or swap them out for mini chocolate chips. For a festive twist, try adding crushed peppermint candy canes to the dough. The possibilities are endless!
Ingredients
All-Purpose Flour – Be sure to measure the flour properly. If you don’t have a kitchen scale, spoon the flour into the measuring cup and level it off with a butter knife. Too much flour can make the cookies dry and crumbly.
Powdered Sugar – This recipe uses powdered (confectioners’) sugar in both the dough and as a coating, giving the cookies their signature sweet, melt-in-your-mouth texture.
Unsalted Butter – Let the butter come to room temperature for easier mixing and a smooth dough.
Vanilla – I prefer vanilla extract, but feel free to use any vanilla you have on hand.
Sourdough Discard – Use unfed sourdough starter (discard) that’s no older than 2 weeks for the best results. Need your own sourdough starter? Buy your own dehydrated sourdough starter here!
Salt – A pinch of salt helps to balance out the sweetness of these cookies.
Chopped Nuts (optional) – Walnuts are my favorite, but feel free to experiment with pecans, macadamia nuts, or ground almonds. If you have a nut allergy or prefer nut-free cookies, simply skip the nuts altogether.
Cookie Variations
For Chocolate Lovers – Instead of chopped nuts, try substituting 1/2 cup of mini chocolate chips. For an extra special treat, wrap the dough around a Hershey’s Kiss before baking!
For a Festive Twist – Stir in 1/2 cup of crushed peppermint candy canes or use holiday-colored sprinkles for a cheerful touch. You can also swap the vanilla extract for almond extract for a sweet, fruity flavor, or use peppermint extract for a more festive holiday feel.
Supplies
Large Bowl
Kitchen Scale (optional, but helpful)
Hand Mixer
Rubber Spatula
Baking Sheet
Parchment Paper
Wire Racks
How to Make Sourdough Mexican Wedding Cookies
Preheat the Oven Preheat your oven to 350°F (175°C).
Prepare the Nuts Chop the nuts by hand or use a food processor for a quick and even chop.
Cream the Wet Ingredients In a medium bowl, cream together the butter, powdered sugar, vanilla extract, and sourdough discard on medium speed for about 2 minutes, until the mixture is light and fluffy.
Add Dry Ingredients Add the flour, salt, and chopped nuts (if using) to the bowl. Mix on low speed until just combined. Scrape down the sides of the bowl with a rubber spatula to ensure all dry ingredients are incorporated. The dough will be crumbly, which is perfectly normal.
Shape the Dough Use your hands or a cookie scoop to form the dough into smooth, round balls, about 2 inches wide (or roughly 2 tablespoons of dough per cookie). Gently press the dough together as you shape it—make sure there are no cracks in the ball for the best texture.This recipe should yield about 14-16 cookies.
Prepare for Baking Line a rimmed baking sheet with parchment paper. Place the dough balls about 2 inches apart on the prepared sheet.
Bake the Cookies Bake in the preheated oven for 21-23 minutes, or until the bottoms of the cookies start to turn golden brown. It’s better to slightly underbake them than to overbake, so keep an eye on them.
Decorate with Powdered Sugar While the cookies are still warm, dip each one into a bowl of powdered sugar to coat. Set them on a wire rack to cool. The powdered sugar may melt a little at first.Once the cookies have cooled slightly, roll them in powdered sugar a second time for a nice, even dusting.
How to Serve
Sourdough Mexican Wedding Cookies are a treat on their own, but they pair wonderfully with a warm cup of hot chocolate or coffee. Enjoy!
How to Store
These cookies will stay fresh for up to two weeks when stored in an airtight container at room temperature.
Freezing Tips Sourdough Mexican Wedding Cookies freeze beautifully! To avoid crumbs, store them in a freezer-safe container instead of a zip-top bag. When you’re ready to enjoy them, simply thaw them on the countertop until they return to room temperature.
FAQs:
Why are my sourdough Mexican wedding cookies falling apart after baking? If your cookies crumble after baking, it could be because too much flour was added to the dough, or the cookies were baked too long. For accuracy, use a kitchen scale to measure the flour, or spoon the flour into your measuring cup and level it off with a butter knife.
Why are my cookies flat? Flat cookies may indicate that your oven temperature is too low. Double-check the temperature with an oven thermometer. Also, be sure to use room-temperature butter, not melted butter, as melted butter will cause the cookies to spread too much and lose their shape.
Recipe not foundMelt-in-your-mouth, buttery, and sweetened with powdered sugar, these Polvorones, aka Mexican Wedding Cookies are a must on anyone’s Christmas cookie tray. Adding sourdough discard gives this beloved holiday cookie a slight sourdough tang, while chopped nuts add delicious crunch and texture to these buttery shortbread cookies.
You Can Use Discard or Active Starter and Ferment for Extra Nutrition and Deliciousness!
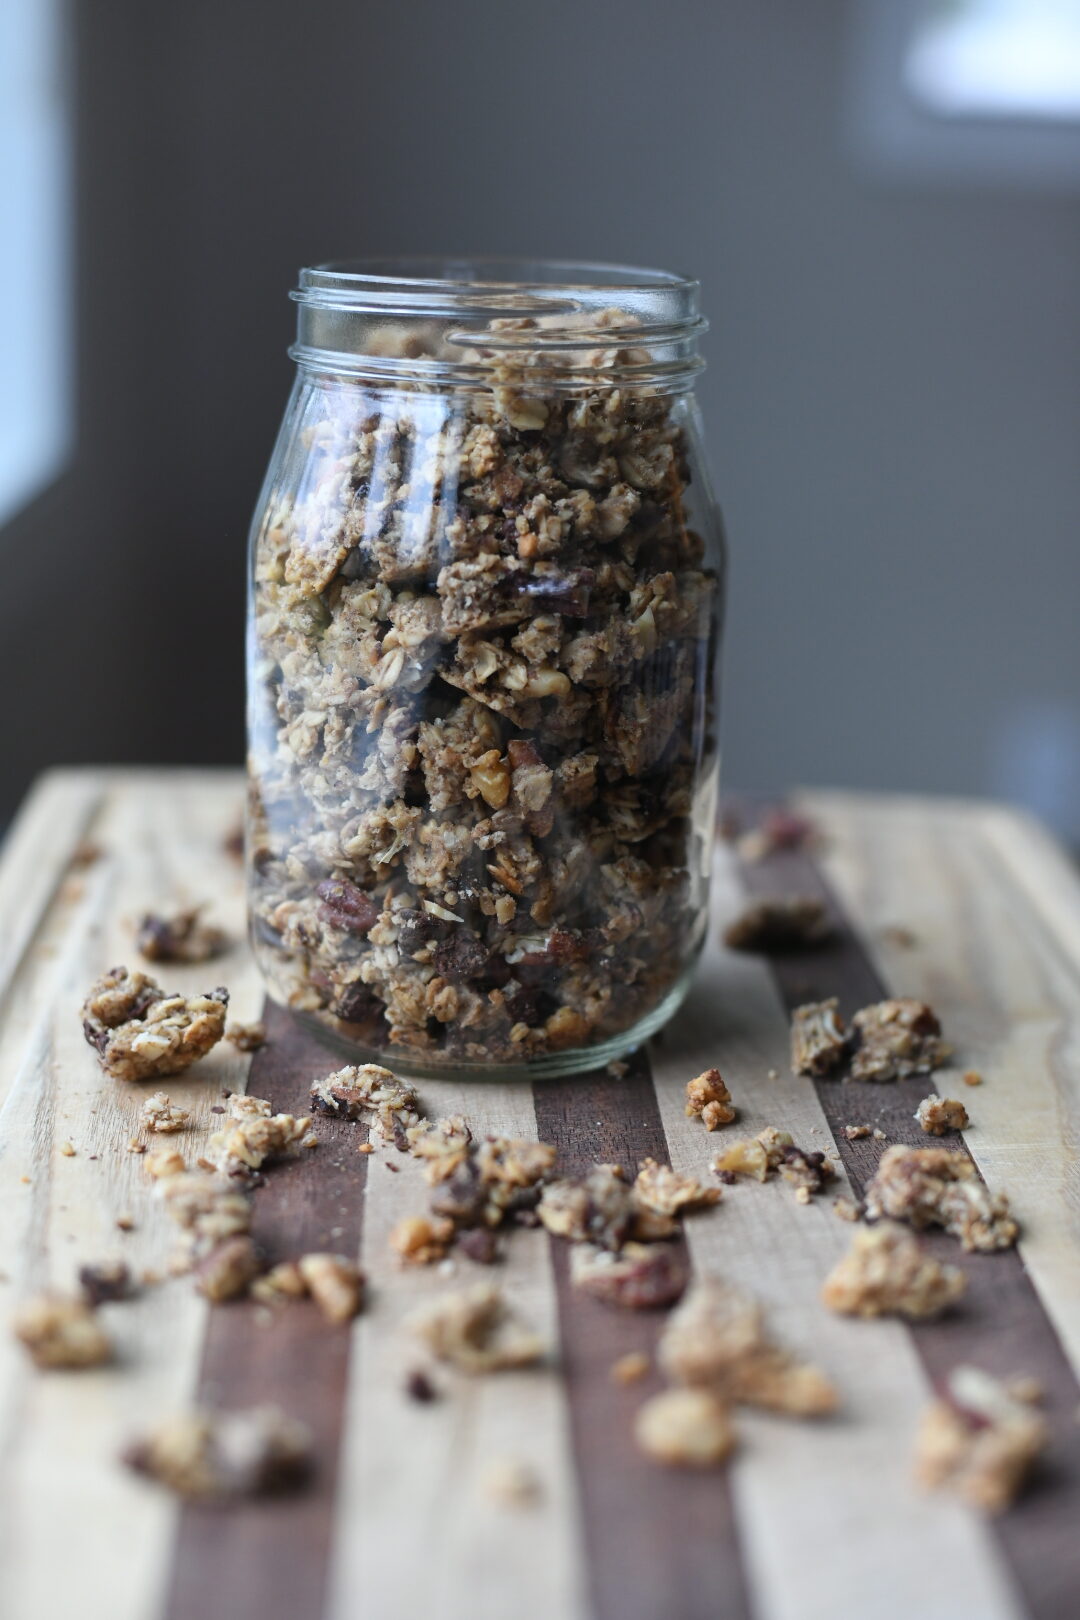
Sourdough chocolate chip granola… so good!
Come and discover the art of crafting homemade sourdough granola, whether you’re utilizing discard or active starter. It’s a straightforward process yielding delectable results! Our nutritious loaded sourdough granola recipe is delicately sweetened with natural maple syrup, boasting a medley of nuts and seeds rich in fiber and omega fatty acids. While we relish the aromatic blend of vanilla, cinnamon, and coconut in our sourdough discard granola, we’ve curated a variety of other flavor and seasoning suggestions for you to explore. Additionally, we’ve included instructions on fermenting sourdough granola, elevating its nutritional profile with added nutrients.
Granola paired with plain yogurt and fresh fruit constitutes a breakfast classic in our household. You just can’t go wrong with the the sweet crunchiness and nuttiness of homemade sourdough granola.
Here’s what you can expect from this sourdough granola recipe:
Chunkiness: Thanks to the sticky sourdough starter and ground flax meal, this granola boasts satisfyingly chunky clusters. These natural binders help maintain the crisp, toasted texture of the granola, allowing you to break it into small cereal-like pieces or enjoy it in larger, snackable clusters, depending on your preference.
Healthier and Less Sweet: Unlike commercial granola, this recipe is healthier and less sweet. Free from refined sugar and puffed rice, it features a high nut and seed-to-oat ratio, providing ample protein and fewer carbs. Additionally, the inclusion of hemp hearts and ground flax seed meal enriches the granola with protein, fiber, omega-3 and omega-6 essential fatty acids, vitamin E, and minerals. If fermented first, these nutrients become even more bioavailable.
Flexibility: This recipe offers flexibility in customization. Whether you use discard or active starter, incorporate your favorite nuts and seeds, experiment with various spices and seasonings, add nut butter, or include dried fruit, the choice is yours. You can bake it immediately or opt to let it ferment. Moreover, individuals baking with gluten-free sourdough starter can easily adapt this recipe to create gluten-free sourdough granola. Embrace your creativity and savor the versatility of this recipe!
Fiona, our active and bubbly sourdough starter
If you need sourdough starter, feel free to pick up a dry (but alive!) organic sourdough starter from the Delgado Homestead shop. All it needs a little water, flour, and few days to get active again.
Achieving that perfect crunch in homemade granola requires some patience and technique. Here are some key tips:
Low and Slow Baking: To ensure optimal crunchiness, bake the granola at a low temperature for an extended period. This allows moisture to evaporate gradually without risking over-toasting or burning. The nuts, seeds, flax meal, and coconut oil in this sourdough discard granola recipe also contribute to its satisfying crunchiness.
Proper Storage: Store your homemade granola in a good-quality, airtight container to preserve its crunchiness. This helps prevent exposure to moisture, which can soften the granola over time.
Patience: While it may not seem super crunchy right out of the oven, homemade granola crisps up significantly as it cools and dries. Allow it to cool completely before transferring it to a storage container to maintain its desired texture.
By following these tips and techniques, you can enjoy homemade granola with the perfect balance of crunchiness and flavor.
Sourdough granola wet ingredients
Here’s how to make fermented sourdough granola for an extra nutritional boost:
Prepare the Mixture: Combine all the wet ingredients in a mixing bowl: sourdough starter, maple syrup, melted coconut oil or butter, ground flaxseed, vanilla extract, cinnamon, sea salt, and water (if fermenting). Mix well to ensure all ingredients are evenly incorporated.
Add the Dry Ingredients: Add the rolled oats, nuts, seeds, hemp hearts, and optional coconut flakes to the wet mixture. Stir until everything is evenly coated with the wet ingredients.
Fermentation: If fermenting the granola, cover the bowl loosely and let it sit at room temperature for 2 to 6 hours. For longer fermentation, move the mixture to the refrigerator (e.g., overnight). Keep in mind that longer fermentation may result in a more sour taste and potentially less crunchiness.
Preheat the Oven: Preheat your oven to 300°F (150°C) while the granola mixture is fermenting.
Baking: Spread the fermented granola mixture evenly on a lined baking sheet. Bake in the preheated oven for 30 to 40 minutes, stirring every 10 minutes to ensure even browning. The granola is ready when it’s golden brown and crisp.
Cooling and Storage: Allow the granola to cool completely on the baking sheet before transferring it to an airtight container for storage. If adding dried fruit, mix it in once the granola has cooled.
This fermented sourdough granola is packed with nutrients and flavor, making it a delicious and wholesome breakfast or snack option. Enjoy it with yogurt, milk, or as a topping for smoothie bowls!
Sourdough granola with chocolate chips after fermenting at room temp and ready to bake
Here’s a step-by-step guide on how to make sourdough granola:
Preheat Oven: Preheat the oven to 315°F (157°C).
Combine Wet Ingredients: In a medium to large mixing bowl, combine the wet ingredients: sourdough starter, maple syrup, melted oil or butter, vanilla extract, salt, cinnamon, and ground flax meal. Mix thoroughly to ensure all ingredients are well combined.
Add Dry Ingredients: Add the rolled oats, nuts, seeds, coconut, and hemp hearts to the bowl with the wet ingredients. Toss and stir until all the dry ingredients are evenly coated with the wet mixture.
Optional Fermentation: Optionally, cover the bowl loosely and let the granola mixture ferment for 2 to 6 hours at room temperature, or longer in the refrigerator, before baking. If refrigerated overnight, allow it to soften and warm up at room temperature for a couple of hours before baking.
Spread on Baking Sheet: Spread the raw granola mixture onto a large baking sheet, greased or lined with parchment paper. Press the mixture down firmly into a solid, flat sheet about ½ inch thick, ensuring all the granola bits are touching.
Bake: Bake the granola in the preheated oven for about 20 minutes or until lightly toasted. Once the outer edges start to brown, remove the baking sheet from the oven and let it cool for about 5 minutes.
Break into Clusters: Using a spatula or your hands (if cool enough), gently break up the granola into large clusters or chunks. Stir, flip, and rotate the clusters on the tray to promote even toasting. Move pieces from the outer edge of the pan inward and vice versa.
Your sourdough granola is now ready to enjoy! You can serve it with yogurt, milk, or eat it as a standalone snack. Store any leftovers in an airtight container for future use.
Looking for sourdough discard recipes? Come try our healthy loaded sourdough granola recipe – with chunky clusters of oats, nuts, seeds, coconut, flax, maple syrup, hemp seeds, vanilla, cinnamon and more. You can make sourdough granola with active or discard starter, or make it fermented!
Oh, the remarkable sourdough starter! That ravenous, effervescent, gurgling entity residing in your kitchen. Your latest companion. And much like any living companion, nourishing your sourdough starter is essential for its well-being! Fortunately, tending to your sourdough starter can be as effortless or as intricate as you prefer, based on your storage method and baking frequency. Unlike conventional pets, however, a sourdough starter expresses gratitude for your attention and affection by yielding mouthwatering, artisanal sourdough bread! Truly a rewarding endeavor.
Keep reading to discover the steps for nourishing your sourdough starter to ensure its vitality and contentment! We’ll explore methods for feeding it using either weight or volume measurements. Additionally, we’ll delve into considerations like selecting the appropriate flour for feeding and determining the storage location—whether in the refrigerator or at room temperature— which influences the feeding schedule. Lastly, we’ll cover preparing a sourdough starter for baking bread and address common inquiries regarding sourdough starter well-being.
If you happen to be starting out with a dehydrated sourdough starter (like the organic dry starter we offer here) you’ll want to tune into this article – specifically about how to reactivate a dry sourdough starter culture.
Don’t miss the printable cheat-sheet at the end!
FEEDING A SOURDOUGH STARTER: BACKGROUND
What is “Feeding” a Sourdough Starter?
Within the ecosystem of your sourdough starter reside thriving communities of yeast and lactic acid bacteria. As these beneficial microorganisms consume carbohydrates present in the flour, they undergo fermentation, transforming those starches into CO2. This natural process is responsible for the delightful airy rise observed in sourdough bread! However, when their food source is depleted, these microbes become hungry, their activity diminishes, and the sourdough starter loses its ability to leaven properly. If neglected and deprived of nourishment for too long, the microbial colony may perish entirely.
Although commonly referred to as “feeding” among bakers, the process involves more than simply adding fresh ingredients. Feeding a sourdough starter typically entails discarding a portion of the existing starter before replenishing it with flour and water. This practice of removing a portion of the colony, along with accumulated metabolic byproducts, while simultaneously introducing a new food source, helps maintain equilibrium within the starter. It also prevents the accumulation of excess starter beyond the capacity of the storage container.
How Much Sourdough Starter to Maintain
The quantity of sourdough starter you opt to maintain and nourish is contingent upon your baking requirements. For instance, if your weekend baking routine involves crafting two or more loaves of bread simultaneously, each loaf will necessitate a specific quantity of starter.
In our basic sourdough bread recipe, approximately 100 grams of active starter is recommended. Consequently, you would require a minimum of 200 grams, with some remaining to sustain and perpetuate the starter. It’s essential never to exhaust all of your starter in a single recipe! Conversely, if you typically bake only one loaf at a time, a smaller amount of starter suffices for maintenance.
Storage Container & Size
Store your sourdough starter in a container that has enough space for the starter itself, plus room for at least tripling in size while it is active. A glass container is a great choice. There are mixed opinions about whether or not it should have an air tight lid. The conclusion we’ve come to is this: it works both ways. However, you never want to leave your container completely open without some type of cover to prevent debris, dust, or fruit flies from getting in! Therefore, either keep a lid sitting loosely on top, or cover it with a coffee filter or lint-free, tight woven cloth.
We keep our starter in a 1 liter (about 1 quart) flip-top glass container. The seal is not perfectly air tight even when clamped closed, so it does allow for some gasses (and starter) to escape. If you want to maintain a larger starter, consider using a 2 liter or half-gallon container.
Where to Store Your Sourdough Starter: Room Temperature or Refrigerator
When preparing your starter for baking, the optimal temperature for reaching peak activity ranges from 70 to 75 degrees Fahrenheit. However, this doesn’t imply that you must maintain this temperature consistently! Healthy sourdough starters can be stored either at room temperature or in the refrigerator. Refrigeration is an excellent option for individuals with busy schedules and serves as an ideal solution during vacations away from home. For longer periods exceeding a couple of weeks, a starter can be frozen, remaining completely dormant until thawed and fed once more.
Here are some key distinctions between a refrigerated and room temperature sourdough starter:
Flavor
Sourdough starters acquire distinct flavor profiles based on their storage location, influenced by the strains of yeast and lactic acid bacteria present in different environments. Storage temperature plays a significant role.
A sourdough starter kept at room temperature develops a sharper, more acidic “sour” flavor profile, whereas those stored in cooler conditions yield a tangy taste reminiscent of yogurt.
Strive to establish a regular feeding regimen. Consider feeding your sourdough starter at consistent intervals, whether daily or weekly. It appears that the yeast and lactic acid bacteria adapt to this routine, intuitively gauging the time and food available before the next feeding, and regulating their activity accordingly. Clever little organisms!
How often should I feed my sourdough starter?
If you bake frequently or have the time to attend to your starter daily, storing it on your countertop is ideal. However, at room temperature, the sourdough starter remains highly active and requires daily feeding. Some dedicated bakers even feed theirs twice a day!
Conversely, sourdough starters kept in the refrigerator only need weekly feeding. The cooler temperatures maintain the microbes’ viability while reducing their activity, necessitating less frequent feeding. This option suits individuals who bake intermittently, like us, just a few times per month.
Occasionally, we extend the intervals between feedings for our refrigerated starter, sometimes even leaving it untouched for several weeks—and it fares quite well! Though I wouldn’t necessarily recommend pushing it to a couple of months. A robust, established starter can endure some neglect. However, the longer the gap between feedings, the slower the starter may become, requiring multiple feedings before use.
Additionally, be aware that a harmless layer of dark liquid called “hooch” may accumulate over time. Further information on that is provided below. Unsure if your neglected starter is still viable? As long as it lacks visible fuzzy mold and perks up after feeding, it’s safe to use!
The moment has arrived to feed your sourdough starter!
FEEDING A SOURDOUGH STARTER: INSTRUCTIONS
Preparing to Feed
Prepare for Activation: If opting to store your sourdough starter in the refrigerator, allow it to awaken and reach room temperature before initiating feeding. Typically, we retrieve ours from the fridge the night before a planned day of feeding and baking or in the morning, commencing feeding later in the day.
Portion Reduction: Whether your starter has been actively fermenting on the countertop or residing in the refrigerator in a quiescent state, it’s imperative to discard a portion of the active sourdough starter before feeding. The amount discarded should align with the quantity you intend to feed, as detailed below.
To discard, gently stir the starter to expel any trapped air. Then, gradually extract small amounts from the container until the desired quantity remains. We typically transfer these removed portions to a separate bowl, using them to feed chickens, create sourdough discard recipes such as starter crackers or granola, or compost them.
Following the removal of the portion, it’s time to incorporate fresh flour and water into the starter!
How to Feed a Sourdough Starter Using Weight:
Some bakers advocate feeding the starter by weight, insisting it’s the superior method. Undoubtedly, it offers the utmost precision and consistency, considering the varying weights and volumes of different flours. To feed a sourdough starter by weight, simply mix equal portions of starter, flour, and water, like 100 grams of each for a standard feeding, or 200 grams for a larger starter.
For this approach, knowing the empty weight of your starter storage container proves invaluable, aiding in the effortless determination of the remaining starter after discarding. Naturally, a kitchen scale is indispensable.
However, we’ve shifted away from weighing ingredients during feedings. While weighing is crucial during initial starter creation or when preparing dough for a loaf, we’ve found it burdensome for routine feedings. Instead, we rely on a blend of traditional cup measurements and a hint of good old-fashioned estimation.
How to Feed a Sourdough Starter Using Volume Measurements:
To feed a sourdough starter using traditional volume measurements, simply combine 1 part remaining sourdough starter, 1 part water, and slightly less than 2 parts flour. For instance, 1 cup of starter, 1 cup of water, and nearly 2 cups of flour. In our kitchen, we incorporate approximately 1 scant cup of flour and 1/2 cup of filtered water with the remaining ½ to ¾ cup of starter left in its storage container after discarding. Since we typically bake one loaf at a time, this modest quantity suits our needs perfectly.
For those who favor this method, consider this handy tip: measure the exact starter quantity once and visually note how much it fills your starter storage container. Our usual half to three-quarter cup of starter fills the container to about a knuckle or inch deep. Nowadays, I simply estimate the starter volume, eliminating an additional step in measurement.
Now Feed
Incorporate the correct proportions of flour and water into your starter, ensuring thorough stirring to eliminate any flour clumps. We typically do this directly in the starter storage container. However, some bakers prefer transferring everything to a separate bowl, combining the ingredients, and then returning it to the original container or transferring it to a fresh one. The choice is yours!
What Type of Flour & Water to Feed Sourdough Starter
Water
When feeding a sourdough starter, it’s advisable to utilize room temperature to slightly warm water. This is especially crucial if your household tends to be cooler, and you’re aiming to prepare the starter for baking promptly. Adding cold water to the mixture will decelerate the activity of the microbes and prolong the activation process. In instances when time is limited, we occasionally microwave the water for a brief 30 seconds. However, it’s important to avoid adding hot water—just lukewarm water suffices.
Furthermore, opt for filtered or non-chlorinated water for all your sourdough (and other fermenting!) endeavors whenever feasible. Chlorine can impede the growth of our beneficial bacteria and disrupt the process. We typically filter our water through a basic carbon filter, such as the one in the fridge dispenser, with satisfactory results. Alternatively, you can let a container of water sit out on the counter for 12 to 24 hours to allow the chlorine to dissipate.
Flour
The choice of flour you use to nourish your sourdough starter is entirely up to your preference! With numerous options available, it’s worth experimenting to see the results you achieve. One popular choice is white all-purpose flour. In our case, we opt for organic bread flour to fulfill the “white” flour component of our starter and dough. Bread flour, with its slightly higher protein content, contributes to a stronger structure.
When feeding our starter, we often combine half bread flour with either whole wheat or rye flour for the remaining portion. Whole wheat and rye are renowned for swiftly boosting the activity and rise of the starter due to their richer nutrient content. Additionally, maintaining a sourdough starter with alternative flours such as einkorn flour or non-wheat options like brown rice flour is entirely feasible.
Getting Your Starter Ready for Baking
Many sourdough recipes require the sourdough starter to be “active” or added at “peak activity”. But what exactly does that entail? A sourdough starter is deemed at peak activity when it’s visibly expanded and bubbly. It should have at least doubled in size or more, showing no further growth but not yet beginning to deflate.
The duration for your starter to reach peak activity after feeding varies based on several factors. These factors include what and how it was fed, the ambient temperature it’s stored at, and the vigor and maturity of the starter. Warmer temperatures accelerate activity, while cooler temperatures slow it down.
If your starter is stored at room temperature, reaching peak activity is relatively effortless as it peaks daily. However, for those of us who store our starters in the refrigerator, it requires some advance planning to prepare for baking. When we anticipate baking in the next day or two, we take the resting sourdough starter out of the fridge and place it on the counter to warm up. Then, we feed it at least twice before using it in a recipe to ensure it reaches peak activity.
Our active and bubbly starter ready for baking
You will develop your own feeding and baking schedule with time.
Here’s a breakdown of our typical routine: Let’s say we plan to bake a loaf on Saturday morning. We remove the starter from the fridge on Thursday evening, allowing it to warm up overnight. Then, on Friday morning, we feed it once, followed by another feeding early Friday afternoon. Ideally, the last feeding should be administered at least three to four hours before beginning the dough-making process. We prepare the dough on Friday evening, allow it to proof overnight in the fridge, and bake it on Saturday morning.
What to do after removing a portion of your sourdough starter to bake with:
Once you’ve taken some starter for a recipe, you have several options for what to do next—and each method is effective! An established sourdough starter is quite forgiving.
One option is to feed your starter once more (adding flour and water, but skipping the discard step since you essentially did that to use in the recipe), allowing it to sit out at room temperature for an hour or two to “feed.” Then, return it to the refrigerator—assuming that’s where you store it.
Alternatively, you can feed the starter and immediately return it to the refrigerator once you’re finished using it. It will still ferment at cooler temperatures, albeit more slowly.
Finally, sometimes we return our starter to the fridge right after use, either at peak activity or just afterward, without feeding it again that day. However, keep in mind that this may result in a slightly lower volume the next time you use it. In such cases, you may want to feed it with flour and water but skip the discard step during the next baking session when waking it up.
What is that dark liquid on the top of my sourdough starter?
This, my friends, is a clear indicator that you haven’t been maintaining your starter’s feeding schedule to its satisfaction. The thin layer of dark liquid that occasionally forms on top of sourdough starter is known as hooch. It signifies that your starter is more active than you’ve been feeding it, has depleted its food source, and is craving more—more than just hungry, it’s hangry.
But fear not, as it’s a simple issue to address and poses no harm! Hooch is a natural byproduct of fermentation (alcohol) created by the hungry yeast and bacteria. It typically emits a strong acidic scent reminiscent of vinegar. When you encounter it, you can either pour off the hooch or simply mix it back into the starter, then proceed with discarding and feeding as usual. However, it’s important to take it as a cue that your feeding schedule may need adjustment. Our starter often develops hooch when we’ve missed a week of feeding.
What if my sourdough starter is bubbling, but not rising?
If your sourdough starter is actively bubbling but fails to rise within a few hours of feeding, the mixture may be excessively wet or runny. Variances in home humidity and flour types can result in different consistencies. When a starter is overly wet and thin, fermentation bubbles may easily escape from the mixture. Ideally, the air bubbles should be mostly contained within the starter, causing it to expand and become spongy.
To remedy this issue, simply incorporate more flour to thicken the mixture. Gradually add a couple of tablespoons at a time until the starter reaches the desired consistency—somewhere between pancake batter and thick, stiff dough.
Now you know how to feed your sourdough starter. Don’t make it hangry!
Stay tuned for more sourdough recipes to come! Thank you for reading. Please feel free to ask questions, and spread the sourdough love by sharing this post.
Handmade Tortillas That Are Warm, Flaky and Really Really Good
Sourdough flour tortillas are easy to make and super tasty!
Who doesn’t love tacos? Once you make them with real tortillas, you will discover how much more you can love tacos.
It was way too long since I ate a fresh, handmade flour tortilla from our favorite Mexican restaurant in San Diego, Old Town Mexican Cafe. There’s nothing like eating a handmade flour tortilla fresh off the comal. These ladies would throw it down at the front of the restaurant so everybody can smell the goodness and watch the magic happen while they wait for their table.
Since moving our family from Southern California to the Pacific Northwest, we have really missed authentic Mexican food. So, it has made me seriously step my game up at home. This includes trying my hand at making tortillas.
We eat so many tortillas in this household. Our kids will eat any meat as long as it’s wrapped in some kind of tortilla. Whether it’s fried corn tortillas or warm and buttered flour tortillas, it is a staple around here. So after we got into the sourdough game, it feels good to know we are feeding our family tortillas that are made by hand without all the bullshit additives.
The flour you use will make a huge difference. If you can, go with Sonora wheat, which is a low-protein, soft white wheat. We often use pastry flour which will give you a similar soft and tender tortilla. If you can’t use either Sonora wheat or pastry flour, you can use all-purpose flour, but the tortillas won’t be quite as tender and soft (but still delicious).
When you make flour tortillas with sourdough starter, they come out extra flaky and springy with a delightful tangy finish. You also get the added health benefits from the wild yeast and beneficial lactic acid bacteria that are in the sourdough starter.
Fiona, our active and bubbly sourdough starter
Need a starter? Buy your own dehydrated organic “Fiona” sourdough starter here. It comes with easy instructions and will last a lifetime of baking!
Put the flour into a medium bowl. Add the lard and, using your fingers, blend the lard into the flour until the mixture is crumbly and the pieces of lard are pea-sized. In a small bowl, combine the water and salt, stirring until the salt is dissolved. Stir in the starter. Pour the water mixture into the flour mixture. Using a spoon or your hand, stir until well combined. Knead the dough by hand a few times, just until the dough holds together and forms a cohesive ball. Wrap the dough in a clean kitchen towel or beeswax paper, or put it in a sealable container. Refrigerate for at least 2 hours and up to 2 days. Remove the dough from the fridge and unwrap it. Divide the dough into 18 equal pieces, each about the size of a small apricot. Roll the pieces between your palms or against the table until they are evenly round.
On a very lightly floured work surface, use your hands to flatten each ball into a disc. Then, using a rolling pin, roll each disc until it is about 6 inches in diameter. (If you have a tortilla press, you can use it to flatten the balls, but you’ll probably want to finish them with a rolling pin anyway—these are best when they are pretty thin.)
Transfer each tortilla to a sheet of parchment or waxed paper, stacking the tortillas between sheets of paper so that they are flat and not touching. Freeze the tortillas for about 1 hour.
Preheat a cast-iron skillet, griddle, or comal over medium-high heat (if you’re using a cast-iron skillet, you may want to smear a little vegetable oil very lightly on it before preheating). The baking surface needs to be plenty hot, so give it a few minutes to preheat. Griddle the tortillas one at a time until both sides have golden-brown blisters, about 60 seconds per side. The tortillas may puff up a little as they cook, but they will flatten as they cool. Keep the finished tortillas in a covered dish or wrap them in a clean kitchen towel to keep them warm while you work.
The tortillas are best served right away. If you have some left over, you can store them in an airtight container for a few days and quickly reheat them in a hot skillet before serving, or freeze for up to 1 month.